Introduction to Ube Hopia
When you think of delightful Filipino desserts, ube hopia deserves a prominent spot on your list. This beloved pastry is not just a treat for the taste buds; it’s a slice of culture, history, and comfort rolled into one. But what exactly is ube hopia, and why do people adore it so much?
What is Ube Hopia and Why is it Beloved?
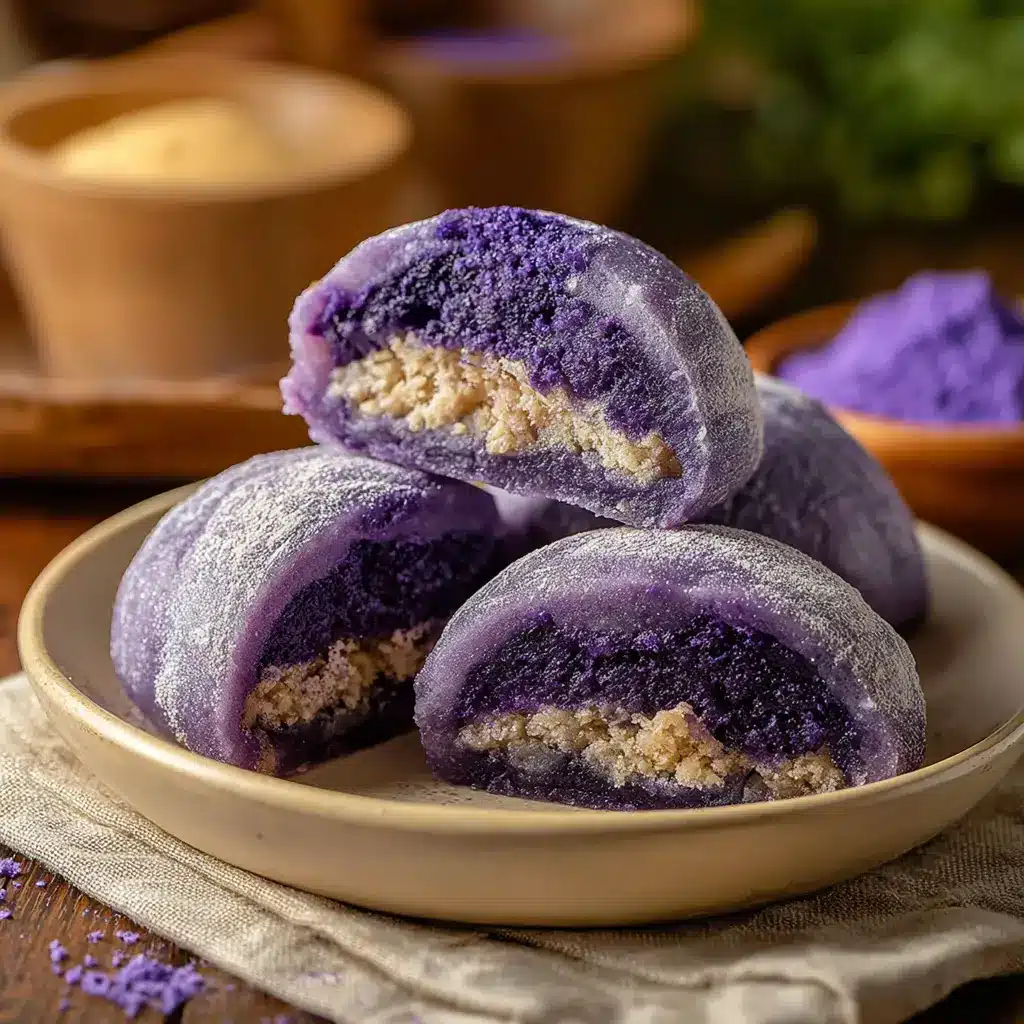
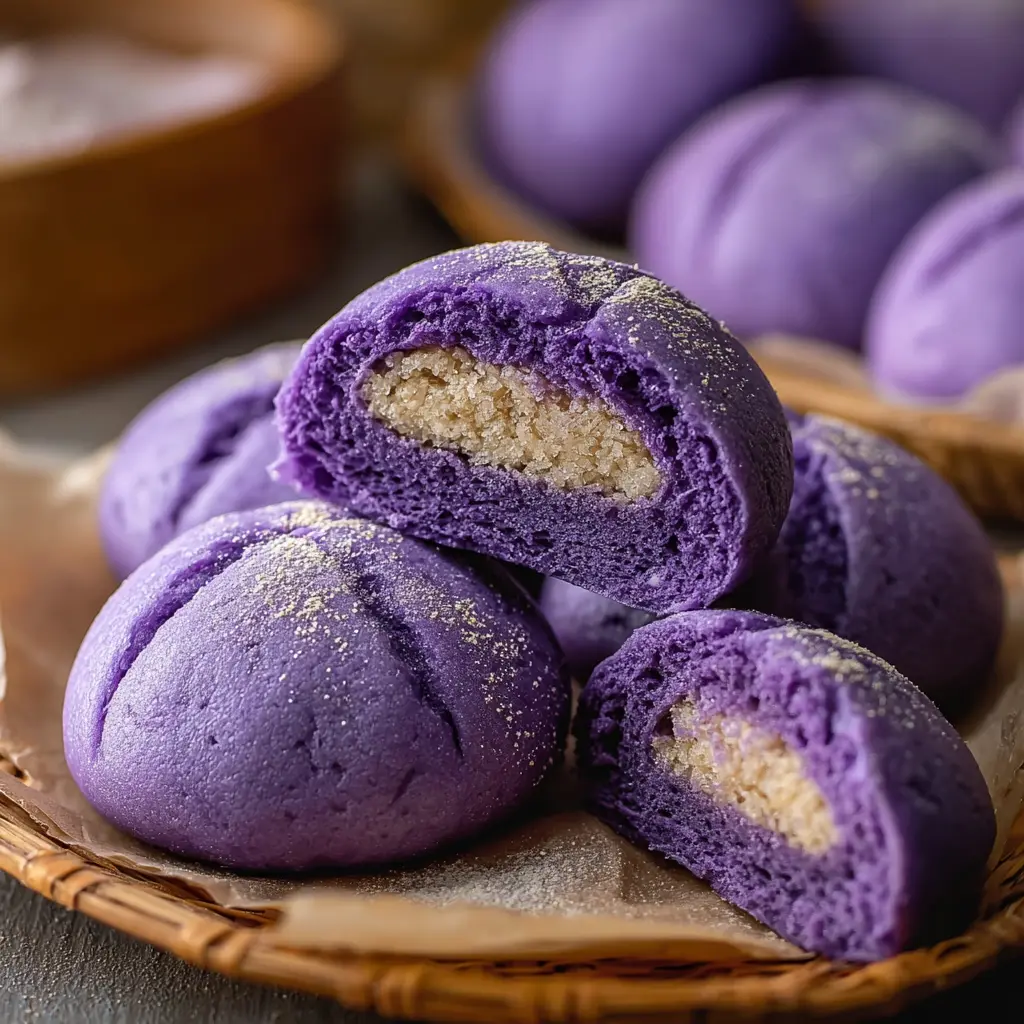
Ube hopia is a flaky pastry filled with sweet purple yam, known as ube. Originating from the Philippines, these delicious treats have made their way into the hearts and stomachs of many, both locally and internationally. If you’ve ever tasted it, you know the joy it brings— it’s as if each bite evokes memories of childhood and family gatherings. The ube lends a vibrant color and a unique flavor that’s hard to resist.
You may wonder why ube hopia is so special compared to other pastries. Here are a few reasons:
- Cultural Heritage: For many Filipino families, making ube hopia is a cherished tradition. It’s often prepared during holidays or special occasions, serving as a sweet reminder of home.
- Versatility: While the classic ube filling is a favorite, ube hopia can also be made with other fillings, making each bite an adventure.
- Healthier Sweet Option: Compared to other sugary treats, ube is rich in vitamins A and C, making it a relatively healthier dessert option.
As its popularity continues to soar, ube hopia has transcended its local roots. Thanks to food blogs and social media, culinary enthusiasts across the globe are embracing this Filipino delicacy. You might even find it available at specialty shops or gourmet markets near you. For more inspiration, check out The Filipino Food Movement for more on the cultural significance of ube and traditional recipes.
Now that you know what makes ube hopia special, it’s time to explore how you can make this delicious treat yourself with our easy-to-follow ube hopia recipe. Making it is not only rewarding but also a wonderful way to connect with Filipino culture. Ready to dive in?

Ingredients for Ube Hopia
Crafting the perfect ube hopia at home is a delightful journey, filled with vibrant colors and mouthwatering flavors! Before you dive into this “ube hopia recipe,” let’s gather the essential ingredients that will make your pastries truly stand out.
Essential ingredients for delicious Ube Hopia
To whip up an irresistible batch of ube hopia, you’ll need the following:
- Ube (Purple Yam): This is the star of the show! Use fresh or frozen grated ube for the best flavors.
- Mung Bean Paste: This sweet filling adds a unique texture and taste, perfectly complementing the ube.
- Flour: All-purpose flour works best to create that flaky crust you’re going for.
- Sugar: Granulated sugar enhances the sweetness, making your ube hopia irresistible.
- Butter: Use unsalted butter to add richness and a soft texture to the dough.
- Water: A little water helps bind everything together, creating the perfect consistency.
With these ingredients in hand, you’re set to embark on a culinary exploration of flavors and textures! Don’t forget to check out resources like Serious Eats for tips on using ube in various dishes. Ready to start baking?
Preparing Ube Hopia
Making ube hopia is a delightful way to connect with Filipino culinary traditions. This popular pastry, filled with sweet purple yam, is perfect as a snack or dessert. Let’s walk through the preparation of this delicious treat step-by-step, ensuring you create perfect bites every time.
Gather and prepare your ingredients
Before diving into the ube hopia recipe, you’ll want to collect all your ingredients. This step is crucial to make the cooking process smoother and more enjoyable. Here’s what you’ll need:
-
For the dough:
-
2 cups all-purpose flour
-
1 cup water
-
1/4 cup sugar
-
1/4 cup vegetable oil
-
A pinch of salt
-
1/2 teaspoon baking powder
-
For the filling:
-
1 cup ube (purple yam), cooked and mashed
-
1/2 cup sugar
-
1/4 cup coconut milk
-
1/2 teaspoon vanilla extract
-
1 tablespoon cornstarch (optional for thickness)
Preparation is key! Make sure to have everything measured out and ready, as this will make your cooking process flow much more smoothly. You can find fresh ube at local markets or online, helping to ensure you’re using quality ingredients for the best flavor.
Making the dough from scratch
Now that your ingredients are gathered, it’s time to whip up your dough. This part of the ube hopia recipe is where the magic begins.
-
In a large mixing bowl, combine the flour, sugar, salt, and baking powder. Give it a good stir to ensure everything is evenly mixed.
-
Gradually add water and vegetable oil to the dry ingredients, mixing until a soft dough forms.
-
Once the dough is cohesive, knead it gently on a floured surface for about 5 minutes. This develops the gluten, giving your pastries that perfect texture.
-
Cover your dough with a damp cloth and let it rest for about 30 minutes. This resting period allows it to relax, making it easier to roll out later.
Creating the filling
Your dough needs to rest, so now’s the perfect time to prepare the ube filling. This is what gives ube hopia its distinctive and delicious flavor.
-
In a saucepan over medium heat, combine the cooked and mashed ube, sugar, coconut milk, and vanilla extract. Stir continuously to avoid burning.
-
If you prefer a thicker filling, add the cornstarch now. Keep stirring until the mixture thickens; this usually takes about 5-7 minutes.
-
Once your filling reaches a thick, spreadable consistency, remove it from the heat and allow it to cool before using it. This helps prevent the dough from becoming soggy when you fill it.
Shaping the Ube Hopia
Shaping your ube hopia is where you can get a little creative!
-
Divide your rested dough into equal portions—about the size of a golf ball works well.
-
Roll each portion into a flat circle, roughly 4-5 inches in diameter.
-
Place a spoonful of your cooled ube filling in the center of each circle.
-
Carefully fold the dough over the filling, pinching the edges securely to create a pocket. You can also twist the edges for a decorative touch, if you like.
-
Place the filled pastries on a baking sheet lined with parchment paper. Make sure to give them enough space to expand as they bake.
Baking to perfection
The final step is baking your ube hopia to golden perfection.
-
Preheat your oven to 350°F (175°C). Gradually warming the oven allows your pastries to cook evenly.
-
Bake the filled pastries for about 25-30 minutes or until they’re golden brown. Keep an eye on them towards the end to achieve that perfect color without burning.
-
Once baked, allow them to cool on a wire rack. This cooling helps maintain their crispness.
And there you have it! With just a few simple steps, you can enjoy fresh, homemade ube hopia. Serve them at parties, or keep them all to yourself for a delightful treat anytime. Remember, the best part about making these yourself is being able to share (or not share) the love!
Variations on Ube Hopia
Exploring ube hopia opens up a world of delightful possibilities! Whether you stick with the classic sweet purple yam filling or venture into uncharted territories, there’s no shortage of creativity here.
Different fillings to try
While ube is the star of the show, why not mix things up? Here are a few tasty alternatives you might consider:
- Mung Bean: This filling offers a subtly sweet and earthy flavor that pairs beautifully with the flaky crust.
- Pineapple: Sweet and tart, pineapple filling brings a tropical vibe to your ube hopia. It’s refreshing and a great contrast to the richer flavors.
- Red Bean: For those who appreciate a slightly nutty taste, red bean offers a unique twist that still feels indulgent.
- Coconut: If you love a tropical feel, adding shredded coconut to the filling gives a delightful chewiness and flavor.
These variations are a fantastic way to personalize your ube hopia recipe and cater to your guests’ preferences.
Adapting the recipe for dietary needs
Being mindful of dietary restrictions doesn’t mean you have to sacrifice flavor! Here’s how to adapt your ube hopia:
- Gluten-Free: Substitute all-purpose flour with a gluten-free blend. Many blends include xanthan gum to help mimic the texture of traditional dough.
- Vegan Options: Use plant-based butter instead of regular butter, and replace egg wash with almond milk for a glossy finish.
- Sugar Alternatives: Experiment with natural sweeteners like agave or coconut sugar if you’re aiming to reduce refined sugar intake.
Adaptation is key, and it allows everyone to enjoy this delicious treat, regardless of their dietary needs. For more on inclusive cooking, check out resources from The Kitchn and explore their tips!
By incorporating these variations and adaptations, your ube hopia experience will be both delightful and inclusive, inviting everyone to the table!
Cooking notes for Ube Hopia
When diving into this ube hopia recipe, it’s important to keep a few cooking notes in mind to ensure that your pastries turn out perfectly.
-
Choosing Ube: Always opt for fresh or frozen ube for the best flavor. Store-bought ube halaya can be used, but make sure to check the ingredients for authenticity.
-
Flour Matters: For a flaky crust, use all-purpose flour with a bit of cornstarch mixed in. This gives your ube hopia that delightful, tender texture everyone loves.
-
Chilling the Dough: Don’t skip chilling the dough! This step helps to relax the gluten, making it easier to roll out later. Ideally, let it rest in the fridge for at least an hour.
-
Filling Variation: Feel free to experiment with your filling. While traditional ube is delicious, adding a hint of coconut cream or even sweetened red beans can add delicious depth.
For further inspiration, check out recipes on Serious Eats or Bon Appétit for unique variations. Enjoy your baking adventure!
Serving suggestions for Ube Hopia
Pairing with beverages
When you indulge in your delightful ube hopia recipe, the right beverage can elevate the experience. Try pairing it with:
- Coffee: A warm cup of freshly brewed coffee, whether it’s a classic black or a creamy latte, complements the sweet, earthy flavor of ube wonderfully.
- Herbal Tea: Experiment with chamomile or mint herbal teas for a soothing contrast. The subtle notes enhance the nuttiness of the ube filling.
- Coconut Water: For a refreshing twist, serve your hopia with chilled coconut water. It adds a tropical flair that harmonizes beautifully with the dessert.
Ideal occasions for serving
Ube hopia is not just a treat; it’s perfect for various occasions:
- Charming Gatherings: Surprise your friends at brunch with these delightful pastries as a unique centerpiece.
- Festive Celebrations: They’re sure to impress during holiday parties or family reunions, inviting everyone to share in a Filipino culinary tradition.
- Casual Snacks: Enjoy a piece or two on a lazy afternoon as a comforting pick-me-up, especially when you’re winding down after a long workday.
For even more delightful ideas on serving and enjoying ube hopia, discover some creative combinations at Serious Eats or learn about its cultural significance at The Spruce Eats.
Tips for Making Perfect Ube Hopia
Common Mistakes to Avoid
When crafting your ube hopia recipe, it’s easy to make a few missteps that can affect the final product. Here are some common pitfalls:
- Skipping the resting time: Allowing your dough to rest is crucial for gluten development. If you’re too eager to roll it out, your hopia will end up tough instead of tender.
- Not measuring accurately: Baking is a science, so precision matters. Use a kitchen scale for flour and other ingredients to ensure you get the proportions right.
- Overworking the dough: While you want a smooth consistency, excessive kneading can make your hopia dense. Aim for a balance to maintain that flakiness.
How to Achieve Flaky Layers
Creating those beautiful flaky layers in your ube hopia is the hallmark of a successful recipe. Here’s how to nail it:
- Use cold ingredients: Keep your butter or margarine cold; this helps create those layers. Consider chilling your flour, too, if possible.
- Folding technique: Instead of rolling the dough out completely, fold it multiple times. This technique creates layers by trapping air and moisture.
- Don’t rush the baking: It may be tempting, but let your hopia bake until golden brown. This ensures that the layers are cooked through evenly.
For more expert tips on baking, consider checking resources like The Kitchn or Serious Eats. Happy baking, and enjoy the delightful flavors of your ube hopia!
Time details for Ube Hopia
Preparation time
For the ube hopia recipe, set aside about 30 minutes for preparation. This includes gathering and measuring your ingredients, as well as making the dough and filling. The key here is to take your time to ensure everything is ready for a seamless cooking experience.
Cooking time
Once you’re all prepped, the actual cooking time is relatively quick—around 20 minutes will do. You’ll want to keep a close eye on the ube hopia as it bakes, ensuring it reaches that perfect golden brown.
Total time
In total, you’re looking at about 50 minutes from start to finish. This makes it an enjoyable activity that won’t take up your entire day! It’s perfect for a weekend baking session or a fun evening with friends.
Curious about more unique recipes? Check out Serious Eats for inspiration!
Nutritional Facts for Ube Hopia
Calories
One serving of Ube Hopia typically contains around 200 calories. Given its delightful sweetness and rich, buttery crust, it’s easy to see why this treat can quickly become a favorite snack or dessert option.
Sugar Content
Ube Hopia is known for its distinct sweetness, which is largely derived from its sugar content. On average, each piece has about 15 grams of sugar. If you’re mindful of your sugar intake, it’s wise to enjoy this pastry in moderation. You can find more tips on managing sugar consumption on sites like Healthline.
Dietary Considerations
When diving into this ube hopia recipe, consider that it contains wheat flour, making it less suitable for those with gluten sensitivities. However, it’s a delightful option for friends not following gluten-free diets. Additionally, Ube Hopia can be a treat to share during special occasions or with loved ones, as it’s often enjoyed in Filipino gatherings. Always check the ingredient labels if purchasing pre-made varieties to be aware of any allergens or additives.
By keeping these nutritional facts in mind, you can enjoy Ube Hopia as part of a balanced diet. Whether you’re making this delicious recipe at home or enjoying it at a local café, it’s essential to savor each bite!
FAQs about Ube Hopia
How can I store Ube Hopia properly?
Storing your Ube Hopia correctly ensures that these delicious little treats stay fresh and tasty. After your hopia has cooled completely, place them in an airtight container. For best results, line the container with parchment paper to absorb any moisture. Store them at room temperature for up to 3 days. If you want to keep them for longer, consider refrigerating them, but be aware that this might change their texture slightly.
What can I substitute for ube halaya?
If you can’t find ube halaya (purple yam jam) — a key ingredient in our ube hopia recipe — don’t worry! You can create a similar flavor and texture by using other substitutes:
- Sweet potato puree: This can provide a similar sweetness and color.
- Taro paste: While this has a different flavor profile, it’s creamy and delicious.
- Commercial purple yam spread: Available in many Asian grocery stores, this is a convenient alternative.
For a deep dive into ube’s unique flavor and health benefits, check out articles from the American Heart Association for more information.
Can Ube Hopia be frozen?
Absolutely! Freezing Ube Hopia is a great way to extend their shelf life. To freeze, wrap each hopia individually in plastic wrap, then place them in a freezer-safe bag. They can last for up to a month in the freezer. When you’re ready to enjoy them, simply thaw them in the refrigerator overnight, and you can reheat them in an oven at 350°F for about 10 minutes for that freshly-baked taste.
With these pointers, you can enjoy your Ube Hopia anytime! If you have any more questions or tips to share, feel free to reach out.
Conclusion on Ube Hopia
In wrapping up your journey with this delightful ube hopia recipe, you’ll discover a treat that bridges nostalgia and creativity. These flaky pastries, bursting with the vibrant flavor of ube, make for a perfect afternoon snack or a thoughtful homemade gift.
As you bask in the compliments from friends and family, remember that the joy of baking lies in the process itself. Try experimenting with different fillings or shapes to make it uniquely yours. For more culinary inspiration, you might want to explore resources like Serious Eats or The Spruce Eats.
So roll up your sleeves, embrace the fun, and enjoy every bite of your delicious ube hopia! Happy baking!
Print
Ube Hopia Recipe: Easy Indulgence for Homemade Sweet Treats
- Total Time: 55 minutes
- Yield: 12 pieces
Description
Indulge in the delightful flavors of Ube Hopia with this easy recipe that guides you through creating these sweet treats at home.
Ingredients
- 2 cups all-purpose flour
- 1/2 cup sugar
- 1/2 cup unsalted butter, softened
- 1/2 cup water, warm
- 2 teaspoons baking powder
- 1/2 teaspoon salt
- 1 cup ube halaya (purple yam jam)
Instructions
- In a bowl, mix the flour, sugar, baking powder, and salt.
- In another bowl, combine the softened butter and warm water until smooth.
- Gradually combine the dry ingredients with the wet ingredients until a dough forms.
- Knead the dough lightly on a floured surface, then let it rest for 30 minutes.
- Preheat your oven to 350°F (175°C).
- Divide the dough into small balls and flatten them.
- Place a spoonful of ube halaya in the center of each flattened dough, fold, and seal.
- Place on a baking sheet and bake for 20-25 minutes until golden.
- Let cool before serving.
Notes
- For a flakier texture, let the dough chill in the refrigerator for 1 hour before baking.
- You can sprinkle sugar on top for added sweetness.
- Prep Time: 30 minutes
- Cook Time: 25 minutes
- Category: Desserts
- Method: Baking
- Cuisine: Filipino
Nutrition
- Serving Size: 1 piece
- Calories: 150
- Sugar: 5g
- Sodium: 100mg
- Fat: 7g
- Saturated Fat: 4g
- Unsaturated Fat: 3g
- Trans Fat: 0g
- Carbohydrates: 20g
- Fiber: 1g
- Protein: 2g
- Cholesterol: 20mg
")