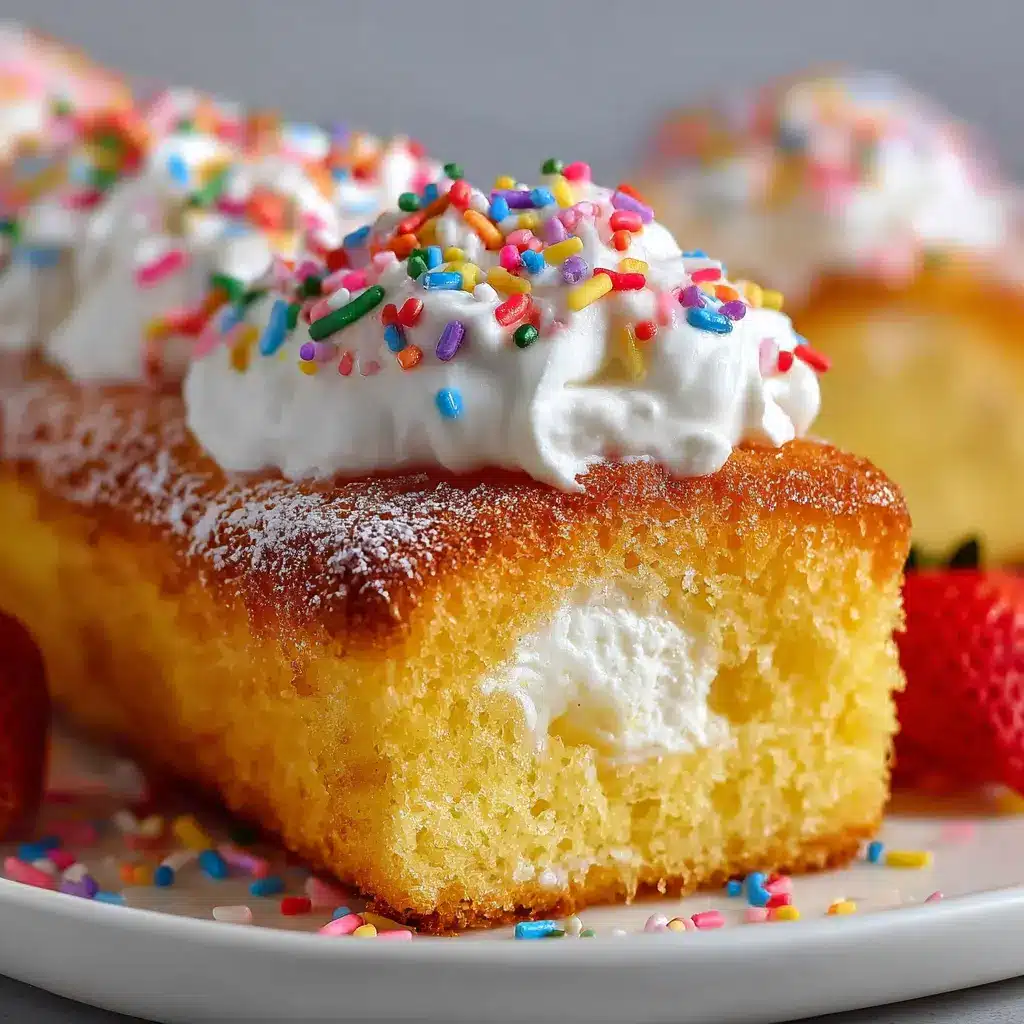
Introduction to Twinkie Cake
When life gets busy, the last thing you want to worry about is spending hours in the kitchen—and that’s where twinkie cake comes in. This delightful no-bake dessert has become a go-to for young professionals who crave something sweet amidst their hectic schedules. Imagine a fluffy cake that embodies nostalgia yet is incredibly easy to whip up; that’s the magic of twinkie cake!
So why is twinkie cake the perfect dessert for young professionals? Here are a few compelling reasons:
Quick and Simple Preparation
After a long day at work, the last thing many of us want is to tackle an elaborate recipe. With twinkie cake, you skip the oven, cutting down on time spent cooking. The base is made using store-bought Twinkies, layered with a rich, creamy filling that can be prepared in minutes. This means you can satisfy your sweet tooth without any added stress!
Versatile and Customizable
Another great advantage of twinkie cake is its flexibility. Feeling adventurous? You can easily integrate various flavors into the filling, such as chocolate or strawberry. You can also elevate your dessert by adding fruit or nuts for a unique twist that caters to individual taste preferences. Personalizing this dessert is not only fun but also a fantastic way to impress your friends during casual gatherings.
Perfect for Celebrations
Despite its simplicity, a twinkie cake can make a stunning centerpiece for any occasion. Whether it’s a birthday, an office party, or simply a delightful treat for friends on a cozy Friday night, this cake never fails to draw smiles. Plus, with each bite, you’ll be transported back to childhood days when life was simpler—the perfect touch of nostalgia amidst your busy adulthood.
In conclusion, if you’re looking for a sweet escape that requires minimal effort and maximizes flavor, consider making a twinkie cake. It’s a delightful blend of convenience, creativity, and nostalgia, ensuring it will be a hit for every occasion. Ready to dive into this easy dessert? Stay tuned for the full recipe that will have you impressing friends in no time!
Ingredients for Twinkie Cake
Essential Ingredients Overview
Creating a delicious Twinkie cake is a breeze with just a handful of essential ingredients. First, you’ll need a box of Twinkie cakes, which serve as the delicious base for this easy no-bake dessert. A cup of whipped topping adds that creamy texture we’re all fond of, while pudding mix (vanilla or banana works wonderfully) enhances flavor and richness. Don’t forget about milk to prepare your pudding; it’s essential for that velvety consistency!
Here’s a quick list of the main ingredients:
- Box of Twinkies
- Cup of whipped topping
- Instant pudding mix (vanilla or banana)
- Milk (for pudding preparation)
Optional Toppings and Variations
To take your Twinkie cake to the next level, consider some optional toppings and variations. For a burst of color and flavor, fresh fruits like strawberries or bananas are delightful. Chocolate shavings or sprinkles can add a fun crunch or decorative flair. You might even explore different pudding flavors to tailor it to your taste buds.
Experimenting with these toppings makes it easy to create a unique dessert that fits any occasion. Will you go for a fruity upgrade or stick with a classic chocolate twist? The choice is yours! For more inspiration, check out these delicious no-bake desserts here.
Preparing Twinkie Cake
Creating a Twinkie cake is a deliciously simple process that will surely make your gatherings extra special. This no-bake delight is perfect for those who want to impress without spending hours in the kitchen. Let’s walk through each step together to ensure you end up with a stunning cake that’s as delightful to look at as it is to eat.
Gather All Ingredients
Before diving into the preparation, it’s essential to gather all your ingredients. This step not only ensures you won’t run into any surprises midway but also helps you get into the cooking mindset. Here’s what you need for your Twinkie cake:
- 10-12 Twinkies
- 8 oz cream cheese, softened
- 1/2 cup powdered sugar
- 1 cup whipped topping
- 1 package (3.4 oz) vanilla pudding mix
- 2 cups milk
- Optional: chocolate shavings or fresh fruit for garnish
Isn’t it great how straightforward this shopping list is? You can usually find all these items at your local grocery store or online.
Slice the Twinkies
Now that you have everything ready, it’s time to slice the Twinkies. Using a serrated knife, cut each Twinkie in half lengthwise. Try to make the slices as even as possible, as they’ll stack on one another to form the beautiful layers of your cake. A pro tip: if the Twinkies are a bit soft, chilling them in the fridge for 30 minutes beforehand can make slicing easier!
Make the Cream Cheese Mixture
Next up is creating the delicious cream cheese mixture that will add an exciting layer to your Twinkie cake. In a mixing bowl, combine the softened cream cheese and the powdered sugar. With a hand mixer or a whisk, mix until it becomes smooth and creamy. Gently fold in the whipped topping until it’s well blended. This creamy mixture is going to be a game-changer for your cake!
Prepare the Vanilla Pudding
While the cream cheese mixture is delightfully simple, let’s take it up a notch with the vanilla pudding. In another bowl, whisk together the pudding mix and milk until the mixture thickens—this usually takes about 2 minutes. Let it sit for a couple of minutes to become even creamier. The vanilla pudding adds an incredible richness that pairs wonderfully with the Twinkies.
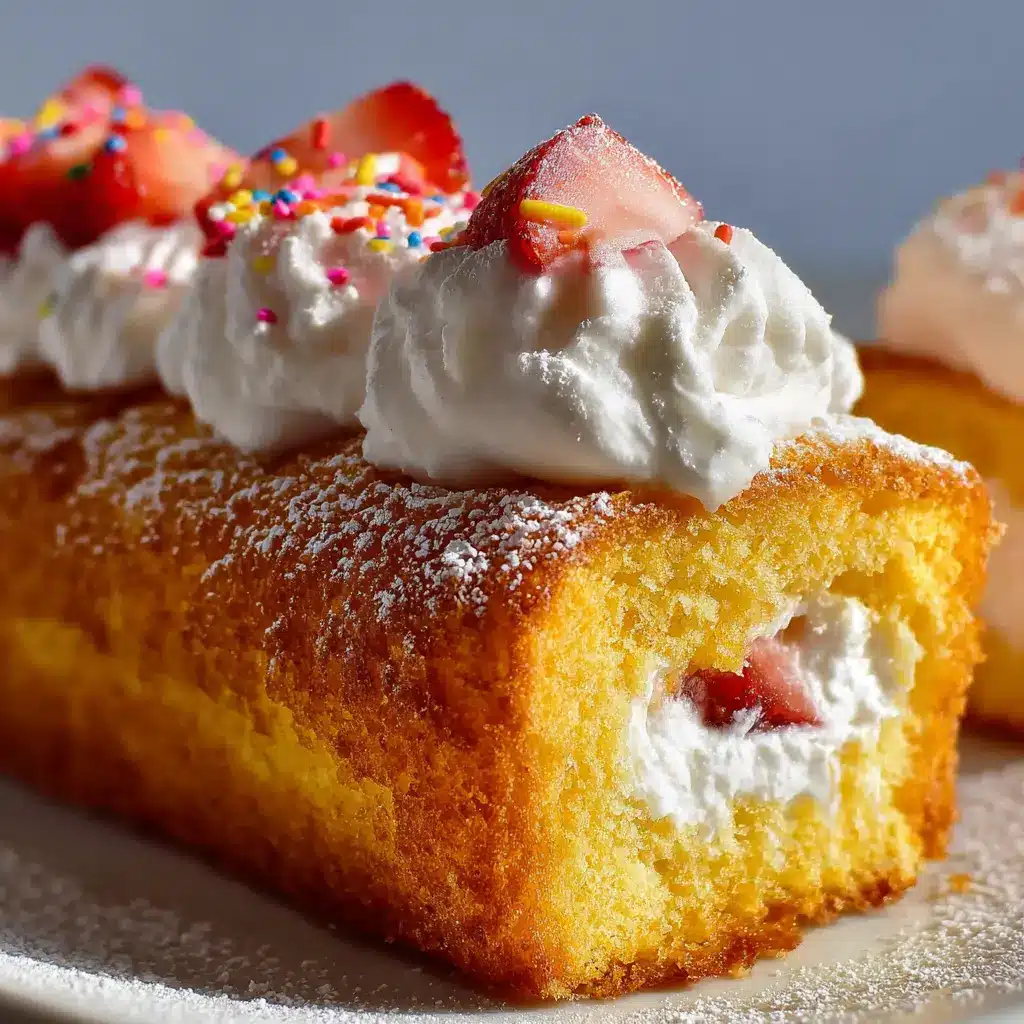
Layer the Ingredients
Now for the fun part: layering! In a 9×13 dish, start by placing a single layer of Twinkie halves, cut side up. Follow this with a generous layer of the cream cheese mixture, then a layer of vanilla pudding. Repeat the layers until you reach the top of the dish, ending with pudding. If you fancy a decorative touch, these layers create a beautiful visual and delicious contrast!
Chill the Cake
You may want to dig in right away, but patience is key for the best flavor. Cover the Twinkie cake with plastic wrap and place it in the fridge for at least 4 hours, or overnight if you can wait! Chilling allows the flavors to meld beautifully and gives the cake a chance to set.
Once it’s chilled, don’t forget to add your optional toppings like chocolate shavings or fresh fruit to impress your friends and family.
The next time you’re looking for a show-stopping dessert, remember this simple Twinkie cake recipe. It’s an easy, no-bake indulgence that’s perfect for any occasion, proving once again that you don’t need to spend hours in the kitchen to make something spectacular. Happy baking! For extra tips on no-bake desserts, check out sources like Bon Appétit or Food Network.
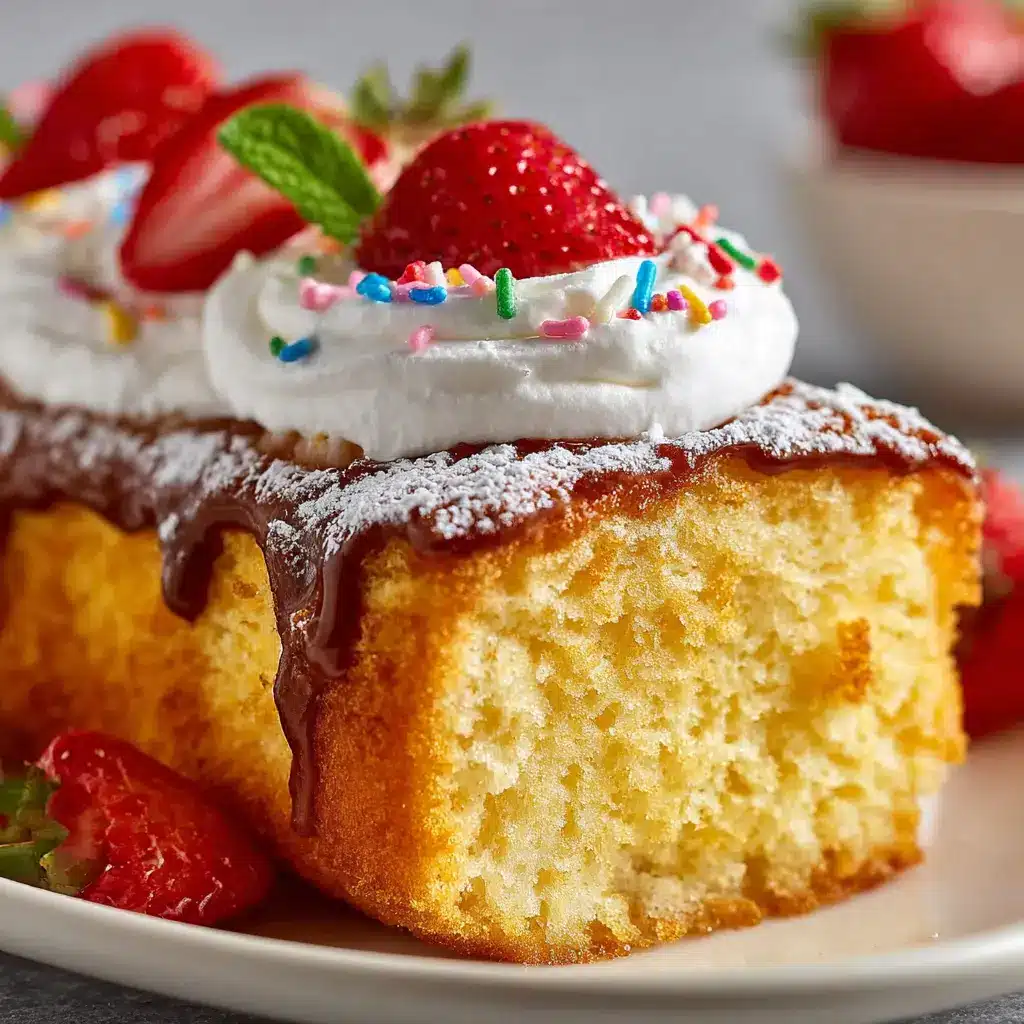
Variations on Twinkie Cake
There’s something inherently delightful about a Twinkie cake, and its versatility allows you to get creative in the kitchen! Whether you’re a chocolate lover, a health-conscious eater, or looking to cater to your plant-based friends, there’s a variation for everyone.
Indulge in Chocolate Twinkie Cake
If you have a sweet tooth, a chocolate Twinkie cake might be your new favorite dessert. You can easily transform the classic recipe by substituting vanilla pudding with chocolate pudding. The creamy layers of chocolate add a rich, luscious touch. Top it off with chocolate shavings or a drizzle of chocolate syrup for that extra indulgence. Plus, you can find great tips on how to balance flavors in this chocolate dessert guide!
Fresh and Fruity Options
For a lighter, refreshing treat, try a fruit-filled Twinkie cake. Incorporate seasonal fruits like strawberries, blueberries, or peaches between layers of cake and frosting. You can even mix these fruits into your whipped topping for a vibrant burst of flavor. This version is always a hit for summer gatherings or picnics.
Vegan Twinkie Cake for Everyone
Don’t think the fun is limited to those who eat eggs or dairy! Craft a delicious vegan Twinkie cake using plant-based pudding and coconut whipped cream. Not only is this version friendly for vegan diets, but it’s also surprisingly rich and satisfying. Ensure you’re using quality ingredients; organic sources can make a significant difference in taste. Consider checking out this helpful vegan dessert resource for inspiration!
With these variations on Twinkie cake, you’ll always have a crowd-pleasing dessert up your sleeve. What will you try first?
Cooking Tips and Notes for Twinkie Cake
Getting the Right Consistency
Achieving the perfect consistency for your twinkie cake is crucial to ensure that you get that dreamy, soft texture reminiscent of the beloved treat. When mixing your ingredients, be careful not to overdo it. A light hand is key—fold your whipped cream gently into the cake mixture to maintain the fluffiness. If your mixture feels too thick, consider adding a splash of milk to loosen it up. Remember, this isn’t a race; take your time to mix everything just right.
How to Store Leftovers
Once you’ve indulged in your twinkie cake, you’ll want to save some for later (if there’s any left!). Store it in an airtight container in the refrigerator to keep it fresh and creamy. It should stay good for about 3-4 days. For longer storage, you can freeze individual slices. Just wrap them tightly in plastic wrap and then in foil to prevent freezer burn. When you’re ready to enjoy, simply let them thaw in the fridge and enjoy that soft texture once again!
Consider checking out Storage Tips from The Kitchn.
Serving suggestions for Twinkie Cake
Ideal pairings with beverages
When serving your delightful Twinkie cake, think about what beverages will really enhance this treat. A rich cup of coffee or a refreshing iced tea can turn a simple dessert into a cozy afternoon break. For something fruity, consider pairing it with sparkling lemonade; the citrus will balance the sweetness beautifully. If you want to keep things light, a chilled glass of almond milk is not only delicious but also complements the cake’s creamy texture. You could even offer a variety of options to your guests, making the experience more enjoyable!
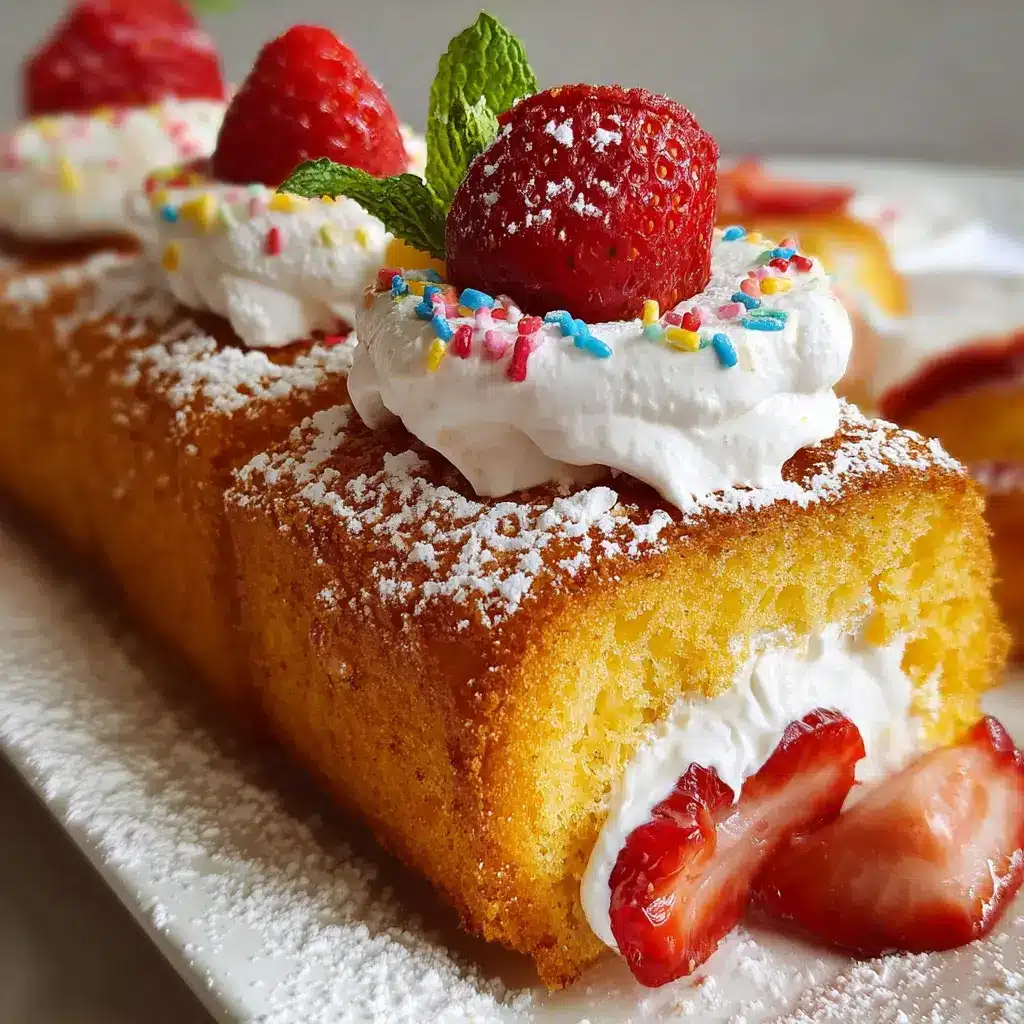
Presentation tips for gatherings
A Twinkie cake is not just delicious; it’s also a visual delight! To present it like a pro:
- Layer it nicely: Use clear glass dishes to showcase those beautiful layers, making each slice a treat for the eyes.
- Garnish creatively: Add fresh berries or mint leaves on top for a pop of color. A light dusting of powdered sugar can elevate its look even more.
- Serve with flair: Slice the cake into evenly proportioned pieces and arrange them on a stylish platter.
Presentation is key! This not only makes your dessert irresistible but also sparks conversation and excitement among your guests.
For more tips on creating the perfect dessert spread, check out articles from Epicurious and The Kitchn.
Time breakdown for Twinkie Cake
Preparation time
Making your delectable Twinkie Cake requires just about 30 minutes of preparation. This includes gathering all your ingredients and assembling the layers. Don’t forget, this no-bake treat is all about convenience, so it’s perfect for busy weeknights or last-minute gatherings.
Chilling time
After you’ve put your cake together, it needs some TLC in the fridge. Allow it to chill for at least 3 hours. This time allows the flavors to meld and the cake to set, resulting in a more luscious texture. Patience is key, but the wait is definitely worth it!
Total time
In total, you’re looking at around 3.5 hours to create your Twinkie Cake masterpiece. With minimal prep and hands-on time, it’s an excellent dessert choice that seems fancy without being overly complicated. Check out more convenient no-bake recipes here. Magic happens when no-bake desserts come together, so let’s get started!
Nutritional facts for Twinkie Cake
When you’re indulging in a delightful Twinkie Cake, it’s always great to know what you’re enjoying. Here’s a quick look at the nutritional facts that can help you make informed choices.
Calories per serving
Each slice of this scrumptious Twinkie Cake contains approximately 250 calories. While it’s definitely a treat, it’s good to savor each bite!
Sugar content
One of the key components of this cake is its sweetness. Expect around 20 grams of sugar per serving, derived mainly from the Twinkies and frosting. If you’re keeping an eye on your sugar intake, consider balancing it out with healthier meals throughout your day.
Suggested serving size
We recommend a serving size of about 1 slice, perfect for enjoying a satisfying dessert without overdoing it. Pair it with a cup of coffee or herbal tea for a lovely afternoon treat.
If you’re interested in understanding more about the nutritional aspects of desserts, the USDA FoodData Central is an excellent resource to explore.
Feel free to adjust your portions if you’re sharing this decadent Twinkie Cake at gatherings—everyone will appreciate the effort!
FAQ about Twinkie Cake
Can I make Twinkie Cake ahead of time?
Absolutely! One of the great things about this no-bake Twinkie cake is that it can be made ahead of time, making it perfect for busy schedules. Ideally, you want to let it chill in the refrigerator for at least four hours or, better yet, overnight. This resting time allows the flavors to meld beautifully. So, if you’re prepping for a gathering or just want a treat on hand, feel free to whip it up a day in advance!
What can I substitute for whipped topping?
If you’re looking to switch things up or maybe you’re not a fan of whipped topping, there are several alternatives you can try. Some popular options include:
- Homemade whipped cream: Just whip some heavy cream until soft peaks form; it’s light, fluffy, and oh-so-delicious.
- Greek yogurt: For a tangy twist and added protein, use plain Greek yogurt. Just make sure to sweeten it to taste!
- Coconut whipped cream: This is a fantastic non-dairy option that adds a lovely coconut flavor.
You can also explore store-bought options like dairy-free whipped toppings if you’re looking for a vegan-friendly alternative.
How can I modify the recipe for allergies?
When it comes to Twinkie cake, modifying the recipe for allergies is a breeze. Here are a few suggestions:
- Nut allergies: Ensure your ingredients are nut-free, and you can substitute nut-based toppings or fillings with seeds or more fruits.
- Dairy allergies: Opt for coconut cream or non-dairy milk alternatives if a dairy ingredient is used.
- Gluten sensitivities: Use gluten-free cakes or cookies if your Twinkie cake includes them.
Be sure to check ingredient labels to avoid cross-contamination, and for more allergy-friendly tips, resources like the Food Allergy Research & Education (FARE) are invaluable.
Whether you’re planning a party or simply looking for a delightful dessert, this Twinkie cake will surely be a hit!
Conclusion on Twinkie Cake
Final thoughts on making Twinkie Cake at home
Creating a Twinkie cake is not just an enjoyable baking experience; it’s a delightful trip down memory lane. The beauty of this no-bake dessert lies in its simplicity and the nostalgic flavors that can brighten any gathering. Imagine surprising your friends with a dessert that’s not only easy to make but also takes them back to their childhood!
When you whip up your own Twinkie cake, you can customize it to your taste, whether it’s a layer of fresh fruit or a drizzle of rich chocolate. Plus, with no baking required, it’s a perfect choice for those hectic weeknights.
Ready to serve up this nostalgia? Don’t forget to share your experience and any creative twists you’ve added. For more tips and dessert ideas, explore resources at Food Network or Bon Appétit. Happy baking!
Print
Twinkie Cake No-Bake: The Best Indulgent Treat You’ll Love
- Total Time: 4 hours 30 minutes
- Yield: 12 servings
- Diet: Vegetarian
Description
This no-bake Twinkie cake is a delightful and indulgent dessert that combines the flavors of classic Twinkies with a creamy filling, making it a perfect treat for any occasion.
Ingredients
- 14 Twinkies
- 1 cup heavy whipping cream
- 1/2 cup powdered sugar
- 1 teaspoon vanilla extract
- 1/2 cup chocolate syrup
Instructions
- In a mixing bowl, whip the heavy cream until it forms soft peaks.
- Gradually add the powdered sugar and vanilla extract, continuing to whip until well combined.
- In a 9×13 inch pan, arrange a layer of Twinkies at the bottom.
- Spread half of the whipped cream mixture over the Twinkies.
- Drizzle some of the chocolate syrup over the whipped cream layer.
- Repeat with another layer of Twinkies, whipped cream, and chocolate syrup.
- Cover and refrigerate for at least 4 hours before serving.
Notes
- For a richer flavor, you can add cocoa powder to the whipped cream.
- Make sure to refrigerate the cake overnight for the best texture.
- Prep Time: 30 minutes
- Category: Desserts
- Method: No-Bake
- Cuisine: American
Nutrition
- Serving Size: 1 slice
- Calories: 300
- Sugar: 20g
- Sodium: 150mg
- Fat: 15g
- Saturated Fat: 10g
- Unsaturated Fat: 5g
- Trans Fat: 0g
- Carbohydrates: 35g
- Fiber: 1g
- Protein: 3g
- Cholesterol: 30mg
")