Introduction to Tiramisu Lady Fingers
What is Tiramisu and Why is it Loved?
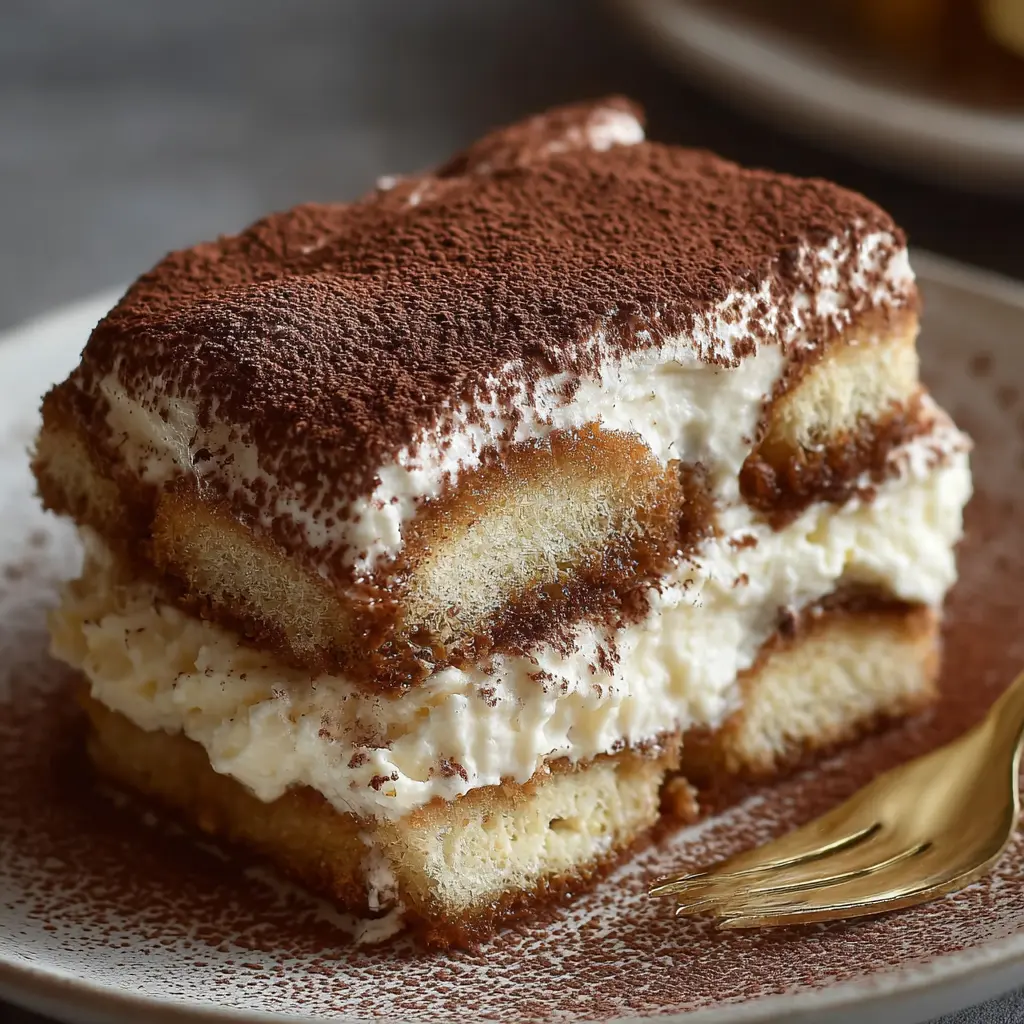
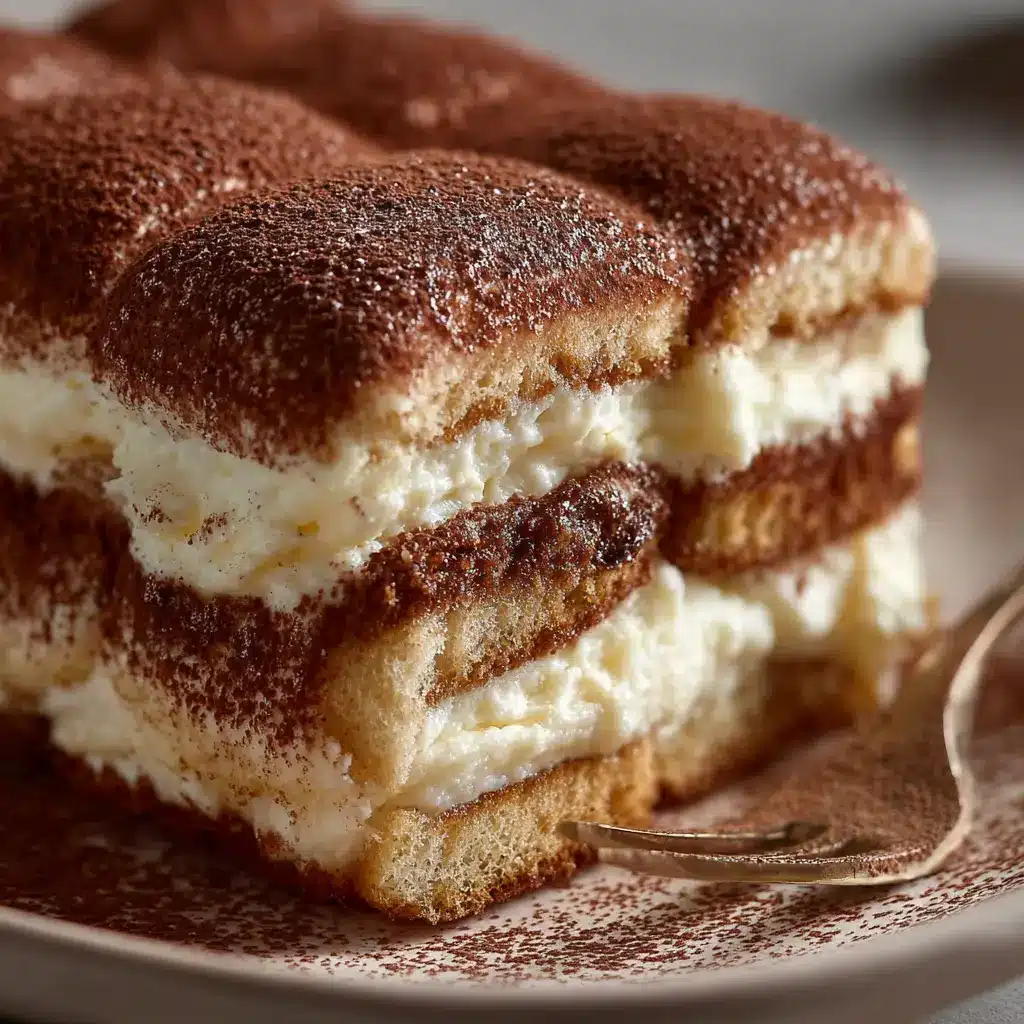
Tiramisu is more than just a dessert; it’s a celebration of flavors and textures that brings joy to anyone who indulges in it. Made with creamy mascarpone cheese, rich coffee, and sweet cocoa powder, each bite delivers a delightful balance of sweetness and bitterness. But the real stars of this classic Italian dessert are the lady fingers, or savoiardi, which are sponge-like cookies that soak up the flavors of the coffee and add that necessary structure.
Why do we love tiramisu so much? Perhaps it’s the nostalgia of enjoying it at a family gathering or a cozy café. Some say it’s the perfect pick-me-up after a long day, thanks to the invigorating coffee. Others are drawn to its luxurious creaminess—every spoonful feels like a mini-vacation.
A Brief History of Tiramisu
Originating from the Veneto region of Italy, the tiramisu has a relatively recent history, dating back to the 1960s. There are various fascinating anecdotes about its origin, one of which suggests it was created in a small restaurant, Le Beccherie, in Treviso. As the story goes, the dessert was intended as a mood booster for its consumers (tiramisu translates to “pick me up”). According to the Italian Academy of Cuisine, it quickly gained popularity not only in Italy but across the globe, becoming a staple on dessert menus everywhere.
Many versions of tiramisu have emerged since its inception. For instance, some modern recipes play with flavors, adding fruits or different spirits. However, the classic preparation retains the timeless lady fingers that give it that unmistakable character.
Next time you dig into a slice of this heavenly dessert, remember that the tiramisu lady fingers are an essential component. They soak up rich coffee, adding a layer of indulgence to the already divine experience. Whether you’re recapping your day with friends or celebrating a special occasion, don’t underestimate the role these little cookies play.
For more details about different tiramisu variations and recipe tips, feel free to check reputable sources like BBC Good Food or Serious Eats.
Are you ready to dive into making your own tiramisu lady fingers? Let’s get started!
Ingredients for Tiramisu Lady Fingers
Essential ingredients for the perfect tiramisu
Creating delightful tiramisu lady fingers is all about quality ingredients that enhance the flavors and texture of your dessert. Here’s what you’ll need:
- Eggs: Fresh, large eggs are essential for the perfect sponge. Separating the yolks from the whites is key to achieving that airy consistency.
- Sugar: Granulated sugar not only sweetens but stabilizes the egg whites when beaten.
- Flour: All-purpose flour works beautifully, but if you’re looking for a lighter touch, consider using cake flour.
- Baking Powder: A pinch helps the lady fingers puff up just right, giving them that classic sponge cake texture.
- Vanilla Extract: A splash of this adds depth and fragrance to your batter.
Crafting tiramisu lady fingers at home can be rewarding—who doesn’t love that homemade touch?
Substitutions for dietary preferences
If you have certain dietary restrictions or preferences, don’t worry. You can easily make swaps while still enjoying these scrumptious biscuits:
- Gluten-Free: Substitute all-purpose flour with a high-quality gluten-free blend found at Bob’s Red Mill.
- Egg-free: Use flaxseed meal or aquafaba as a replacer for eggs to maintain that fluffy texture.
- Sweeteners: Opt for coconut sugar or your favorite plant-based sweetener if you’re watching your sugar intake.
With just a few adjustments, everyone can indulge in the delightful world of tiramisu! Finding substitutes can often lead to delicious surprises, so don’t be afraid to experiment.
Preparing Tiramisu Lady Fingers
Making tiramisu lady fingers is both an art and a science, but don’t worry; with the right guidance, you’ll master them in no time. These delicate sponge cookies are the backbone of the perfect tiramisu, absorbing coffee and blending beautifully with the mascarpone mixture. Let’s dive into the steps that will transform you into a tiramisu expert.
Brew Strong Coffee
To create a delightful tiramisu, you need a robust cup of coffee. The flavor of the coffee will significantly impact your dessert, so opt for something rich and aromatic. Here’s how to get the best brew:
- Choose your beans wisely: Dark roast coffee works beautifully for tiramisu, as it has bold flavors that complement the sweetness of the mascarpone.
- Brew it strong: Use double the amount of coffee grounds you normally would. If you’re using a drip coffee maker, that could mean 4 tablespoons instead of 2.
- Let it cool: Once your coffee is brewed, allow it to cool completely. Hot coffee can dissolve lady fingers too quickly, turning your tiramisu into a soggy mess.
If you’re curious about coffee brewing methods, check out this great guide for tips on perfecting your brew.
Whip the Cream
Next, it’s time to whip that cream! This step involves a bit of elbow grease, but the result is worth it.
- Select the right cream: You want heavy whipping cream for a rich texture. Light cream just won’t cut it here.
- Chill your tools: For fluffier cream, chill your mixing bowl and beaters in the fridge for about 10-15 minutes before whipping.
- Whip until peaks form: Using an electric mixer, whip the cream on medium speed until you see soft peaks. This should take about 3-5 minutes.
Fluffy whipped cream adds an airy texture to the tiramisu lady fingers, making each bite delightful.
Prepare the Mascarpone Mixture
Now for the star of the show: the mascarpone cheese. This creamy, rich cheese binds everything together in your tiramisu.
- Blend your ingredients: In a separate bowl, combine room-temperature mascarpone cheese with about 1/4 cup of sugar.
- Add vanilla: Incorporate a teaspoon of vanilla extract for an extra flavor enhancement.
- Fold in the whipped cream: Gently fold the whipped cream into the mascarpone mixture until you see no streaks. Be careful not to deflate the cream!
This rich mixture will coat your lady fingers perfectly, adding a luxurious touch to your dessert.
Dip the Lady Fingers
Time to assemble your tiramisu lady fingers! Here is where the magic happens.
- Quick dips only: Take your cooled coffee and quickly dip each lady finger into the coffee, making sure not to soak it. A second is usually sufficient.
- Don’t linger: If you leave them in too long, your lady fingers will become overly soggy—nobody wants that!
Layer the Ingredients
With everything prepped, it’s time to layer!
- Start with a layer of lady fingers: Arrange half of your dipped lady fingers in a single layer at the bottom of your serving dish.
- Spread the mascarpone mixture: Using a spatula, spread half of your mascarpone mixture over the lady fingers.
- Repeat: Continue with another layer of dipped lady fingers followed by the remaining mascarpone mixture.
You can even add a sprinkle of cocoa powder or chocolate shavings between layers for an extra treat!
Chill Before Serving
Patience is key!
- Let it set: Cover your tiramisu and chill in the refrigerator for at least 4-6 hours, preferably overnight. The flavors meld beautifully during this time.
- Garnish before serving: Just before you serve it, dust the top with cocoa powder for that classic tiramisu finish.
As you chill out with your completed tiramisu, take a moment to reflect: was it easier than expected? You’re now ready to whip up this classic Italian dessert that’s sure to impress friends and family alike.
With these steps, you’re well on your way to creating an unforgettable tiramisu featuring those delightfully delicate lady fingers. Enjoy every delicious bite!
Variations on Tiramisu Lady Fingers
When it comes to tiramisu lady fingers, the adventure doesn’t end at the classic coffee version. There are so many ways to get creative! Here are a few variations to help you take your tiramisu game to the next level.
Chocolate Tiramisu with Dark Cocoa
If you’re a chocolate lover, consider swapping some of the flour for dark cocoa powder. This will give your tiramisu lady fingers a rich, chocolatey flavor that pairs beautifully with the creamy layers. Simply incorporate about ¼ cup of cocoa into the dry ingredients and follow your regular recipe. The result? A dessert that’s not just indulgent but also visually impressive with a dark, velvety finish.
Fruity Tiramisu with Berries
Looking for a refreshing twist? Try a berry-infused version of tiramisu lady fingers. Use pureed strawberries, raspberries, or blueberries in your mascarpone mix instead of coffee. A splash of citrus juice can enhance the flavor, brightening up the entire dish. Layer in fresh berries between those luscious lady fingers for added texture and freshness. It’s a perfect dessert for summer gatherings or when you need a fruity pick-me-up.
Coffee Alternatives for a Twist
Ditching coffee doesn’t mean sacrificing flavor! You can use strong brewed chai tea or even matcha for a different spin on your tiramisu lady fingers. These alternatives not only provide a unique taste but also add various health benefits. Make sure to adjust the sugar content based on your chosen flavor to keep your dessert perfectly balanced.
So, whether you go chocolate, fruity, or opt for a twist with tea, these variations on tiramisu lady fingers are sure to delight your guests. Which one will you try first? If you’re looking for more innovative recipes, check out Serious Eats for inspiration!
Cooking Tips and Notes for Tiramisu Lady Fingers
How to Achieve the Perfect Ladyfinger Texture
Creating tiramisu lady fingers, or savoiardi, calls for patience and precision. Start by whipping your egg whites until they’re stiff and glossy—this airiness is vital for that light, airy texture. Gently fold them into the egg yolk mixture, being careful not to deflate the batter. For an extra layer of flavor, consider adding a pinch of salt and vanilla extract. Use a piping bag to create uniform shapes; this ensures even baking and a consistent look.
Importance of Chilling Time
Once you’ve assembled your tiramisu lady fingers and layered them with mascarpone, don’t rush the chilling process. Letting your dessert chill for at least 4 hours (or overnight, if possible) allows the flavors to meld beautifully. This resting time is crucial for achieving that melt-in-your-mouth experience! For more insights on chilling desserts, check out the Food Network’s guide to cooling techniques.
Remember, the perfect tiramisu is all about balance, so take your time and enjoy the process!

Serving Suggestions for Tiramisu Lady Fingers
Creative Presentation Ideas
When it comes to serving tiramisu lady fingers, presentation can elevate your dessert from simple to stunning. Consider using:
- Individual glasses or jars: Layer the lady fingers with mascarpone cream and cocoa powder for a charming, personal touch.
- Serving on a slate board: This modern approach adds a rustic charm. Dust the edges with cocoa powder for a dramatic effect.
- Fruit accents: Garnish with fresh berries or edible flowers for a pop of color and freshness.
Your guests will appreciate the effort, and it will make for an Instagram-worthy snap!
Pairing Suggestions for Coffee Lovers
For those who adore coffee, serving tiramisu lady fingers can be an even more delightful experience:
- Espresso or brewed coffee: The rich flavors of these beverages complement the sweet mascarpone layers perfectly.
- Cold brew: If you’re looking for something refreshing, a smooth cold brew can be a fantastic pairing, enhancing the coffee flavor in your dessert.
- Nutty alternatives: Try pairing with a roasted hazelnut latte to bring additional complexity to your dessert experience.
For further inspiration, check out resources like Specialty Coffee Association for the latest coffee trends and pairings. Enjoy the culinary journey of flavors!
Time Breakdown for Tiramisu Lady Fingers
Preparation time
Making tiramisu lady fingers is a delightful process that typically takes about 30 minutes. This initial stage involves mixing the ingredients, whipping the eggs, and gently folding everything together to achieve that light, airy texture we all love. It’s a perfect excuse to crank up your favorite playlist and enjoy the moment!
Chilling time
After preparing, your tiramisu lady fingers will need some time in the fridge. Let them chill for at least 2 hours—this allows the flavors to meld beautifully and the texture to set, leading to that classic tiramisu experience we crave.
Total time
All in all, expect to spend around 2 hours and 30 minutes to enjoy your homemade tiramisu lady fingers. This includes prep and chilling time. If you’re planning a dinner party or just a cozy evening at home, this treat will surely impress! Want to learn more about dessert timings? Check out this helpful guide on timing in baking from King Arthur Baking.
Nutritional Facts for Tiramisu Lady Fingers
When you’re indulging in tiramisu lady fingers, it’s good to know what you’re enjoying. Let’s break it down!
Calories per serving
Typically, a serving of tiramisu lady fingers contains around 150-200 calories. This makes them a delightful treat that won’t completely derail your diet.
Breakdown of macronutrients
These sweet treats consist of a balance of macronutrients:
- Carbohydrates: Approximately 25-30g per serving
- Protein: About 3-4g, thanks to the eggs and flour
- Fats: Ranges from 5-7g, depending on ingredients used
For a deeper dive into nutritional information, check out NutritionData. Whether you’re enjoying them during a dinner party or a quiet evening at home, knowing the nutritional value of tiramisu lady fingers can help you make informed choices.
Wouldn’t you agree it’s nice to balance indulgence with some mindfulness?
FAQs about Tiramisu Lady Fingers
What can I use instead of mascarpone cheese?
If you’re running low on mascarpone cheese, don’t fret! There are some great alternatives that can maintain the creamy texture of your tiramisu lady fingers. You can opt for cream cheese blended with a little heavy cream for that silky consistency. Another option is ricotta cheese, which offers a lighter flavor profile. For a dairy-free version, try cashew cream or a store-bought vegan cream cheese. Whichever you choose, just be mindful of adjusting sugar levels to keep your dessert perfectly balanced!
How long can I store leftovers?
Leftover tiramisu can be a sweet treat for days! When stored in an airtight container in the refrigerator, your tiramisu lady fingers will stay fresh for up to 3-4 days. Make sure to cover them well to prevent drying out! Just keep in mind that the flavors meld and deepen over time, making it even more delicious.
Can I freeze tiramisu?
Absolutely! Freezing tiramisu lady fingers is a great way to preserve them, especially if you know you won’t finish it all in a few days. Wrap your tiramisu tightly in plastic wrap and place it in a freezer-safe container. It can last for about 2-3 months in the freezer. When you’re ready to enjoy, simply thaw it in the fridge overnight, and you’ll have a delightful dessert ready to go.
For additional tips on dessert storage, check out this comprehensive guide on proper food preservation from the USDA. If you have any more questions, feel free to drop a comment! Happy baking!
Conclusion on Tiramisu Lady Fingers
Recap of the recipe and its appeal
In this delicious journey of crafting tiramisu lady fingers, you’ve learned how to blend basic ingredients into a delightful treat that elevates any dessert. The light, airy texture paired with the rich flavors makes them an irresistible addition to your tiramisu. These lady fingers offer the perfect balance of sweetness and taste, highlighting why they’re a cornerstone in Italian desserts.
Encouragement to try making it at home
So why not bring the deliciousness of tiramisu lady fingers into your kitchen? Making them at home is not only rewarding but also allows you to add your personal touch. Whether you’re whipping them up for a special occasion or just to enjoy on a cozy night, your creativity and effort will surely impress your friends and family. Plus, baking can be a wonderfully relaxing activity. Dive into this recipe and discover the joy of homemade treats! For additional tips and tricks, check out resources on baking basics or Italian dessert techniques.
Print
Tiramisu Lady Fingers: Easy Recipe for a Divine Dessert Delight
- Total Time: 35 minutes
- Yield: 24 lady fingers
- Diet: Vegetarian
Description
Delight in the rich and creamy layers of Tiramisu with these homemade lady fingers. Perfectly soft and sweet, these lady fingers are the perfect base for your divine dessert.
Ingredients
- 4 large eggs, separated
- 1 cup granulated sugar
- 1 teaspoon vanilla extract
- 1 cup all-purpose flour
- 1/4 teaspoon salt
- Powdered sugar for dusting
Instructions
- Preheat your oven to 350°F (175°C) and line a baking sheet with parchment paper.
- In a mixing bowl, whisk the egg yolks and granulated sugar until pale and fluffy. Add vanilla extract and mix well.
- In another bowl, beat the egg whites with salt until stiff peaks form.
- Gently fold the egg whites into the egg yolk mixture.
- Gradually sift in the flour and gently fold until no streaks remain.
- Spoon the batter into a piping bag and pipe 3-inch long strips onto the prepared baking sheet.
- Bake for 12-15 minutes or until lightly golden. Allow to cool and dust with powdered sugar.
- Use the lady fingers in your favorite tiramisu recipe.
Notes
- Ensure the egg whites are not greasy for better volume.
- Store unused lady fingers in an airtight container.
- Prep Time: 20 minutes
- Cook Time: 15 minutes
- Category: Dessert
- Method: Baking
- Cuisine: Italian
Nutrition
- Serving Size: 2 lady fingers
- Calories: 80
- Sugar: 6g
- Sodium: 50mg
- Fat: 1g
- Saturated Fat: 0g
- Unsaturated Fat: 0g
- Trans Fat: 0g
- Carbohydrates: 15g
- Fiber: 0g
- Protein: 2g
- Cholesterol: 30mg
")