Introduction
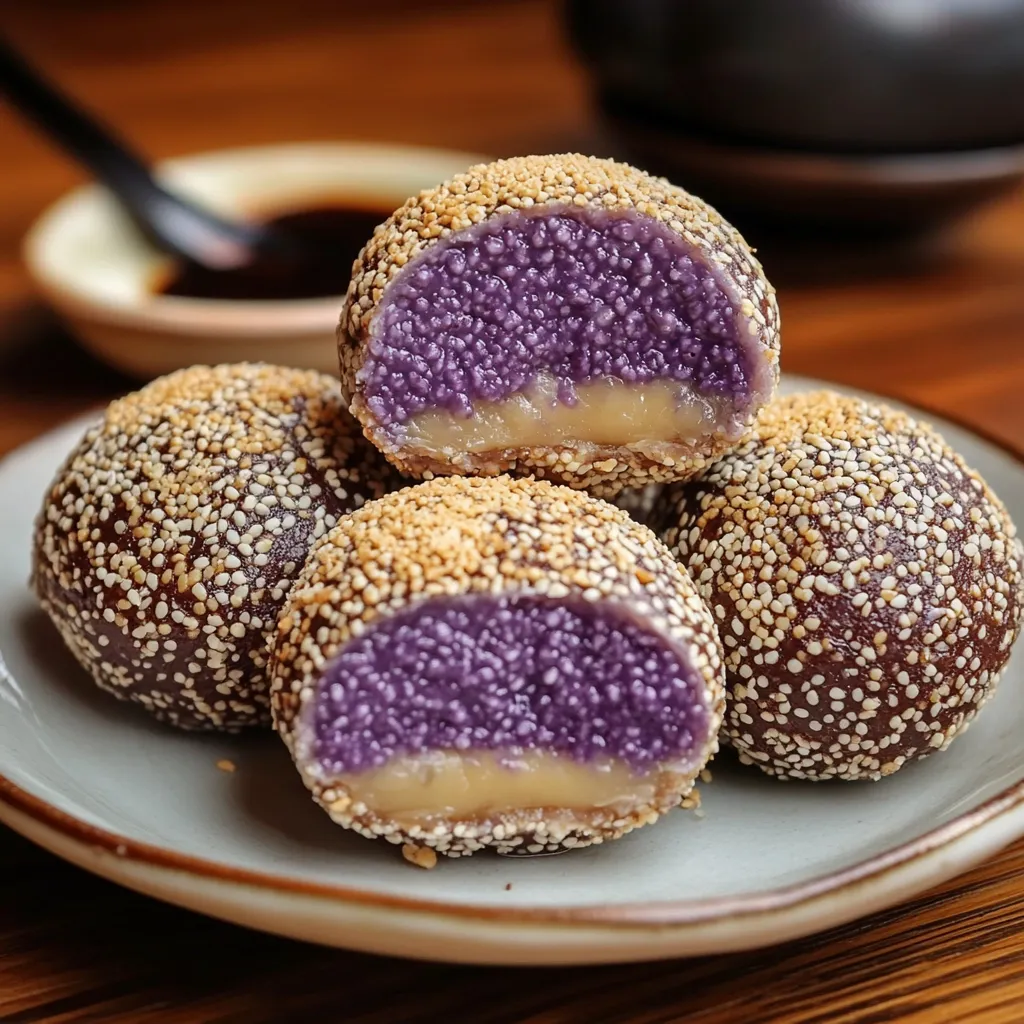
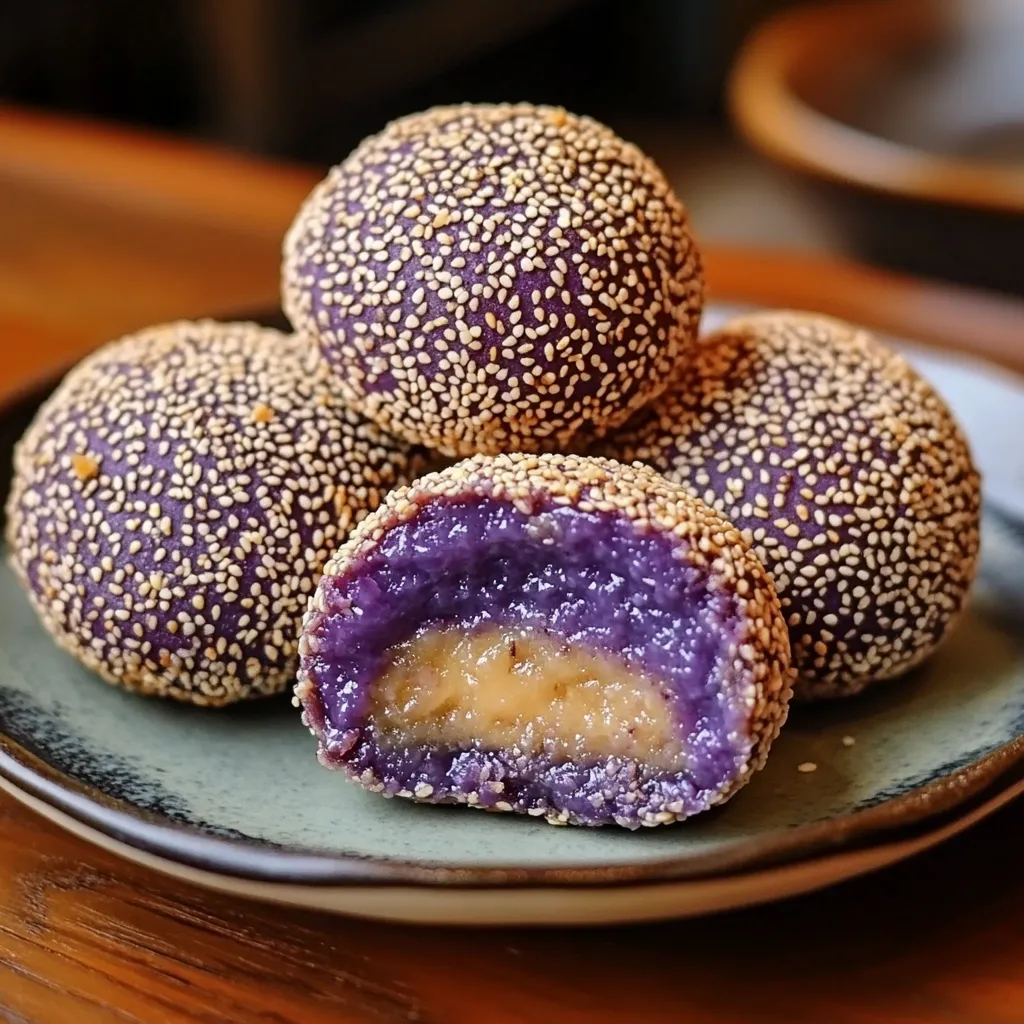
These crispy-on-the-outside, gooey-on-the-inside Ube Cheese Buchi are everything you didn’t know you needed—until now. A playful twist on the traditional sesame mochi ball, this Filipino-inspired version is stuffed with rich ube halaya and a surprise center of melty cheese. It’s sweet, savory, chewy, and crunchy—all in one heavenly bite.
Whether you’re already a fan of Filipino desserts or looking to try something new, this recipe is approachable and fun. It’s perfect for family gatherings, potlucks, merienda (afternoon snack), or even a sweet weekend project. You don’t need a bakery to get that beautiful golden crunch and gooey ube filling. With a few simple ingredients and some love, you’ll have a tray of these irresistible treats in no time.
Ready to get your hands a little sticky? Let’s make these Ube Cheese Buchi from scratch—you’ll be amazed at how easy (and delicious) it is.
Why You’ll Love This Ube Cheese Buchi Recipe
Key Benefits
If you’re looking for a dessert that delivers texture, flavor, and surprise all in one bite, this is it. Ube Cheese Buchi is:
-
Easy to make at home – no fancy techniques or tools required
-
Texturally delightful – crisp shell, chewy mochi, gooey center
-
Flavor-packed – sweet ube meets melty, salty cheese
-
Party-friendly – these buchi disappear fast from any dessert table
They’re everything you love about traditional buchi, with a playful Filipino twist.
Suitable For
This recipe is designed to be flexible and beginner-friendly, perfect for:
-
First-timers exploring Filipino or Asian desserts
-
Gluten-free eaters—glutinous rice flour contains no gluten
-
Mochi lovers who enjoy experimenting with fillings
-
Cheese dessert fans who love that creamy, savory-sweet contrast
No matter your skill level or occasion, these buchi are sure to bring smiles.
Ingredients for Ube Cheese Buchi
Core Ingredients
Here’s what you’ll need to bring these delicious bites to life:
-
2 cups glutinous rice flour – gives the dough its chewy mochi texture
-
½ cup sugar – adds sweetness to balance the savory cheese
-
¾ cup water – hydrates the dough
-
½ teaspoon vanilla extract – adds subtle warmth (optional)
-
¼ teaspoon salt – enhances flavor
-
½ cup sesame seeds – classic coating for that crispy finish
-
Cooking oil – for deep-frying
-
½ cup ube halaya – the heart of the filling
-
½ cup cream cheese or cheddar cheese, cubed – melty center
Substitutions and Tips
-
Swap cheddar for mozzarella if you prefer more stretch in the center
-
Homemade or store-bought ube halaya both work beautifully—just adjust sweetness accordingly
-
Use coconut sugar for a deeper, caramelized flavor profile
-
Food-safe gloves help handle the sticky dough and keep things clean
-
If your dough feels too wet, sprinkle in a bit more rice flour until smooth
This recipe is forgiving, so feel free to make it your own with small tweaks.
Best Ube and Cheese for Ube Cheese Buchi
Choosing the right ube and cheese makes all the difference in texture and flavor.
Ube Halaya Options
-
Store-bought ube halaya is convenient and consistent. Look for one with minimal additives.
-
Homemade ube halaya gives you full control over sweetness and texture—great if you have time.
-
You can also mash cooked purple yam and mix it with a bit of condensed milk for a quick DIY option.
Best Cheese Choices
-
Cream cheese brings a smooth, tangy richness that pairs beautifully with ube’s earthiness.
-
Cheddar cheese adds saltiness and a little bite—great for balance.
-
Eden cheese is a go-to in the Philippines, loved for its melt and mild flavor.
Want the best of both worlds? Mix a cube of cheddar with a dollop of cream cheese for a flavor surprise.
Kitchen Tools You’ll Need
Must-Have Tools
-
Mixing bowls – for combining dry and wet ingredients
-
Measuring cups and spoons – accurate measurements make for perfect texture
-
Deep fryer or heavy-bottomed pan – to fry evenly and maintain oil temperature
-
Slotted spoon or spider strainer – for safe and easy removal of buchi from hot oil
Nice-to-Have Tools
-
Silicone mat or non-stick surface – makes dough handling and cleanup easier
-
Kitchen scale – if you want even, bakery-style portions
-
Thermometer – helpful to maintain the ideal frying temp (around 325–350°F)
With the right tools and a little patience, you’re all set to make a batch of crispy, chewy perfection.
How to Make Ube Cheese Buchi
Making Ube Cheese Buchi at home might sound fancy, but it’s actually super doable—even if you’re not a pro in the kitchen. With a little prep and a handful of pantry staples, you’ll be frying up golden, chewy mochi balls with that sweet-savory filling in no time. Let’s break it down step by step so you feel confident the whole way through.
Step 1: Make the Dough
Start by combining your dry ingredients in a mixing bowl: glutinous rice flour, sugar, salt, and a touch of vanilla extract if you’re using it. Give it a quick stir to evenly distribute everything.
Next, slowly pour in the water while mixing with your hand or a spatula. Don’t rush this part—add the water a bit at a time until the dough comes together. You’re looking for a texture that’s smooth and pliable, not sticky or too wet. If it gets too soft, sprinkle in a little more rice flour.
Let the dough rest for 10 to 15 minutes. This gives the starch time to relax and helps prevent cracking when you start shaping the balls later.
Step 2: Prepare the Filling
While the dough is resting, get your filling ready. Cut your cheese into small cubes—about ½-inch works well. Then, use a teaspoon to portion out the ube halaya. If it’s sticky, lightly oil your spoon or fingers to make it easier to handle.
Step 3: Assemble the Buchi
Once the dough has rested, divide it into equal portions—12 pieces is a good standard, but you can go smaller for bite-sized versions.
Flatten each piece into a disc with your fingers. Place a teaspoon of ube halaya in the center, followed by a cube of cheese. Then gently pinch the edges together and roll it back into a ball, making sure it’s sealed tight.
Tip: If any filling starts to peek out, pinch it shut and give it a gentle roll to smooth out the surface.
Step 4: Coat with Sesame Seeds
Lightly dampen each ball with water—just enough to make the sesame seeds stick. Roll the balls in a shallow bowl of sesame seeds until fully coated. Then roll them again gently between your palms to press the seeds into the surface. This helps keep the coating intact while frying.
Step 5: Fry Until Golden
Heat enough oil in a deep pan over medium-low heat. You want the oil hot enough to sizzle, but not so hot that the outside browns before the inside cooks.
Gently lower the buchi into the oil in batches. Stir occasionally to ensure even browning, and cook until they float and turn a rich golden brown—about 4 to 5 minutes. Once done, transfer them to a plate lined with paper towels to drain.
Let them cool slightly before serving—they’ll be molten-hot inside, but once they’re just warm, the texture is absolutely perfect.
Tips for Success
A few simple tricks can take your buchi from good to amazing. Here’s what to keep in mind:
-
Don’t overstuff. It’s tempting to pack in more ube and cheese, but too much filling can cause the dough to tear or leak during frying. A teaspoon of ube and a small cube of cheese is the sweet spot.
-
Keep the oil at medium-low heat. Too hot and the outside will brown too fast. Too cold and the buchi will absorb excess oil. Aim for steady, gentle bubbles.
-
Re-roll after coating with sesame seeds. This extra step ensures the seeds stick and won’t fall off during frying. It also smooths the surface, giving each buchi that classic round shape.
-
Test one first. Before frying the whole batch, cook a single buchi to check your oil temp and dough consistency. Adjust as needed—this one step can save your entire batch.
Ready for the next part—storage, FAQs, or wrapping it up with a cozy conclusion?
How to Store Ube Cheese Buchi
If you’re lucky enough to have leftovers (they disappear fast!), here’s how to store them so they stay fresh and delicious.
At Room Temperature
Ube Cheese Buchi can be kept at room temperature in an airtight container for up to 24 hours. They’ll stay chewy with a bit of crisp left in the coating. For best results, keep them in a cool, dry place—away from moisture or direct sunlight.
In the Refrigerator
To extend their life, refrigerate them in a sealed container for up to 3 days. While they may lose some crispness, you can revive that crunch by reheating them in an air fryer or toaster oven for a few minutes. Avoid microwaving—this tends to make the mochi rubbery instead of soft and chewy.
Freezing Tips
Want to prep ahead? Freeze the buchi before frying. Just assemble the balls, skip the frying, and store them on a tray in the freezer until solid. Then transfer to a zip-top freezer bag.
When you’re ready to enjoy, fry them straight from frozen, just lower the oil temperature slightly and give them a little more time in the oil to cook through evenly.
Frequently Asked Questions (FAQs)
Can I bake these instead of frying?
Technically yes, but it’s not recommended. The crisp shell and chewy center rely on frying. Baking results in a tougher texture and less of that golden, crunchy magic that makes buchi so special.
Can I make this ahead of time?
Absolutely. The best way is to assemble the buchi and freeze them raw. When you’re ready, just take them straight from the freezer to the fryer. No thawing needed. Perfect for party prep or making ahead for the weekend.
What if I can’t find ube halaya?
No worries—just mash cooked purple sweet potatoes and mix them with a little condensed milk until thick and slightly sweet. It’s not an exact match, but it’s a great substitute in flavor and texture. You can even add a drop of ube extract for that signature purple hue.
Can I make it without cheese?
You can, but you’ll lose that creamy, salty contrast that balances out the sweetness of the ube. The cheese brings the magic—especially when it melts into the warm filling. That said, if you’re dairy-free or just not into cheese, the buchi will still be tasty with just ube inside.
Related Recipes
If you enjoyed making Ube Cheese Buchi, here are a few other Filipino-inspired treats to explore:
-
Mochi Donuts with Ube Glaze – chewy, colorful, and Instagram-worthy
-
Ube Cheese Pandesal – soft, fluffy bread with a surprise center
-
Tikoy with Cheese – a Lunar New Year favorite with a Filipino twist
-
Fried Sesame Balls (Jian Dui) – the original inspiration behind this recipe
Explore more in our dessert section for fun, family-friendly bakes and bites that bring a taste of home.
Conclusion
Ube Cheese Buchi brings together all the textures and flavors you love—crisp edges, chewy centers, creamy cheese, and that unmistakable ube sweetness. It’s a recipe that feels nostalgic, playful, and just the right amount of indulgent.
Perfect for special occasions or just a cozy afternoon treat, this dish is guaranteed to spark joy at first bite. So gather your ingredients, roll up your sleeves, and give it a try—you might just find your new favorite dessert.
If you do, don’t forget to share your creation. We’d love to see how your buchi turned out.
Print
The Best Ube Cheese Buchi Recipe
- Total Time: 35 minutes
- Yield: 12 buchi balls
Description
Ube Cheese Buchi are Filipino-style sesame balls made from glutinous rice flour, stuffed with sweet ube halaya and melty cheese. They’re deep-fried to golden perfection with a chewy interior and crispy exterior. The sweet-savory combo makes them totally irresistible.
Ingredients
-
2 cups glutinous rice flour
-
½ cup sugar
-
¾ cup water
-
¼ tsp salt
-
½ tsp vanilla extract (optional)
-
½ cup ube halaya
-
½ cup cream cheese or cheddar, cubed
-
½ cup sesame seeds
-
Cooking oil, for frying
Instructions
-
Make Dough: Mix flour, sugar, salt, and vanilla. Gradually add water until dough forms. Let rest.
-
Prepare Filling: Cut cheese into cubes, portion ube halaya.
-
Assemble: Divide dough, flatten, stuff with ube and cheese, and roll into balls.
-
Coat: Dampen balls, roll in sesame seeds, and re-roll for firmness.
-
Fry: Deep fry on medium-low heat until golden brown and floating. Drain on paper towels.
Notes
-
Re-roll buchi after sesame coating for a smoother surface.
-
Test-fry one ball first to adjust oil temperature.
-
Ube halaya can be substituted with mashed purple yam and condensed milk.
- Prep Time: 20 minutes
- Cook Time: 15 minutes
- Category: Dessert/Snack
- Method: Deep-Fry
- Cuisine: Filipino
Nutrition
- Calories: 180
- Sugar: 7g
- Sodium: 100mg
- Fat: 8g
- Carbohydrates: 24g
- Fiber: 1g
- Protein: 3g
")