
Introduction to Butterfinger Pie
There’s something truly special about desserts that evoke nostalgia while still being effortlessly modern. Enter Butterfinger Pie, a delightful treat that seamlessly marries the beloved flavors of the classic Butterfinger candy bar with the ease of a no-bake pie. For young professionals juggling busy schedules and a myriad of responsibilities, this dessert is not just a sweet escape; it’s the ultimate crowd-pleaser for gatherings or a simple indulgence after a long week.
Why Butterfinger Pie is the Ultimate Dessert for Young Professionals
Picture this: it’s the end of a taxing day at work. You finally settle onto your couch, craving something satisfying yet uncomplicated. That’s where Butterfinger Pie shines. With minimal preparation time and no baking required, this dessert fits perfectly into the fast-paced life of young professionals. The combination of creamy filling and crunchy Butterfinger bits creates a texture that’s simply irresistible.
- Saves Time: The no-bake aspect means that you can whip up this pie in less than 30 minutes, leaving you with more time to relax or tackle your to-do list.
- Easily Customizable: Whether you want to add extra layers or mix in your favorite chocolate crumbles, the flexibility of this pie recipe allows you to put your own spin on it.
According to a survey by The American Culinary Federation, dessert is often the most anticipated part of a meal, especially among friends and colleagues. What better way to impress your guests than by serving a creamy and flavorful Butterfinger Pie?
Plus, it doesn’t just taste incredible; it sparks conversations. How many times have you reminisced about your favorite childhood candy while enjoying a slice? Food has that unique power to connect us, and this pie offers a delicious gateway into delightful conversations about nostalgia, favorite snacks, and culinary adventures.
So, if you’re looking for a showstopper dessert that embodies both ease and indulgence, Butterfinger Pie deserves a spot in your recipe arsenal. Grab a few friends, a fork, and prepare to be the office hero—or simply enjoy it solo; we won’t judge.

Ingredients for Butterfinger Pie
Creating a delicious Butterfinger Pie requires just a handful of simple ingredients that come together for a show-stopping dessert. Here’s what you’ll need:
- Oreo Crust: About 1 package of Oreo cookies, crushed; this will be your pie’s delightful base.
- Cream Cheese: 8 ounces, softened. This adds richness and creaminess to the filling.
- Cool Whip: 8 ounces, to fold in for that light, airy texture you crave in a pie.
- Peanut Butter: 1 cup of creamy or crunchy—whichever you prefer will enhance that signature Butterfinger flavor.
- Powdered Sugar: 1 cup, to sweeten and stabilize the pie filling.
- Butterfinger Bars: 2 to 3 bars, crushed. These are essential for that irresistible Butterfinger crunch.
Each ingredient plays a role, from the buttery crust to the creamy filling, making this dessert as enjoyable to make as it is to eat. Curious about the origins of Butterfinger? Check out Snickers vs. Butterfinger for more tasty tidbits. Happy baking!
Preparing Butterfinger Pie
Creating Butterfinger pie is a delightful experience that combines creamy goodness with the crumbly texture of the beloved candy bar. This no-bake dessert is simple enough for a weekday treat and impressive enough for gatherings. Here’s a step-by-step guide to help you prepare this delightful dessert.
Gather Your Ingredients
Before you dive into mixing and folding, it’s essential to gather everything you’ll need. Here’s a list of ingredients:
- 1 package of cream cheese (8 oz), softened
- 1 cup powdered sugar
- 1 teaspoon vanilla extract
- 2 cups cool whip or whipped topping
- 1 package (about 4-6) Butterfinger candy bars
- 1 graham cracker crust (store-bought or homemade)
You might want to take a trip to your local grocery store or check an online supplier for some of these ingredients. Using fresh, quality ingredients always makes a difference in flavor. Consider grabbing a few extra Butterfinger bars for snacking as you cook—you deserve it!
Mix the Creamy Filling
In a medium mixing bowl, start by beating the softened cream cheese until it’s smooth and creamy. The cream cheese acts as the base for your filling, giving it that rich consistency. Add the powdered sugar and vanilla extract, mixing until well combined. The mixture should have a fluffy texture.
This step is crucial for achieving that delectable filling you’re craving. When you pour it into your graham cracker crust, you want it to maintain that lush, velvety feel. If you’re looking for more insights on how to balance flavors in desserts, sites like Joy of Baking offer excellent tips.
Fold in the Whipped Topping
Once your creamy filling is ready, it’s time to lighten it up a bit by adding the whipped topping. Using a spatula, gently fold in the cool whip. Be careful not to overmix; you want to retain that airy texture. This is what transforms your filling into something truly magnificent. The contrast of the light topping with the dense cream cheese is truly something special, and it’s what makes Butterfinger pie so irresistible.
This part is about balance—ensuring that your filling remains light while still capturing all that flavor you’ve just created!
Incorporate the Butterfinger Pieces
Now, here comes the fun part—adding the Butterfinger candy bars! Unwrap each bar and chop them into small pieces. You want them to be chunks, not dust, so you can still savor that delightful crunch. Fold the chocolatey, peanut-buttery goodness directly into your creamy mixture. This is a great time to taste the filling because it’s honestly hard to resist at this point!
If you find that you have some Butterfinger crumbs left over, don’t worry! You can save those for a sprinkle on top later or to use in another recipe (like a milkshake).
Assemble and Chill
With your filling ready, pour it into your graham cracker crust, spreading it evenly. For an added touch, you can sprinkle some extra chopped Butterfinger on top for decoration. Once everything is assembled, cover your pie with plastic wrap and pop it in the refrigerator.
Allow your Butterfinger pie to chill for at least four hours (or overnight if you can wait that long). This helps the flavors meld and the filling set properly. Trust us; patience is key here, and it will be well worth the wait!
Now that you’re armed with this straightforward guide, get in the kitchen and whip up your own delicious Butterfinger pie. Whether it’s for a special occasion or just to satisfy your sweet tooth, you’ll love this creamy, crunchy treat. After all, who can resist the combination of chocolate and peanut butter? Enjoy!

Variations on Butterfinger Pie
When it comes to Butterfinger pie, the classic dessert is a crowd-pleaser, but why stop at one delicious version? Let’s explore some enticing variations that can elevate this treat to new heights!
Butterfinger Pie with Added Chocolate
If you’re a chocolate lover, consider enhancing your Butterfinger pie with a creamy chocolate layer. Here’s how:
- Ingredients: Mix in 1 cup of melted chocolate or cocoa powder into your whipped cream mixture. Dark chocolate or milk chocolate both work beautifully.
- Layering: Spread a layer of chocolate ganache beneath your pie filling for an extra indulgent experience.
- Topping: Use chocolate shavings or chips alongside your crushed Butterfinger on top for that perfect visual appeal.
This delightful twist adds richness and depth, making every bite a heavenly experience.
Nut-Free Butterfinger Pie Option
For those with nut allergies, don’t feel left out! You can still enjoy a scrumptiously smooth Butterfinger pie. Here are some smart substitutions:
- Graham Cracker Crust: Opt for a nut-free version or use crushed cookies, such as vanilla wafers, as the base.
- Butterfinger Alternative: Instead of traditional Butterfinger bars, try using nut-free candy bars like Skor or Heath. These still give you that sweet, crunchy texture.
By being mindful of ingredient swaps, you can create a dessert that everyone can savor.
With these variations, your Butterfinger pie can become a personalized masterpiece that suits any taste or dietary need. Ready to impress your friends and family with your creativity? Check out other delicious pie recipes here.
Cooking Tips for Butterfinger Pie
Creating a Butterfinger pie that’s both delicious and impressive doesn’t have to be daunting! Here are some essential tips to help you craft the perfect dessert.
Choose the Right Ingredients
Opt for high-quality peanut butter and cream cheese, as they dramatically enhance the flavor. Don’t skimp on the Butterfinger candy bars—using freshly crushed pieces will give you the best crunch!
Creaming Technique Matters
When whipping your cream cheese and sugar together, ensure a thorough mix. This creates a smooth filling without lumps, so don’t rush this step! You want that velvety texture to shine in your pie.
Chill for Perfection
After assembling your Butterfinger pie, allow it to chill for several hours or, ideally, overnight. This helps the flavors meld beautifully and ensures a firm slice when you serve it. Don’t forget to cover it with plastic wrap to maintain freshness!
Presentation Tips
For a fab finishing touch, consider drizzling melted chocolate or caramel on top. A sprinkle of crushed Butterfinger pieces adds an extra layer of texture. Keep in mind, the visual appeal can be just as important as taste!
Feeling inspired? Ready to create your own Butterfinger pie masterpiece? For more creative dessert ideas, check out Food Network or Serious Eats for tips and recipes!
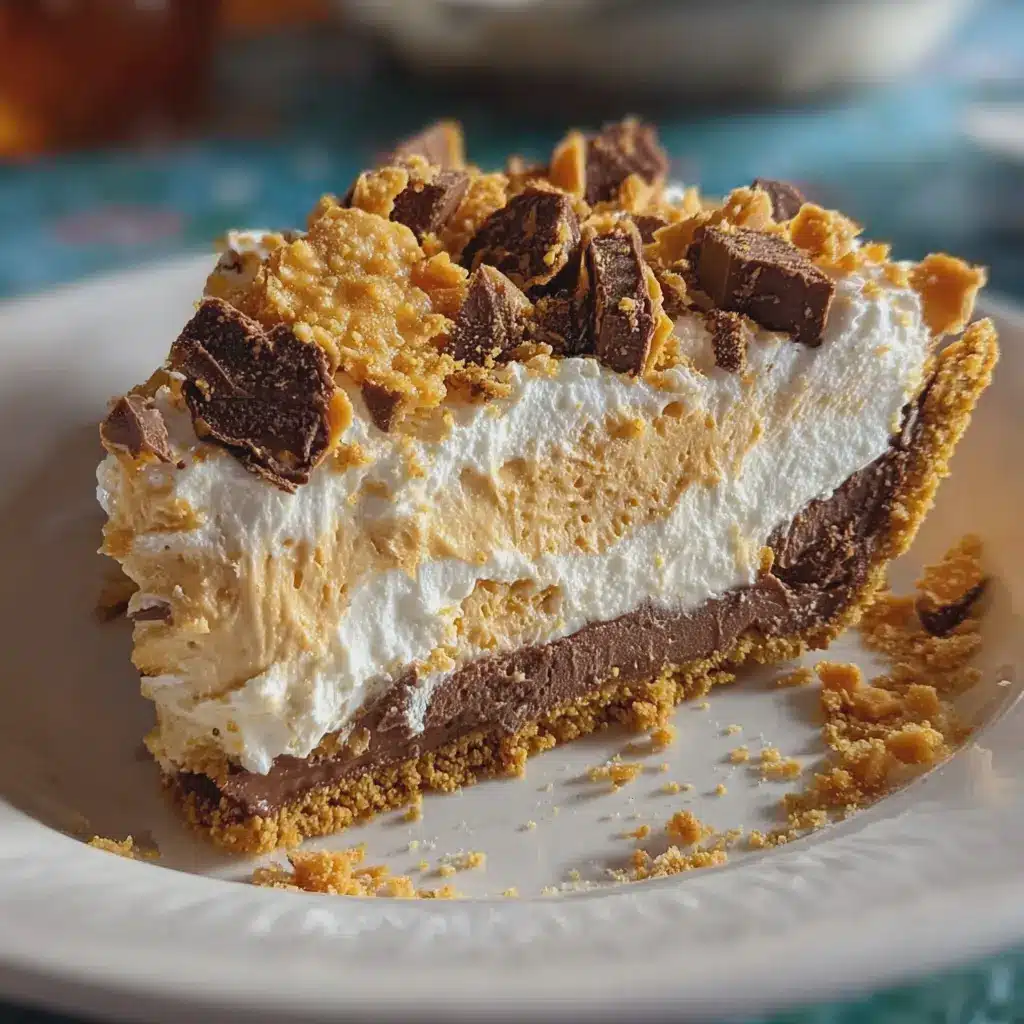
Serving Suggestions for Butterfinger Pie
When it comes to indulgent desserts like Butterfinger Pie, presentation is everything! Here are some delightful serving suggestions to elevate your treat.
Pair It Up
Consider serving your Butterfinger Pie alongside a scoop of vanilla or chocolate ice cream. The creaminess of the ice cream beautifully balances the pie’s rich, peanut buttery goodness. You could even drizzle some chocolate or caramel sauce over the top for that extra flair!
Garnish Ideas
A sprinkle of crushed Butterfinger candies on top creates a crunchy texture contrast. You might add whipped cream for that classic pie finish. Pro tip: Make your own whipped cream for a fresher taste—just whip some heavy cream with a bit of sugar until it reaches the peaks you desire!
Perfect Beverages
To complement your Butterfinger Pie, try serving cold milk, a creamy hot chocolate, or even a refreshing iced coffee. These beverages enhance the flavor profile without overwhelming the dessert’s sweetness.
Creative Serving Styles
For a fun twist, cut the pie into small squares or mini portions and serve them on a tiered cake stand. Not only does this make for a stunning display, but it also encourages sharing—perfect for gatherings or celebrations!
Feel inspired? You can find more about the art of pie presentation over at Forbes and Serious Eats.
Time Breakdown for Butterfinger Pie
When you’re ready to whip up a delicious Butterfinger Pie, it’s helpful to know just how long the process will take. Here’s a simple breakdown of the times involved so you can plan your dessert making with ease.
Preparation Time
The active preparation for your Butterfinger Pie will take about 15 minutes. This includes gathering ingredients like cream cheese, whipped topping, and of course, those tasty Butterfinger candies. It’s quick and fun—perfect for a weeknight treat!
Chilling Time
Next up is the chilling phase, which is crucial for that creamy texture. Let your pie chill in the refrigerator for at least 4 hours, allowing the flavors to meld beautifully.
Total Time
In total, you’re looking at around 4 hours and 15 minutes from start to finish. Most of that time is simply waiting for it to chill. So, while you’re waiting, why not prep a meal or binge-watch your favorite series? Make sure to check out this guide on making delicious desserts for more sweet inspiration!
Nutritional Facts for Butterfinger Pie
When it comes to enjoying a delightful dessert like butterfinger pie, knowing the nutritional facts can help you savor every bite without guilt. Here’s a quick breakdown for this indulgent treat.
Calories
A slice of butterfinger pie typically contains around 350 calories. While it’s a rich dessert, balancing it with lighter meals throughout your day can help incorporate butterfinger pie into your diet without excessive calorie intake.
Protein
You can expect about 5 grams of protein per serving. While this isn’t a significant amount, pairing it with other protein-rich foods can enhance your overall intake for the day.
Sugar
The sweet factor! Each slice has approximately 25 grams of sugar. If you’re mindful of sugar consumption, consider enjoying a smaller portion or pairing it with a balanced meal to offset the sweetness.
For more insights on managing sugar intake, check out resources from the American Heart Association. Remember, indulgence is best enjoyed occasionally!
FAQs about Butterfinger Pie
When it comes to preparing a delightful Butterfinger Pie, you might have a few questions at the back of your mind. Let’s tackle some of the most frequently asked questions to make your pie-making experience smoother!
Can I make Butterfinger Pie in advance?
Absolutely! One of the beauties of Butterfinger Pie is that it holds up wonderfully when made a day or two in advance. This can actually enhance the flavor as the ingredients marinate together. Just be sure to cover it tightly with plastic wrap, allowing it to chill in the fridge until you’re ready to serve it to your guests. It makes for an easy, stress-free dessert option, especially for gatherings.
How can I store leftover Butterfinger Pie?
If you do have leftovers (which we hope you do, since it’s that delicious), storing them is a breeze! Keep any remaining pie covered in the refrigerator in an airtight container. It should stay fresh for up to four days. You can enjoy the rich combination of flavors for days after the initial serving. Just remember, it’s best served chilled!
Is there a gluten-free version of Butterfinger Pie?
Yes, there is! To whip up a gluten-free Butterfinger Pie, simply substitute the traditional graham cracker crust with a gluten-free version. Many brands now offer gluten-free graham crackers that hold their texture and taste beautifully. You can also make your own crust using ground almonds or gluten-free cookies. This way, everyone can enjoy this creamy indulgence!
For more tips or gluten-free alternatives, check out the Gluten-Free Society for references and recipes. Your pie will taste just as amazing, with everyone leaving your table satisfied!
Conclusion on Butterfinger Pie
In wrapping up our journey into the world of Butterfinger Pie, it’s clear this dessert is not just a treat but a crowd-pleaser that can elevate any gathering. Its delightful crunch and creamy filling balance perfectly, making it a go-to dessert for everything from casual weeknight dinners to festive celebrations.
- Whether you’re a novice in the kitchen or a seasoned pro, this recipe is simple to master.
- Experiment by adding different toppings or variations that reflect your taste.
So, why not whip up this Butterfinger Pie for your next occasion? It’s sure to impress your friends and family—after all, who can resist the allure of chocolate and peanut butter? For more inspiration, check out how to make homemade whipped cream to pair perfectly with this sumptuous dessert. Dive into this sweet adventure, and let every bite bring you joy!
Print
Butterfinger Pie: The Easy Indulgent Dessert You’ll Love
- Total Time: 4 hours 15 minutes
- Yield: 8 servings
Description
Indulge in the creamy, crunchy goodness of Butterfinger Pie, an effortless dessert that’s perfect for any occasion.
Ingredients
- 1 package of cream cheese
- 1 cup of powdered sugar
- 1 tub of whipped topping
- 4 Butterfinger bars, crushed
- 1 graham cracker crust
Instructions
- In a mixing bowl, beat the cream cheese until smooth.
- Add the powdered sugar and mix until well combined.
- Fold in the whipped topping and crushed Butterfinger bars.
- Pour the mixture into the graham cracker crust and smooth the top.
- Chill in the refrigerator for at least 4 hours before serving.
Notes
- You can top the pie with additional crushed Butterfinger for extra crunch.
- Make sure to chill the pie for longer if you prefer a firmer texture.
- Prep Time: 15 minutes
- Category: Dessert
- Method: No-Bake
- Cuisine: American
Nutrition
- Serving Size: 1 slice
- Calories: 250
- Sugar: 20g
- Sodium: 150mg
- Fat: 15g
- Saturated Fat: 9g
- Unsaturated Fat: 4g
- Trans Fat: 0g
- Carbohydrates: 30g
- Fiber: 1g
- Protein: 3g
- Cholesterol: 30mg