Introduction to Thumbprint Cookies
A Sweet Treat That Takes You Back to Childhood
There’s something irresistibly nostalgic about thumbprint cookies. These delightful confections often transport us back to our childhood kitchens, where the scent of freshly baked goodies mingled with laughter and a hint of mischief. Whether you recall baking with parents or devouring them at school bake sales, thumbprint cookies hold a special place in many hearts.
So, what is it about these cookies that captivates our taste buds and stirs fond memories? Perhaps it’s the charming little “thumbprint” left in the dough, begging to be filled with your favorite jam or chocolate. The beauty of thumbprint cookies lies in their versatility; you can customize the filling to your whim. From classic raspberry preserves to indulgent dark chocolate ganache, the possibilities are endless.
Making thumbprint cookies is not just about savoring a sweet treat; it’s an experience. You might find yourself reaching for that family recipe or experimenting with new flavors, turning your kitchen into a hub of creativity. Did you know that research shows baking can significantly reduce stress? Next time you’re feeling overwhelmed, grab your mixing bowl and remember how much fun it is to create something delicious.
To start your thumbprint cookie journey, all you need are basic ingredients like flour, sugar, and butter. The recipe is straightforward, making it a perfect project for a weekend afternoon. Plus, involving friends or family in the process can turn it into a fun bonding activity.
For tips on unique fillings and techniques, check out Serious Eats and The Kitchn, where you’ll find informative articles that will elevate your cookie game.
As you gather your ingredients and prepare to bake, remember: the heart of thumbprint cookies is not just in their delectable taste but in the joy they bring, both to the baker and those lucky enough to enjoy them. So roll up your sleeves and let’s create some sweet memories with these timeless treats!
Ingredients for Thumbprint Cookies
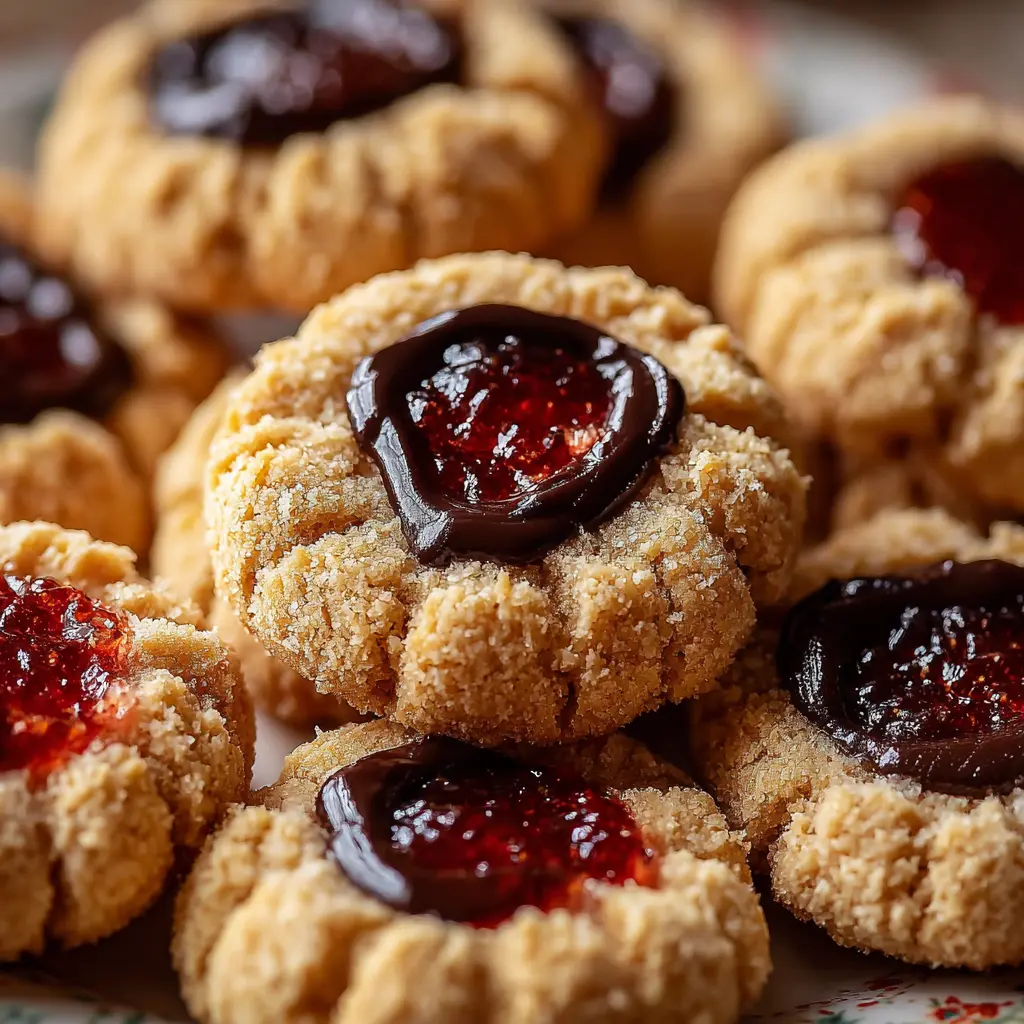
Essential ingredients for the perfect thumbprint cookies
Creating delicious thumbprint cookies starts with a well-rounded collection of essential ingredients. The beauty of these cookies lies in their simplicity and adaptability. Here’s what you’ll need:
- Butter: Unsalted, at room temperature for that rich flavor and tender texture.
- Sugar: Granulated sugar works best to sweeten your cookies while creating that lovely crispy exterior.
- Brown Sugar: A touch of brown sugar adds moisture and depth to the flavor profile.
- Egg Yolk: Just one egg yolk enhances richness and helps bind everything together.
- Flour: All-purpose flour is ideal for structure. You can experiment with whole wheat or gluten-free varieties if needed.
- Jam or Preserves: This is where the magic happens! Choose your favorite — strawberry, raspberry, or even apricot.
These ingredients come together to create that classic thumbprint cookie experience, perfectly balancing crunch and chewiness. Plus, the filling options are endless! Check out this guide to types of jams to find the perfect match for your cookies. So, what’s stopping you from baking these delightful treats? The kitchen awaits!
Preparing Thumbprint Cookies
Baking thumbprint cookies is one of those delightful kitchen experiences that can transport you straight back to childhood memories. Whether you’re filling these sweet treats with fruit jam, chocolate, or a nutty surprise, the process is simple and incredibly satisfying. Let’s dive into how to prepare these classic cookies step-by-step!
Preheat your oven
Before diving into the dough, your first step begins with a crucial baking tip: preheat your oven to 350°F (175°C). This might seem minor, but it ensures your cookies bake evenly and develop that beautiful golden color. While waiting for the oven to heat up, take a moment to gather all your ingredients. Preparation is key, and having everything on hand makes the whole process smoother. If you’re a fan of baking, check out King Arthur Baking for more tips on your oven and baking temperature adjustments.
Cream the butter and sugar
Next, grab a mixing bowl and get ready to create that delicious base for your thumbprint cookies. Start by adding 1 cup of room-temperature unsalted butter and 1 cup of granulated sugar to the bowl. Using a hand mixer, cream them together until the mixture is light and fluffy. This step typically takes about 2-3 minutes. The butter-sugar blend should turn a pale yellow color—it’s the perfect sign that you’re on the right track.
Mix in the vanilla extract
Once you’ve achieved that delightful fluffiness, it’s time to add a splash of personality to your dough by mixing in 1 teaspoon of pure vanilla extract. This is a fantastic way to enhance the flavor profile of your thumbprint cookies. Mix thoroughly until the vanilla is well incorporated, lending its cozy aroma to your mixture. Vanilla isn’t just a flavor—it’s a mood booster!
Combine dry ingredients to form dough
Now, we shift our focus to the dry ingredients. In another bowl, whisk together 2 cups of all-purpose flour, 1 teaspoon of baking powder, and a pinch of salt. This combination is essential for achieving that perfect texture. Slowly add the dry mixture to your creamed butter and sugar, stirring until just combined. Avoid overmixing, as this can lead to tough cookies. Once combined, it’s time to chill the dough—wrap it in plastic wrap and refrigerate for about 30 minutes. Chilling not only helps the dough hold its shape but enhances the flavor deeply.
Shape and fill the cookies
After the dough has chilled, remove it from the fridge and prepare for the fun part! Scoop about 1 tablespoon of dough and roll it into a ball between your palms. Place the dough ball onto a baking sheet lined with parchment paper. Using your thumb (or the back of a spoon), make an indentation in the center of each ball. This is where your creativity shines! Fill each thumbprint with your choice of filling, like fruit preserves or chocolate ganache. Make sure not to overfill, as it can bubble over while baking.
Bake to perfection
Finally, it’s time to pop those thumbprint cookies into the preheated oven. Bake them for 12-15 minutes, or until the edges are lightly golden. Keep an eye on them—remember, cookies can go from perfect to overbaked in just a minute! Once they’re out, let them cool on the baking sheet for a few minutes before transferring to a wire rack. This cooling period allows the cookies to set up just right.
There you have it, a straightforward guide to preparing delicious thumbprint cookies! With just a few steps, you can create delightful treats perfect for any occasion. So gather your ingredients and enjoy a little baking therapy! And if you want to explore more cookie recipes or baking tips, check out Food Network for various ideas to inspire your baking journey. Happy baking!
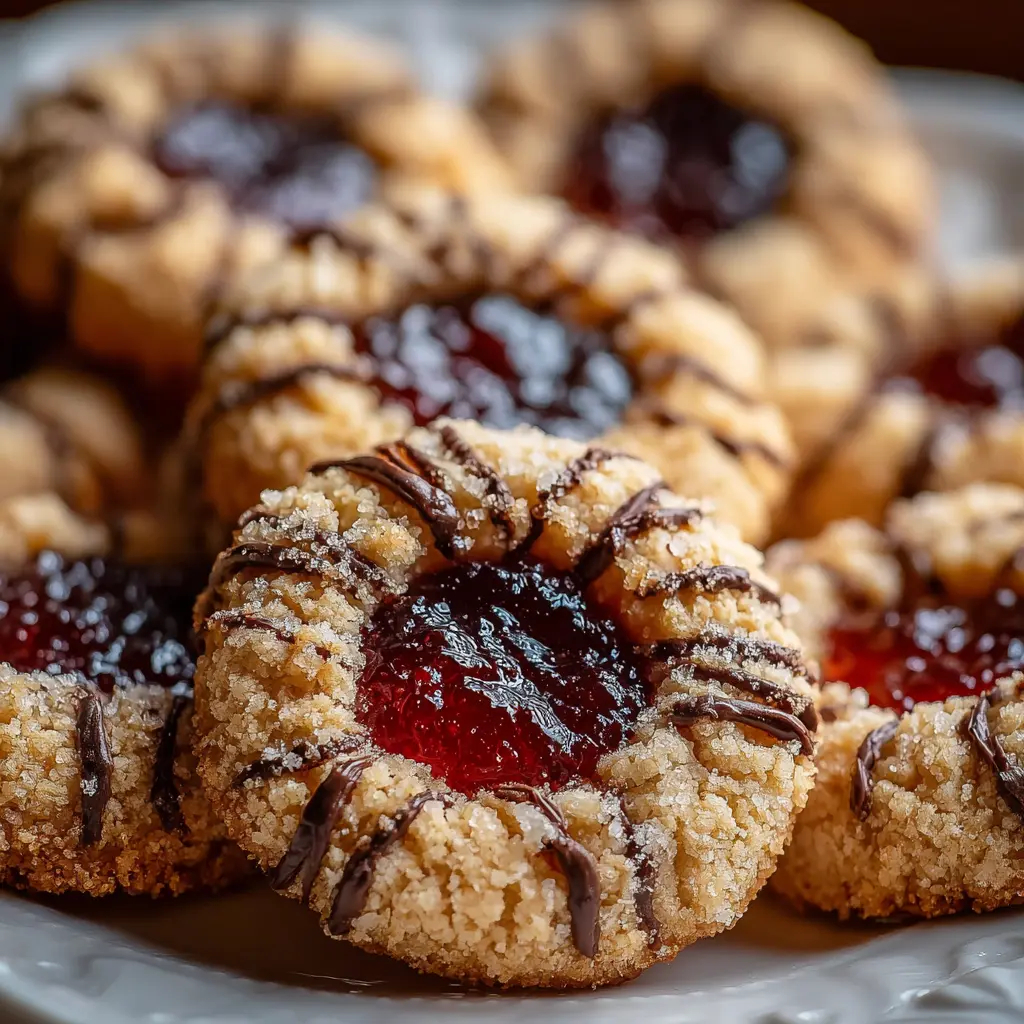
Variations on Thumbprint Cookies
When it comes to thumbprint cookies, the classic version is just the beginning. Let’s dive into some delightful variations that can elevate your cookie game and satisfy all kinds of cravings!
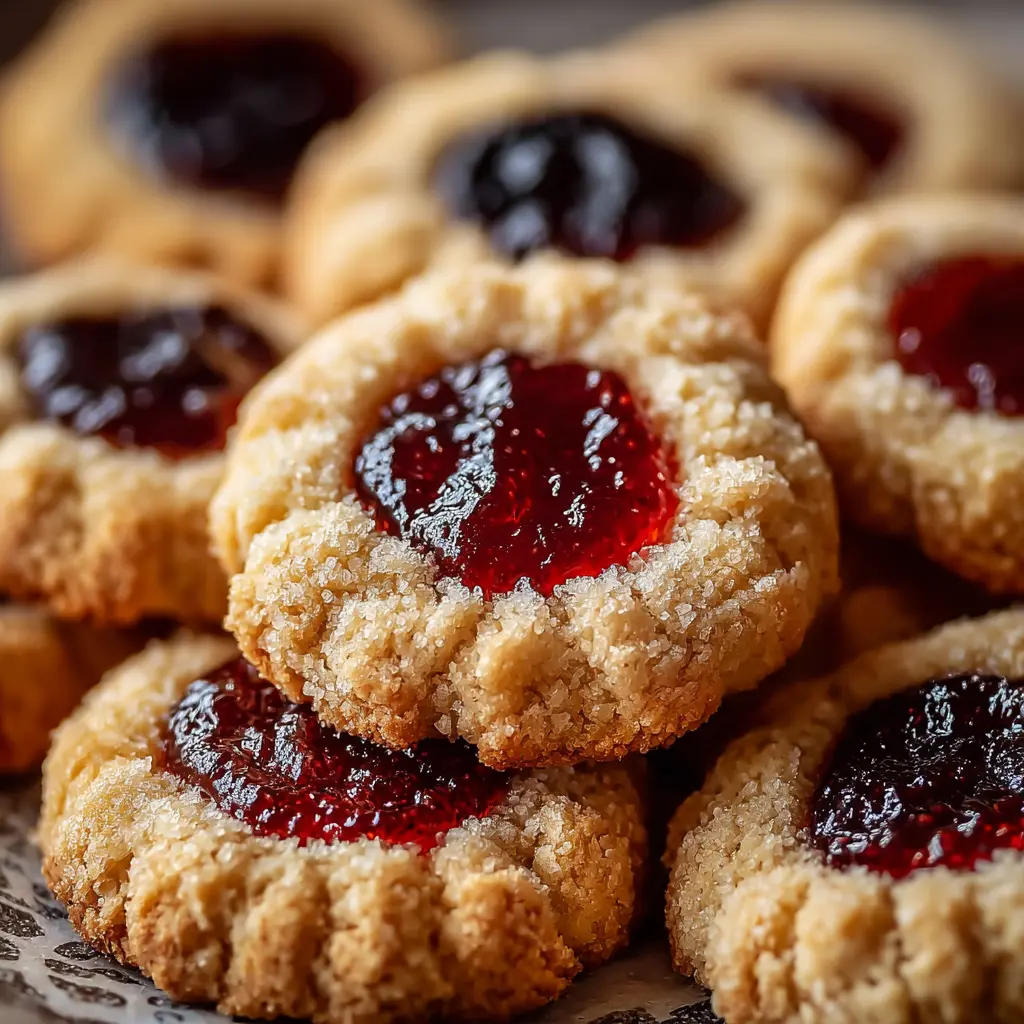
Classic fruit jam fillings
Of course, the traditional route is to fill your cookies with fruit jams. Strawberry, raspberry, or apricot preserves are excellent choices! The sweetness and tang perfectly complement the buttery cookie base. If you’re curious about homemade jams, this guide on making fruit preserves can inspire you to create custom flavors tailored to your liking.
Chocolate or nut butter alternatives
For thumbprint cookies that satisfy a chocolate or nut butter craving, why not swap out the jam for luscious fillings like Nutella or almond butter? Chocolate ganache can also make a decadent choice. The contrast of the rich fillings against the soft, crumbly cookie is simply divine! Additionally, if you’re looking for something grain-free, consider using a homemade cashew butter—delicious and nutritious! Check out this recipe from Minimalist Baker for inspiration.
Unique flavor combinations for adventurous bakers
If you’re feeling adventurous, experiment with unique flavor profiles! Think about filling your cookies with:
- Lemon curd for a zesty kick
- Matcha cream for a trendy twist
- Caramel sauce for that extra indulgence
These unexpected combinations can delight your friends and create memorable baking experiences. Why stick to the ordinary when the extraordinary is just a flavor away? Remember, baking should be fun, so don’t hesitate to mix it up and discover your new favorite!
Baking notes for Thumbprint Cookies
Tips for achieving the ideal texture and thickness
When making thumbprint cookies, the right balance of ingredients is crucial. For tender and chewy cookies, ensure your butter is softened to room temperature; this helps achieve that melt-in-your-mouth quality. Also, avoid overmixing the dough after adding flour, as this can lead to toughness. Shape your cookies with a gentle hand, keeping them about one inch thick. If you prefer crisper cookies, bake them a minute longer.
The importance of high-quality jam
The filling in your thumbprint cookies truly makes them shine, so don’t skimp on quality. Opt for a fruit jam or preserve that you love—ideally, one made with minimal ingredients. This not only enhances the flavor but also gives your cookies a beautiful, glossy finish. Brands like Bonne Maman or Smucker’s often deliver great results.
Adding a special touch to your thumbprint cookies
Want to elevate your thumbprint cookies? Consider incorporating a pinch of sea salt on top right before baking or mixing in some finely chopped nuts for added texture. A drop of almond or vanilla extract in the dough can also boost the flavor profile. If you’re feeling adventurous, experimenting with unusual jams like fig or spicy pepper can add a unique twist!
Serving suggestions for Thumbprint Cookies
Perfect pairings with milk or coffee
Enjoying thumbprint cookies goes beyond just the cookie itself; it’s all about the experience. A classic pairing is a glass of ice-cold milk, which beautifully complements the sweetness of your cookies. The rich, creamy texture balances perfectly with the fruity jam filling, making it a nostalgic treat. Alternatively, if you prefer a warm beverage, a smooth cup of coffee or a latte can elevate your cookie experience to new heights. The robust flavors of coffee offer a delightful contrast to the sweet, buttery notes of the cookies.
Creative ways to present your cookies
To impress guests, consider how you present your thumbprint cookies. Arrange them on a cute tiered cake stand for an inviting display that draws guests in. You could also package them in clear cellophane bags tied with twine for a charming homemade gift. Personalize each cookie with different fillings—experiment with raspberry, lemon, and chocolate to create a colorful platter that entices the eye and taste buds. For inspiration, check out this creative guide on cookie presentations from Food Network!
With these ideas, you’ll take your cookie enjoyment to the next level. Happy baking!
Tips for making perfect Thumbprint Cookies
How to Avoid Spreading Cookies During Baking
When it comes to thumbprint cookies, avoiding spreading is key for achieving that perfect shape. Here are a few tips:
- Chill the Dough: After mixing the dough, refrigerate it for at least 30 minutes. This solidifies the fats and keeps your cookies from spreading too much.
- Use Parchment Paper: Line your baking sheet with parchment to prevent sticking and help maintain the cookie shape.
- Opt for Accurate Measurements: Make sure you’re measuring flour correctly—too little can lead to flat cookies. Using a digital scale can help!
Secrets to Ensure a Well-Formed Indentation
Creating that signature thumbprint can be tricky. Here’s how to get it just right:
- Gentle Pressure: When you press your thumb into the dough, apply gentle pressure to form an indentation without flattening the cookie entirely. A silicone spatula can also work well for this.
- Chill Again: If the dough is a little too soft after shaping, pop the tray in the fridge for a few minutes before baking. It helps retain the shape!
Storing Your Cookies for Freshness
Fresh cookies are the best! Here’s how to keep your thumbprint cookies delightful for days:
- Airtight Containers: Store your cookies in airtight containers to keep them soft and chewy.
- Layering with Parchment: If you have a lot of cookies, layer them with parchment paper to prevent sticking.
- Freezing for Longer Storage: Want to save some for later? Freeze your cookies in a single layer on a baking sheet, then transfer them to an airtight container.
Finding the balance between chewy and firm is essential in crafting the perfect thumbprint cookie. For more tips and recipe variations, you might want to check out Joy of Baking or Serious Eats! Happy baking!
Time details for Thumbprint Cookies
Preparation time
Making thumbprint cookies is a breeze, with a preparation time of approximately 15-20 minutes. This includes gathering all your ingredients, as well as rolling and shaping the dough balls. You’ll love how quickly you can move through this initial stage, leaving you more time to enjoy the delicious final product.
Baking time
The baking time for these delightful cookies is around 12-15 minutes. It’s the perfect time to grab a cup of tea or coffee while your kitchen fills with a heavenly aroma. Just make sure to keep an eye on them to achieve that golden-brown finish!
Total time
When you combine the preparation and baking times, the total time to whip up these thumbprint cookies is about 30-35 minutes. So, whether you’re baking for an event or just indulging yourself, you can have these treats ready in no time. For an extra kick, try pairing them with a refreshing herbal tea—it’s a match made in heaven!
If you’re interested in more delightful cookies, check out resources like The Food Network for endless ideas.
Nutritional information for Thumbprint Cookies
When you’re indulging in thumbprint cookies, knowing their nutritional content can help you enjoy them guilt-free.
Calories
Each cookie generally contains about 90-100 calories, making them a delightful treat without overdoing it. These cookies are perfect for a sweet snack or a dessert option.
Sugar content
The sugar content varies depending on your choice of fillings, but a standard thumbprint cookie typically has around 6-8 grams of sugar. Opting for a fruit jam can provide natural sweetness while keeping it deliciously fruity!
Dietary considerations
- Allergen alert: Thumbprint cookies often contain gluten, making them unsuitable for those with celiac disease. Consider gluten-free flour alternatives if you want to adapt the recipe.
- Vegan options: You can easily make these cookies vegan by substituting butter with coconut oil or vegan butter, and using a flaxseed egg instead.
- Low-sugar variations: For a healthier version, try using sugar substitutes like Stevia or erythritol for a lower sugar count.
So, whether you’re snacking or sharing, you can make these cookies fit into your lifestyle! For more information on sugar content in baked goods, check out the USDA’s FoodData Central. Remember, moderation is key!
FAQs about Thumbprint Cookies
What can I use instead of jam for the filling?
While traditionally thumbprint cookies are filled with jam, you have a world of flavorful options at your fingertips! Here are some delightful alternatives:
- Nut butters: Try almond or peanut butter for a creamy twist.
- Chocolate ganache: Melt some dark chocolate with heavy cream for a rich, decadent filling.
- Caramel sauce: For those who have a sweet tooth, caramel will elevate your cookies to new heights.
- Fruit curds: Lemon or passion fruit curd adds a zesty, refreshing element!
These alternatives can be just as delicious as the classic jam, so don’t hesitate to experiment!
How can I store leftover thumbprint cookies?
If you find yourself with leftover thumbprint cookies—though it’s a rare occasion—you can keep them fresh for later. Here’s how:
- Room temperature: Store them in an airtight container for up to a week.
- Refrigerator: For extended freshness, you can refrigerate them for up to two weeks, but the texture may change slightly.
- Freezing option: Wrap them in plastic wrap and place them in a freezer bag to store for up to three months. Just thaw them at room temperature when you’re ready to enjoy!
Can I make these cookies gluten-free?
Absolutely! Making gluten-free thumbprint cookies is easier than you think. Substitute all-purpose flour with a blend of gluten-free flours such as almond flour, coconut flour, or a pre-packaged gluten-free flour mix. Just remember that you might need to tweak the liquid ratios a bit, so start with small incremental changes.
For more tips on gluten-free baking, check out resources like The Gluten-Free Baker. Enjoy the process, and happy baking!
Conclusion on Thumbprint Cookies
The joy of homemade treats and memories
As you wrap up your thumbprint cookie adventure, take a moment to savor not just the delightful flavors but also the joyful experience of baking these delectable treats. There’s something magical about creating a batch of thumbprint cookies; they connect us to cherished memories, whether it’s in your own kitchen or shared with loved ones.
Baking allows us to express creativity and bring smiles to faces. Why not gather friends for a fun baking session? Sharing these nostalgic cookies can deepen bonds and create lasting memories. You can even explore variations by trying different fillings like lemon curd or peanut butter. For more creative ideas, check out this insightful baking blog.
Enjoy your thumbprint cookies; they’re more than just sweets—they’re a delicious way to celebrate life’s little moments.
Print
Thumbprint Cookies: The Best Indulgent Treat for Every Occasion
- Total Time: 35 minutes
- Yield: 24 cookies
- Diet: Vegetarian
Description
These thumbprint cookies are a delightful and indulgent treat, perfect for any event or occasion.
Ingredients
- 1 cup unsalted butter, softened
- 1 cup granulated sugar
- 2 large eggs
- 1 teaspoon vanilla extract
- 2 cups all-purpose flour
- 1 teaspoon baking powder
- 1/4 teaspoon salt
- 1 cup fruit preserves (e.g., raspberry, apricot)
Instructions
- Preheat your oven to 350°F (175°C).
- In a large bowl, cream together the butter and sugar until smooth.
- Beat in the eggs one at a time, then stir in the vanilla.
- Combine the flour, baking powder, and salt; gradually stir into the creamed mixture.
- Roll dough into 1-inch balls and place them on a baking sheet.
- Use your thumb to press a small indent into the center of each ball, and fill with your choice of fruit preserves.
- Bake for 12-15 minutes until lightly golden.
- Allow to cool on wire racks.
Notes
- For a touch of elegance, dust cooled cookies with powdered sugar.
- Experiment with different flavors of preserves to suit your taste.
- Prep Time: 20 minutes
- Cook Time: 15 minutes
- Category: Desserts
- Method: Baking
- Cuisine: American
Nutrition
- Serving Size: 1 cookie
- Calories: 120
- Sugar: 5g
- Sodium: 30mg
- Fat: 7g
- Saturated Fat: 4g
- Unsaturated Fat: 2g
- Trans Fat: 0g
- Carbohydrates: 12g
- Fiber: 0g
- Protein: 1g
- Cholesterol: 30mg
")