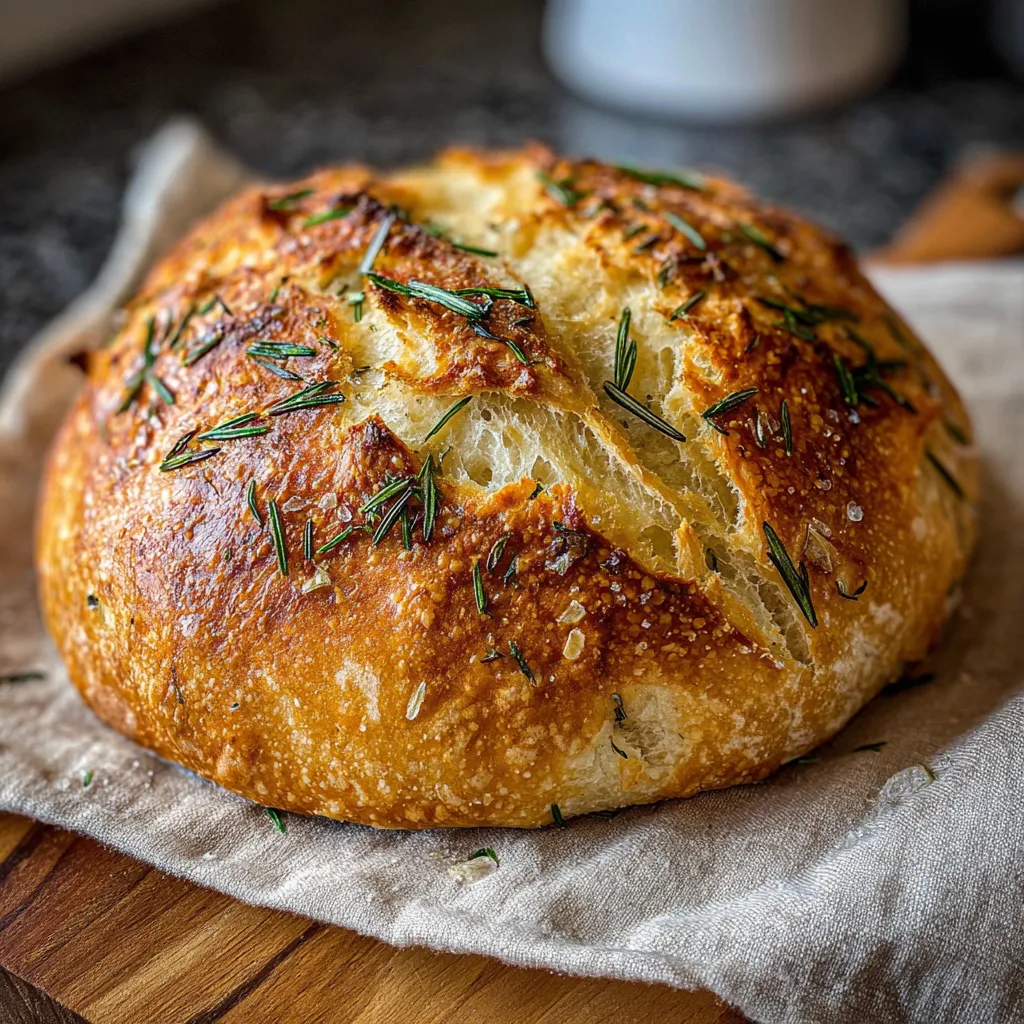
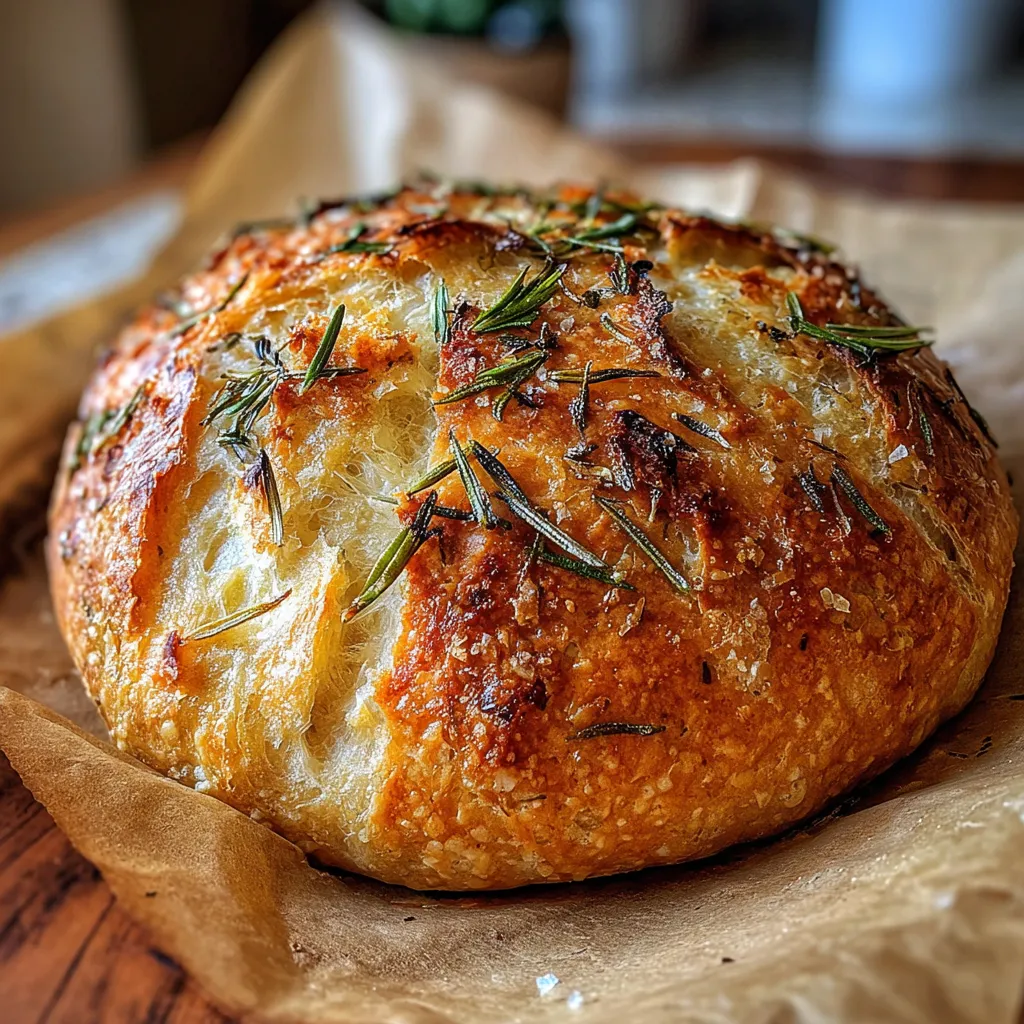
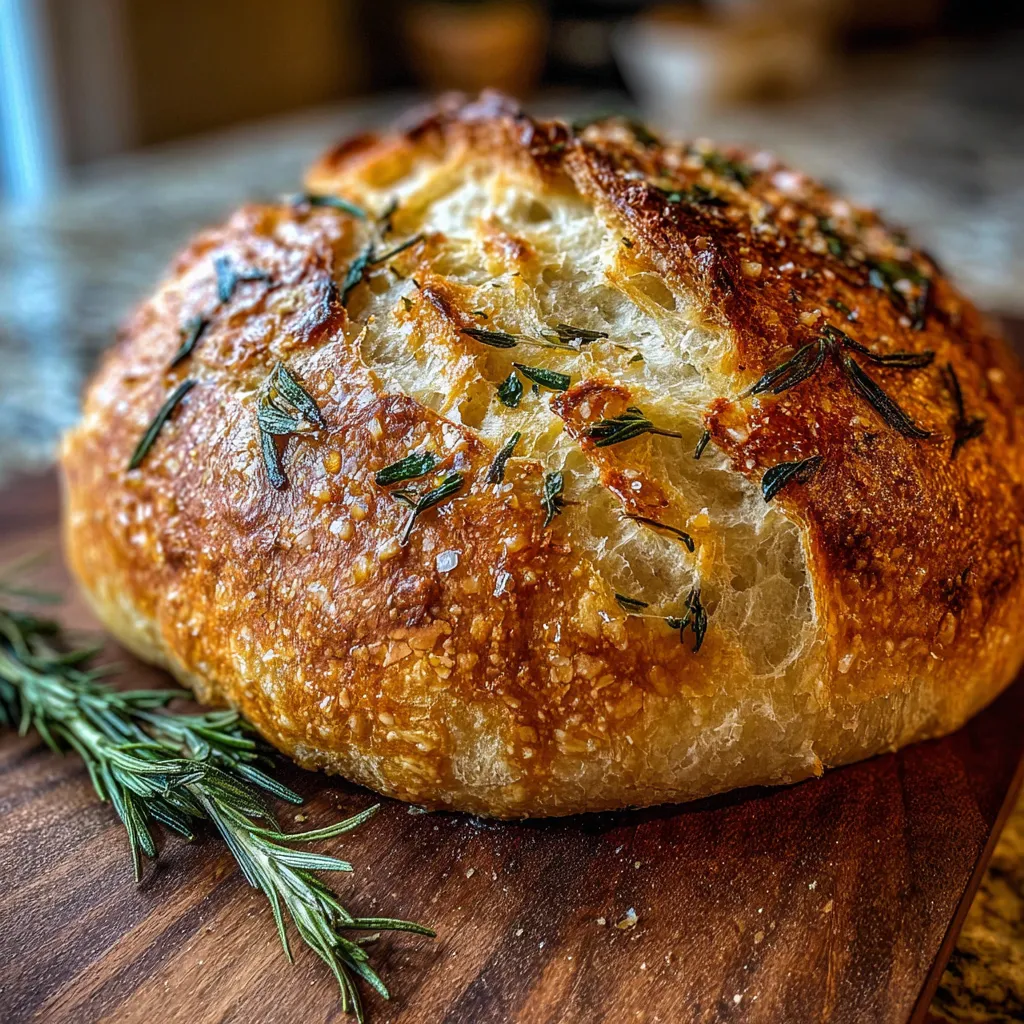
There’s something magical about the smell of freshly baked bread wafting through your kitchen—especially when it’s this Rustic No-Knead Rosemary Garlic Bread. With its crisp golden crust, chewy interior, and fragrant hints of garlic and rosemary, it’s the kind of bread that makes you feel like a seasoned baker, even if you’ve never touched a bag of yeast before.
The best part? You don’t need a stand mixer. You don’t even need to knead. This is truly a set-it-and-forget-it kind of recipe that rewards you with bakery-quality results and only a handful of ingredients. Whether you’re planning a cozy weekend dinner, need the perfect companion for a hearty soup, or want to impress with minimal effort, this bread’s got your back.
Let’s dive into why this bread should be the next thing you bake.
Why You’ll Love This Recipe
Key Benefits
It’s truly no-knead.
If the idea of kneading dough intimidates you or you simply don’t have the time, this recipe takes all that stress away. You mix the dough in one bowl with a spoon or your hands, cover it, and let time do the rest.
A flavor bomb in every bite.
Fresh rosemary adds earthy brightness, while garlic gives the bread a rich, savory depth. The slow fermentation during the long rise builds layers of flavor that taste like something from an artisan bakery.
Crusty outside, soft inside.
Thanks to a Dutch oven and high-heat baking, you get that signature crispy crust with a tender, chewy middle that’s perfect for dipping, toasting, or just eating warm with butter.
Foolproof and flexible.
This recipe is incredibly forgiving. Forgot about it for a few extra hours? No big deal. Want to add olives or cheese? Go for it. It’s your bread—make it yours.
Suitable For
-
Beginners. Never baked bread before? This is a great place to start.
-
Busy folks. Minimal hands-on time means you can fit it into even the busiest schedule.
-
Holiday hosts. This bread feels fancy but doesn’t require hours of effort.
-
Vegetarian diets. Naturally meat-free, and you can customize with plant-based spreads or dips.
-
Anyone who loves garlic bread. This is garlic bread’s grown-up cousin—more rustic, more depth, and even more addictive.
Ingredients for Rustic No-Knead Rosemary Garlic Bread

Core Ingredients
You only need a few pantry staples, but each one plays an important role:
-
All-purpose flour (3 cups): The foundation of the bread. Bread flour also works if you want extra chew.
-
Salt (1 1/2 teaspoons): Enhances flavor and supports gluten development.
-
Instant yeast (1/2 teaspoon): Just a little goes a long way, thanks to the long fermentation.
-
Warm water (1 1/4 cups): Activates the yeast. It should be warm to the touch—not hot.
-
Olive oil (2 tablespoons): Adds richness and helps keep the crumb moist.
-
Garlic (2 cloves, minced): Use fresh for the strongest flavor. Roasting is an option if you prefer a mellow taste.
-
Fresh rosemary (1–2 tablespoons, chopped): Adds herbal brightness. Dried rosemary (1 tsp) is a great alternative if that’s what you have.
Substitutions and Tips
-
Fresh vs dried rosemary: Both work beautifully. If using dried, give it a quick rub between your fingers to release its oils.
-
Roasted garlic: Swap in roasted garlic for a sweeter, milder garlic profile. Just mash it into the dough.
-
Flour type: Bread flour gives a slightly chewier result, while whole wheat flour can be used in part for a more rustic feel—just don’t go more than 50% or the loaf may get dense.
-
Add-ins: Try folding in chopped olives, sun-dried tomatoes, or shredded Parmesan for a delicious twist.
-
Gluten-free: Use a 1:1 gluten-free flour blend. Results may vary, but it can be done!
Best Rosemary for Rustic No-Knead Bread
Fresh rosemary is ideal here. It brings a vibrant, woodsy flavor and makes the whole kitchen smell incredible while it bakes. Look for sprigs that are deep green and pliable—not dry or brittle.
If all you have is dried rosemary, no worries. Crush it lightly before adding it to the dough to bring out its essential oils. You could even mix rosemary with a bit of thyme or sage for a fun herbal variation.
Pro tip: If you grow your own rosemary, this is the recipe to show it off.
Kitchen Tools You’ll Need
Must-Have Tools
You don’t need a lot of fancy gadgets, but a few essentials will make your bread-baking smooth and enjoyable:
-
Dutch oven (or heavy oven-safe pot with lid): This is key for creating steam and achieving that beautiful crust.
-
Large mixing bowl: For combining and rising the dough.
-
Parchment paper: Makes it easier to transfer the dough into the hot pot and helps with cleanup.
-
Measuring cups and spoons: Accuracy matters, especially with flour and yeast.
Nice-to-Have Tools
Not essential, but definitely helpful:
-
Dough scraper or bench knife: Great for shaping and moving sticky dough.
-
Silicone spatula: Makes mixing easier and helps you get every bit of dough out of the bowl.
-
Cooling rack: Allows air to circulate under the bread so the crust stays crisp.
-
Instant-read thermometer: Want to be extra precise? The bread is done when the internal temperature hits about 200–210°F.
How to Make Rustic No-Knead Rosemary Garlic Bread
Let’s get to the heart of this recipe—the part where your kitchen starts smelling like a cozy countryside bakery. Making this Rustic No-Knead Rosemary Garlic Bread is a calm, low-stress process that lets time (and a warm corner of your kitchen) do most of the work.
Here’s the full step-by-step, from mixing to baking. You don’t need experience—just a little patience, a big bowl, and the willingness to let the dough do its thing.
Step 1: Mix the Dough
This step takes five minutes, tops.
In a large mixing bowl, whisk together 3 cups of all-purpose flour, 1½ teaspoons salt, and ½ teaspoon instant yeast. Now pour in 1¼ cups of warm water and 2 tablespoons of olive oil. Stir until a shaggy, sticky dough forms—it won’t look pretty yet, but that’s totally okay.
Add in the minced garlic and chopped rosemary, and mix just until they’re evenly distributed. You don’t want to overwork it—just fold the ingredients in gently.
At this stage, your dough will be sticky and loose. That’s what you want. Resist the urge to add more flour—it’s supposed to look a little messy.
Tip: Use a silicone spatula or wooden spoon. If you’re mixing with your hands, wetting them first can help keep the dough from sticking.
Step 2: First Rise (12 to 18 Hours)
Cover the bowl with plastic wrap or a clean kitchen towel. Let it sit at room temperature for at least 12 hours, or up to 18 if you’re planning ahead. You want a warm, draft-free space—inside your (turned-off) oven with the light on works great.
After the rise, the dough will be puffed up, bubbly, and doubled in size. It should jiggle slightly when you move the bowl. That’s the magic of slow fermentation—it develops the flavor and gives your bread that gorgeous texture.
Don’t worry if you’re off by a few hours—this dough is forgiving.
Step 3: Shape the Loaf
Generously flour your countertop and gently turn the dough out of the bowl. It’s going to be soft and sticky, so use floured hands or a bench scraper to help guide it.
Give it a couple of gentle folds (like folding a letter in thirds), then shape it loosely into a round or oval. Don’t knead—just shape. You’re building a bit of structure without deflating all the air bubbles.
Place the shaped dough onto a sheet of parchment paper. That parchment will make it easy to transfer the loaf into your Dutch oven later.
Step 4: Second Rise (30 to 60 Minutes)
Cover the dough with a clean towel and let it rest again for about 30 to 60 minutes. It should look a little puffier but not dramatically larger.
This short rise helps the gluten relax and preps the dough for its final transformation in the oven.
Optional: Sprinkle a little coarse sea salt on top before baking for extra flavor and a beautiful finish.
Step 5: Preheat the Oven (and the Dutch Oven)
While the dough is rising, place your Dutch oven (with the lid on) into the oven and preheat it to 450°F (230°C). This step is key—the hot Dutch oven mimics a professional steam oven, helping you get that crackly crust.
Let it preheat for at least 30 minutes so the pot is truly hot.
Be careful when removing the pot later—it’ll be scorching. Oven mitts are your best friend here.
Step 6: Bake the Bread
When the dough is ready and the pot is blazing hot, carefully remove the Dutch oven from the oven. Using the edges of the parchment paper, lift the dough and lower it into the pot—paper and all.
Put the lid back on and bake for 30 minutes. This traps steam, which creates that crisp, crackling crust.
After 30 minutes, remove the lid and continue baking for another 10 to 15 minutes. The loaf should be deep golden brown and sound hollow when tapped on the bottom.
Tip: If you have an instant-read thermometer, aim for an internal temperature of 200–210°F.
Step 7: Cool and Serve
Once it’s out of the oven, transfer the bread to a cooling rack. Let it rest for at least 20 minutes before slicing. This part is tough (it smells amazing), but it’s important—the cooling process finishes the bake and helps set the crumb.
Slice thick, toast it, or tear off a warm piece and dunk it in olive oil. However you eat it, you’ll be hooked.
Tips for Success
Here are a few extra pointers to make sure your loaf turns out just right:
-
Use warm, not hot water. Water that’s too hot can kill the yeast. Aim for just slightly warmer than body temp.
-
Give it time. This dough develops flavor during the long rise. Don’t rush it if you can avoid it.
-
Stick with parchment. It makes transferring the dough easy and prevents sticking in the Dutch oven.
-
Play with toppings. A pinch of sea salt or a drizzle of olive oil on top before baking adds great flavor and texture.
-
Resist over-handling. This dough is delicate. Keep shaping to a minimum to preserve those airy bubbles.
How to Store Rustic No-Knead Rosemary Garlic Bread
Fresh homemade bread doesn’t last forever—but here’s how to make the most of it.
At Room Temperature
Wrap the cooled loaf in a clean kitchen towel or store it in a paper bag. This keeps the crust from getting soggy. It’ll stay fresh for about 2–3 days. Avoid plastic bags, which can make the crust soft.
In the Refrigerator
This isn’t ideal, as refrigeration can dry the bread out. But if you must, wrap it tightly in plastic and store in the fridge for up to 4 days. Toasting will help bring it back to life.
Freezing Tips
Want to make a loaf ahead? This bread freezes beautifully.
-
Slice the cooled loaf and wrap tightly in foil or plastic wrap.
-
Place in a freezer-safe bag and store for up to 2 months.
-
To reheat, toast slices directly from frozen or warm the whole loaf in a 300°F oven for 10–15 minutes.
Frequently Asked Questions (FAQs)
Can I make this gluten-free?
Yes, but results can vary. Use a 1:1 gluten-free flour blend designed for baking. Expect a slightly different texture, but still tasty.
Can I speed up the rise time?
You can! Place the dough in a slightly warm (not hot) oven with the light on. This can reduce the rise time, but keep in mind, longer fermentation gives more flavor.
What if I don’t have a Dutch oven?
No problem. Use any heavy pot with a lid that’s oven-safe to 450°F. You can also bake it on a baking sheet with a pan of water in the oven for steam—but the crust may not be quite as crisp.
Can I refrigerate the dough?
Absolutely. After the first rise, pop the dough in the fridge (covered) for up to 2 days. Bring it back to room temp before shaping and baking.
Related Recipes
If you loved this Rustic No-Knead Rosemary Garlic Bread, you might enjoy these other savory bakes:
-
Cheesy Garlic Pull-Apart Bread – Loaded with gooey cheese and roasted garlic flavor.
-
No-Knead Whole Wheat Bread – A healthy twist on the classic, no kneading needed.
-
Herb Focaccia with Sea Salt – Soft, chewy, and perfect for dipping in olive oil.
-
Easy Skillet Cornbread – Crispy edges, moist center, and no fuss.
-
Sourdough Starter Guide – Want to level up your bread game? Start here.
Conclusion
There’s a quiet joy in baking your own bread. It’s simple, grounding, and wildly satisfying—especially when the results are as stunning as this Rustic No-Knead Rosemary Garlic Bread. With just a handful of ingredients and a little patience, you’ll have a crusty, golden loaf that’s perfect for sharing, gifting, or just savoring all to yourself.
Print
Rustic No-Knead Rosemary Garlic Bread
- Total Time: 13 hours (including rise time)
- Yield: 1 loaf (8–10 slices)
- Diet: Vegetarian
Description
A rustic no-knead rosemary garlic bread that’s crusty on the outside, soft inside, and full of flavor. Made effortlessly in a Dutch oven.
Ingredients
- 3 cups all-purpose flour
- 1 1/2 teaspoons salt
- 1/2 teaspoon instant yeast
- 1 1/4 cups warm water
- 2 tablespoons olive oil
- 2 cloves garlic, minced
- 1–2 tablespoons fresh rosemary, chopped (or 1 tsp dried rosemary)
- Optional: coarse sea salt for topping
Instructions
- In a large bowl, mix flour, salt, and yeast.
- Add warm water and olive oil, stirring until a sticky dough forms.
- Stir in minced garlic and rosemary evenly.
- Cover and let rise at room temperature for 12–18 hours.
- Turn dough onto floured surface and gently shape into a loaf.
- Let it rest on parchment paper for 30–60 minutes.
- Preheat oven to 450°F with Dutch oven inside.
- Transfer dough with parchment into the Dutch oven. Cover and bake for 30 minutes.
- Remove lid and bake an additional 10–15 minutes until golden brown.
- Cool on wire rack for 20 minutes before slicing.
Notes
- Use fresh rosemary for the best flavor.
- Let the dough rise overnight for deep flavor.
- Roasted garlic can be used for a milder garlic flavor.
- Spritz loaf with water before baking for extra-crispy crust.
- Prep Time: 10 minutes
- Cook Time: 45 minutes
- Category: Bread
- Method: Baking
- Cuisine: American
Nutrition
- Serving Size: 1 slice
- Calories: 160
- Sugar: 0.4g
- Sodium: 230mg
- Fat: 3.5g
- Saturated Fat: 0.5g
- Unsaturated Fat: 2.8g
- Trans Fat: 0g
- Carbohydrates: 27g
- Fiber: 1g
- Protein: 4g
- Cholesterol: 0mg
")