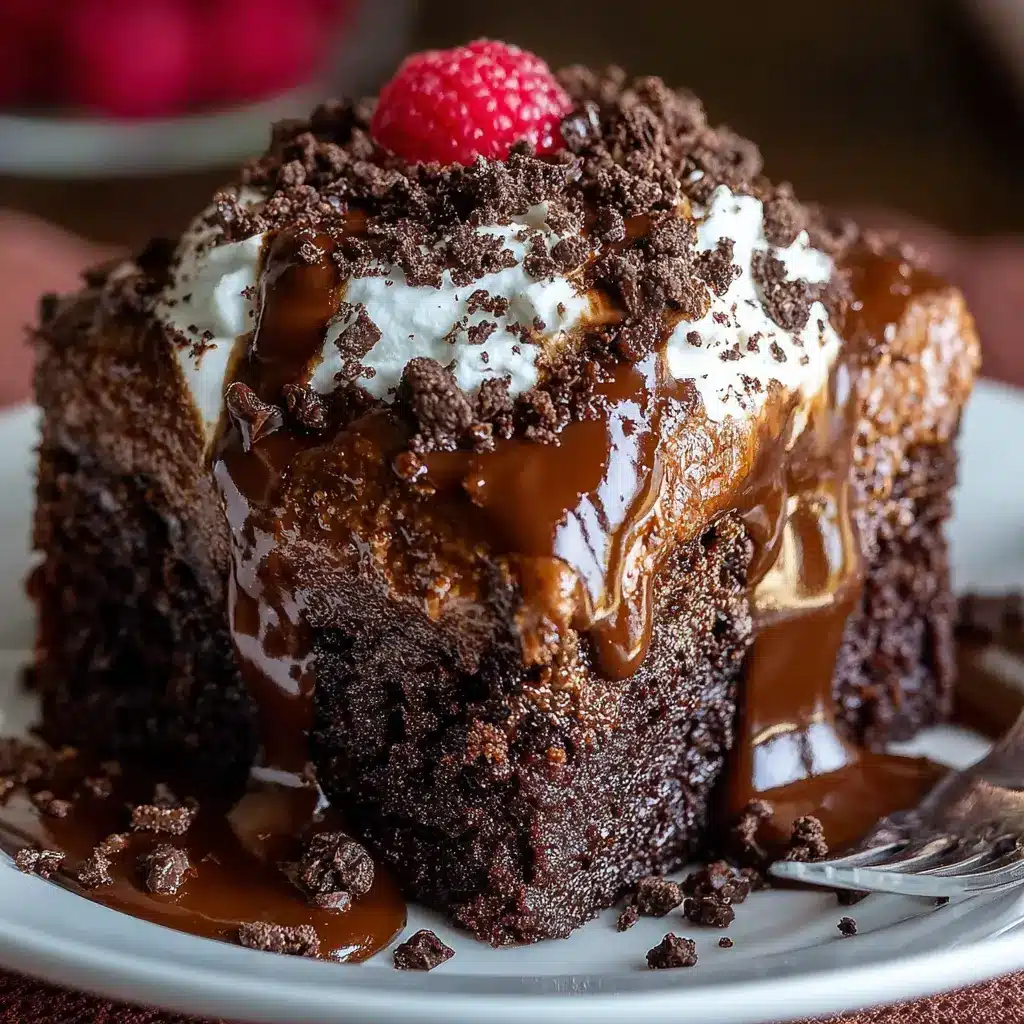
Introduction to Reese’s Peanut Butter Earthquake Cake
What is an Earthquake Cake?
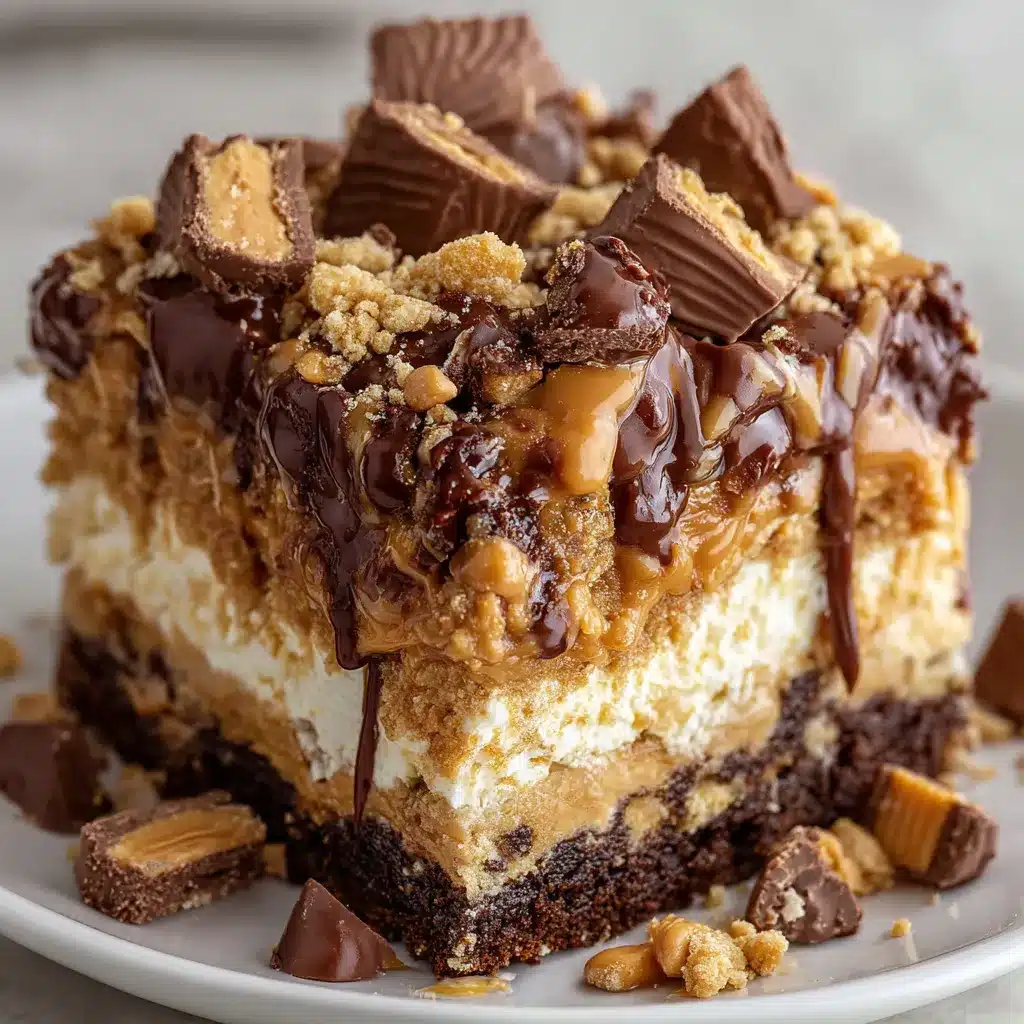
If you’ve been scrolling through dessert trends, you might have stumbled upon the magnificent Earthquake Cake. This dessert is named not just for its appearance but for the delightful chaos of flavors and textures it presents. Typically, an Earthquake Cake consists of a rich chocolate cake base filled with melted chocolate, cream cheese, and earthy peanut butter notes that seem to ‘shake’ together perfectly—hence the name!
What sets the Reese’s Peanut Butter Earthquake Cake apart is its incorporation of classic Reese’s Peanut Butter Cups, making this dessert a chocolate and peanut butter lover’s paradise. As it bakes, the layers sink and bubble, creating fissures that ooze with gooey sweetness. It’s truly a sight to behold (and a joy to taste)!
Why is this cake perfect for young professionals?
Let’s be honest—between juggling work responsibilities, social commitments, and maybe even starting a side hustle, figuring out what dessert to whip up can feel overwhelming. The Reese’s Peanut Butter Earthquake Cake is the perfect solution! Here’s why:
- Easy to Make: This cake requires minimal prep time and basic ingredients you likely have on hand. Simply grab a box of chocolate cake mix, cream cheese, and Reese’s Peanut Butter Cups, and you’re halfway there.
- Crowd-Pleaser: Hosting friends for a casual get-together? This cake will steal the show. Its combination of chocolate and peanut butter ensures it appeals to a wide audience—after all, who doesn’t love a slice of chocolatey goodness?
- Make-Ahead: Busy weeks can leave little to no time for baking. The Reese’s Peanut Butter Earthquake Cake can be made in advance and stored for a few days. This way, you’ll always have a sweet treat ready to impress, even when time is tight.
In a world where we’re often looking for quick and simple but delicious solutions, this cake stands as a testament that gourmet desserts can be approachable and fun. Ready to dive into this baking adventure? Check out this guide on basic baking tips to bolster your kitchen confidence!
Ingredients for Reese’s Peanut Butter Earthquake Cake
Main ingredients needed
Creating a Reese’s Peanut Butter Earthquake Cake is a fun and satisfying adventure in the kitchen, requiring a few staple ingredients that you might already have on hand:
- Chocolate cake mix: The base of your cake, bringing rich flavor and ease.
- Cream cheese: For that delightful gooey center, make sure it’s softened.
- Peanut butter: Preferably creamy to blend easily with the cream cheese.
- Powdered sugar: This adds sweetness and helps thicken the cheese mixture.
- Eggs: Essential for binding your ingredients together.
- Vegetable oil: For moisture and richness.
- Reese’s pieces and mini peanut butter cups: The stars of the show, providing that iconic flavor.
Common substitutes for ingredients
Sometimes you may find yourself short on an ingredient. Here are some handy substitutes you can consider for your Reese’s Peanut Butter Earthquake Cake:
- Greek yogurt for oil: Use plain Greek yogurt to keep the cake moist and add a protein boost.
- Nutty alternatives for peanut butter: If you’re allergic, almond or cashew butter works well too.
- Non-dairy cream cheese: A great option for those who are vegan or lactose intolerant.
Before you know it, you’ll have a delicious cake ready to impress your friends and family! For more baking tips, consider checking out Food Network’s baking section.
Preparing Reese’s Peanut Butter Earthquake Cake

When it comes to dessert that will knock your socks off, Reese’s Peanut Butter Earthquake Cake is definitely a showstopper. Imagine biting into a rich chocolate cake with a gooey peanut butter surprise in the center! Let’s walk through each step to ensure your cake turns out sensational.
Preheat the oven
First things first, you want to make sure your oven is ready to go. Preheat it to 350°F (175°C). Preheating is key to achieving that perfectly baked cake with a delightful texture. While you wait for the oven to heat up, you can gather all your ingredients and equipment—make it a little easier on yourself! Check out some tips on the importance of preheating ovens in this helpful article.
Prepare the chocolate cake batter
Now comes the fun part! In a large mixing bowl, combine:
- 1 box of chocolate cake mix
- 1 cup of water
- 1/2 cup of vegetable oil
- 3 large eggs
Stir until everything is well blended. You’re aiming for a smooth batter without lumps. This isn’t just any chocolate cake; it’s the foundation of your Reese’s Peanut Butter Earthquake Cake. Feel free to use a hand mixer for a fluffier texture. Once it’s thoroughly mixed, set it aside while you whip up the peanut butter filling.
Make the peanut butter filling
Now let’s create that irresistible peanut butter filling! In a separate bowl, mix together:
- 8 oz of cream cheese (softened)
- 1 cup of creamy peanut butter
- 2 cups of powdered sugar
- 1/2 tsp of vanilla extract
This mixture should be smooth and creamy, making it easy to swirl into your cake later on. If you’re a fan of chunky peanut butter, go for it! Adding a bit of crunch might just elevate the cake even further. Wouldn’t that be amazing?
Drop and swirl the peanut butter mixture
After you’ve prepped both the chocolate cake batter and the peanut butter filling, it’s time to combine them. Pour half of the chocolate batter into your greased and floured 9×13-inch baking pan. Next, take your peanut butter mixture and drop spoonfuls over the chocolate layer.
Once you’ve added the peanut butter filling, use a knife to gently swirl it into the chocolate batter. This swirling action not only creates that beautiful marbled effect, but it also ensures that each slice gets a taste of both worlds—the chocolate and the creamy peanut butter.
Add toppings and bake
But we’re not done yet! To truly take your Reese’s Peanut Butter Earthquake Cake over the top, it’s time to add some toppings. Sprinkle some chocolate chips, chopped Reese’s Peanut Butter Cups, and a handful of peanuts over the top of the cake. The crunch from the peanuts and the melted chocolate chips will create a gorgeous texture contrast once baked.
Pop it in the preheated oven and let it bake for about 40-45 minutes, or until a toothpick inserted into the center comes out clean. Once baked, let it cool in the pan for at least 15 minutes before transferring it to a wire rack. This will give you the perfect opportunity to savor the irresistible aroma wafting through your kitchen.
If you’re looking for more delicious desserts to try, feel free to explore Baker’s Royale for extensive options. You’ll be baking like a pro in no time!
Enjoy the delicious process of creating this Reese’s Peanut Butter Earthquake Cake—it’s sure to be a hit with friends and family. Happy baking!
Variations on Reese’s Peanut Butter Earthquake Cake
Trying Out White Chocolate Chips
If you’re looking to switch things up a bit, consider adding white chocolate chips to your Reese’s Peanut Butter Earthquake Cake. The sweetness of white chocolate perfectly complements the rich peanut butter flavor. To incorporate them, simply stir in about a cup of white chocolate chips along with your regular ingredients. This variation not only adds visual appeal but also can create a delightful contrast in taste that may surprise your friends and family!
Dark Chocolate Cake Mix Alternative
Want a deeper, richer flavor? Swap your standard cake mix for a dark chocolate cake mix. The intensity of dark chocolate pairs beautifully with the creamy peanut butter center, giving your cake an indulgent twist that chocolate lovers will adore. Just follow the same preparation steps—dark chocolate really amps up the Reese’s Peanut Butter Earthquake Cake experience!
Adding Peanuts for Crunch
To add an extra layer of texture, think about incorporating some chopped peanuts into the mix. This upgrade not only enhances the crunch but also mirrors the iconic topping on a classic Reese’s cup. Scatter about half a cup of chopped peanuts on top before baking for a delicious crunch that contrasts with the soft, gooey interior. It’s a great way to increase the nutty flavor while delivering that satisfying bite.
Each of these variations provides a fresh take on a beloved dessert, making it easy to enjoy your Reese’s Peanut Butter Earthquake Cake in new ways. So, which variation are you excited to try first? For further inspiration, consider checking out Joy of Baking for unique cake ideas!
Cooking tips and notes for Reese’s Peanut Butter Earthquake Cake
Tips for achieving the perfect gooey center
When making your Reese’s Peanut Butter Earthquake Cake, a gooey center is key! Here are some tips to help you nail that delightful texture:
- Underbake slightly: Remove the cake from the oven while it’s still a bit jiggly in the center. It will firm up as it cools, leaving you with that luscious, molten core.
- Use room temperature ingredients: Bring your eggs and cream cheese to room temperature before mixing. This ensures a smoother batter, helping the cake bake more evenly.
- Layer wisely: Spread the peanut butter and chocolate chips evenly throughout the batter. This will not only enhance flavor but also contribute to that irresistible gooeyness.
Storage advice for leftovers
Did you manage to save some of your Reese’s Peanut Butter Earthquake Cake? Here’s how to keep it fresh:
- Refrigerate: Store leftovers in an airtight container in the fridge for up to five days.
- Freezing: For longer storage, wrap slices tightly in plastic wrap and foil before placing them in a freezer-safe bag. Enjoy within three months for the best flavor.
If you’re looking for additional tips, check out these cake storage guidelines for expert advice!
Serving suggestions for Reese’s Peanut Butter Earthquake Cake
Ideal occasions for serving
Thinking about when to indulge in a slice of Reese’s Peanut Butter Earthquake Cake? This dessert shines at various occasions.
- Birthday celebrations: It’s a guaranteed crowd-pleaser that adds a fun twist to traditional cake.
- Game nights: Who wouldn’t want a hefty slice while cheering on their favorite team?
- Casual get-togethers: Whether it’s a picnic in the park or a cozy movie night at home, this cake offers the perfect sweet touch.
Perfect pairings with non-alcoholic beverages
What goes perfectly with your Reese’s Peanut Butter Earthquake Cake? Here are some delightful beverage options that will elevate your dessert experience:
- Iced coffee: The rich coffee flavors beautifully complement the nutty sweetness of the cake.
- Milkshakes: Try a classic chocolate or vanilla milkshake for an indulgent pairing.
- Chai latte: The spiced warmth of chai balances the decadence of your cake.
Ready to serve up some smiles? Don’t hesitate to explore more about dessert pairings and hosting tips from Serious Eats or Food & Wine for more ideas!
Time breakdown for Reese’s Peanut Butter Earthquake Cake
Preparation Time
Planning to whip up a delicious Reese’s Peanut Butter Earthquake Cake? You’ll need about 20 minutes for preparation. This gives you just enough time to gather your ingredients, preheat the oven, and get everything ready for that heavenly mix of peanut butter and chocolate.
Baking Time
When the oven is set to 350°F (175°C), let your cake bake for 45 to 55 minutes. Trust me, the smell that wafts through your kitchen will make it totally worth the wait! You’ll know it’s done when the edges are golden brown, and a toothpick inserted in the center comes out clean.
Total Time
In total, you’re looking at around 1 hour and 15 minutes from start to finish. With such a straightforward process, it’s perfect for a weeknight treat or a weekend gathering. For additional tips on timing and adjustments, check out this helpful guide. Enjoy baking!
Nutritional facts for Reese’s Peanut Butter Earthquake Cake
Estimated calories per serving
Indulging in a slice of Reese’s Peanut Butter Earthquake Cake is a delightful treat. Each generous serving typically contains around 400-500 calories. This rich dessert is perfect for special occasions or just a cozy night in.
Key nutritional highlights
When indulging in this decadent cake, consider these nutritional aspects:
- Fats: It includes around 22 grams of fat, primarily from the peanut butter and chocolate, providing a satisfying richness.
- Sugars: Expect about 30 grams of sugar, which gives it that sweet, irresistible flavor.
- Protein: With around 6 grams of protein, thanks to the eggs and peanut butter, it offers a small boost in this area.
For more insights, the American Heart Association discusses the importance of balancing treats with nutrient-rich foods. So, while this cake is a treat, remember to combine it with wholesome meals throughout your day! Enjoy the deliciousness responsibly!
If you’re looking for alternatives to this classic, consider exploring healthier dessert options that still satisfy your sweet tooth!
FAQs about Reese’s Peanut Butter Earthquake Cake
Can I make this cake ahead of time?
Absolutely! One of the best things about Reese’s Peanut Butter Earthquake Cake is that it actually tastes even better after a day or two. To prepare it ahead of time, bake the cake and then let it cool completely. You can cover it with plastic wrap or store it in an airtight container for up to three days at room temperature. If you need it for a special event, it’s also fine to freeze the cake for up to a month! Just remember to let it thaw in the fridge overnight before serving.
What’s the best way to store this cake?
To maintain the deliciousness of your Reese’s Peanut Butter Earthquake Cake, store it in an airtight container at room temperature for a maximum of three days. If you want to prolong its life, refrigerate it. Ensure that it’s well-covered to keep it moist. When you’re ready to enjoy it, simply take it out and let it sit at room temperature for a bit to restore some of that lovely texture.
Can I replace peanut butter with other nut butters?
If you need to substitute peanut butter, you can use alternatives like almond butter or cash value butter. Just know that these substitutions might slightly alter the flavor and richness of the cake. For example, almond butter tends to be milder in taste. If you or someone you know has nut allergies, consider using sunflower seed butter as a peanut butter alternative. It’s a great option that remains nut-free and still delicious!
Looking for more tips on baking? Check out resources like the American Bakers Association or their pastry guide for additional insights!
Conclusion on Reese’s Peanut Butter Earthquake Cake
Why You Should Try Making This Cake Today!
If you’re searching for a dessert that merges rich chocolate with creamy peanut butter, then the Reese’s Peanut Butter Earthquake Cake is an absolute must-try. This decadent treat is not only eye-catching—with its molten centers and crumbles of Reese’s—but it also brings a unique twist to your dessert table.
Imagine the satisfying crunch of chocolate alongside the velvety embrace of peanut butter. With every bite, you’ll find yourself surrendering to its delightful mix of flavors. Plus, it’s incredibly easy to whip up, making it a perfect choice for both novices and seasoned bakers.
Don’t wait any longer! Gather your ingredients and get ready to enjoy a slice (or two) of this heavenly cake. Check out our other dessert ideas for more tasty inspiration!
For an in-depth look at similar chocolate desserts, you may want to explore resources like the Food Network or Serious Eats.
Print
Reese’s Peanut Butter Earthquake Cake: The Indulgent Treat You’ll Love
- Total Time: 55 minutes
- Yield: 12 servings
Description
Indulge in the decadent flavors of Reese’s Peanut Butter Earthquake Cake, a must-try treat for chocolate and peanut butter lovers!
Ingredients
- 1 box chocolate cake mix
- 1 cup water
- 1/2 cup vegetable oil
- 3 large eggs
- 1 cup creamy peanut butter
- 1 cup powdered sugar
- 1 cup Reese’s peanut butter cups, chopped
- 1 cup chocolate chips
- 1/2 cup heavy cream
Instructions
- Preheat your oven to 350°F (175°C).
- In a large bowl, mix the cake mix, water, vegetable oil, and eggs until well combined.
- Pour the batter into a greased 9×13 inch baking dish.
- In a separate bowl, combine the peanut butter and powdered sugar until smooth.
- Drop spoonfuls of the peanut butter mixture onto the cake batter, swirling with a knife to create a marbled effect.
- Sprinkle the chopped Reese’s peanut butter cups and chocolate chips on top.
- Bake for 30-35 minutes or until a toothpick inserted comes out clean.
- While the cake is baking, heat the heavy cream until just boiling.
- Pour the hot cream over the baked cake and let it sit for 10 minutes to absorb.
- Let cool before serving.
Notes
- For an extra indulgent treat, serve with whipped cream.
- Make sure to let the cake cool completely before slicing.
- Prep Time: 20 minutes
- Cook Time: 35 minutes
Nutrition
- Serving Size: 1 slice
- Calories: 320
- Sugar: 28g
- Sodium: 350mg
- Fat: 18g
- Saturated Fat: 8g
- Unsaturated Fat: 8g
- Trans Fat: 0g
- Carbohydrates: 40g
- Fiber: 2g
- Protein: 5g
- Cholesterol: 50mg
")