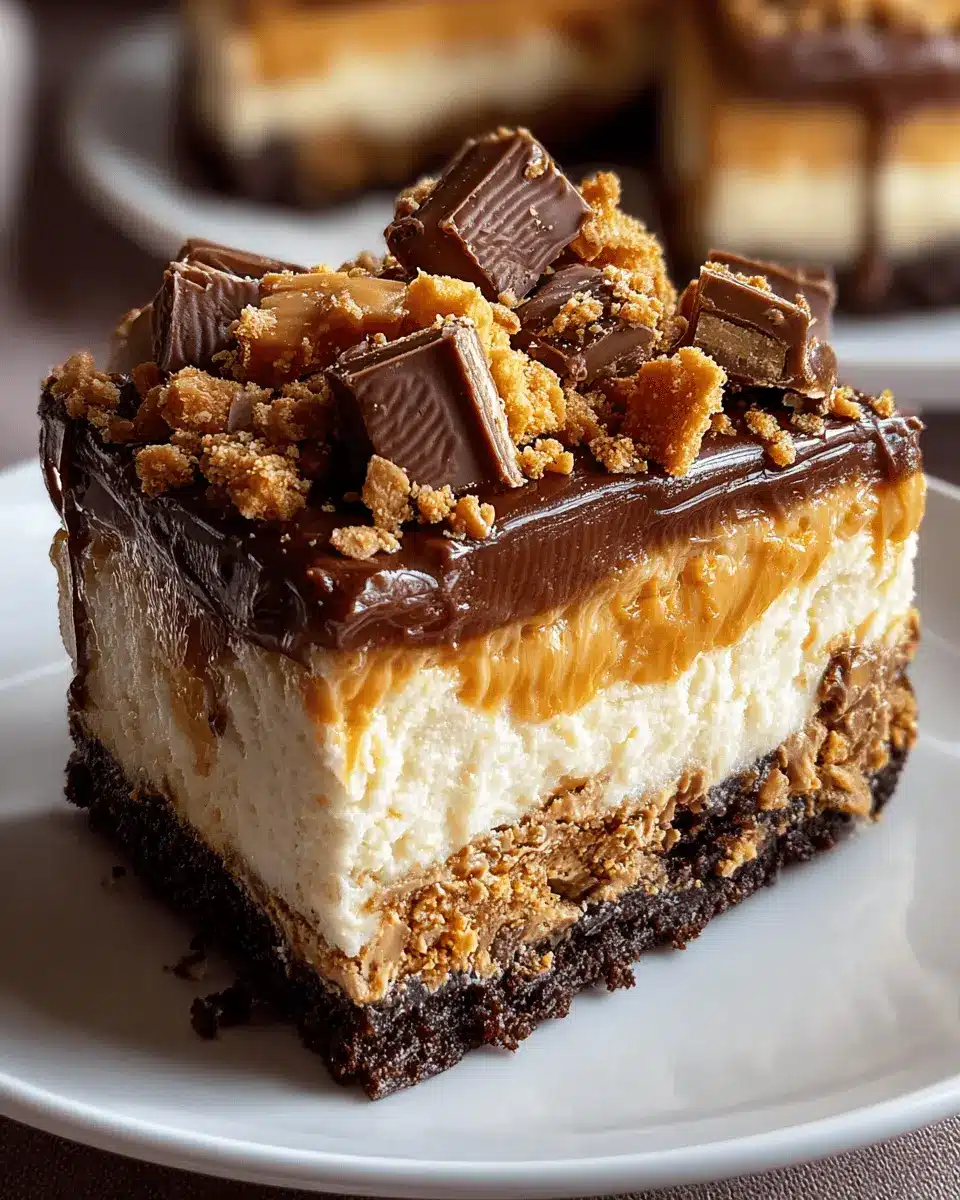
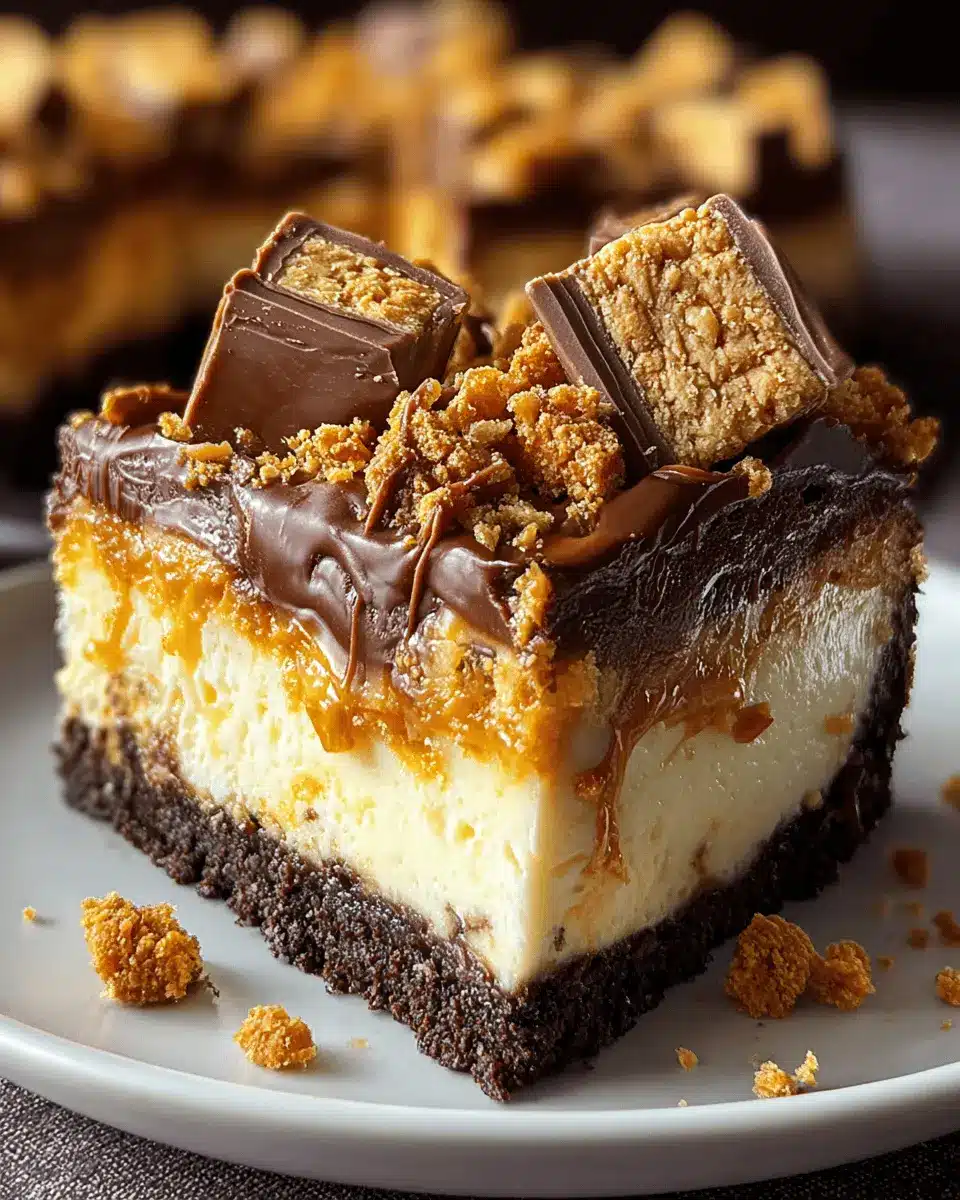
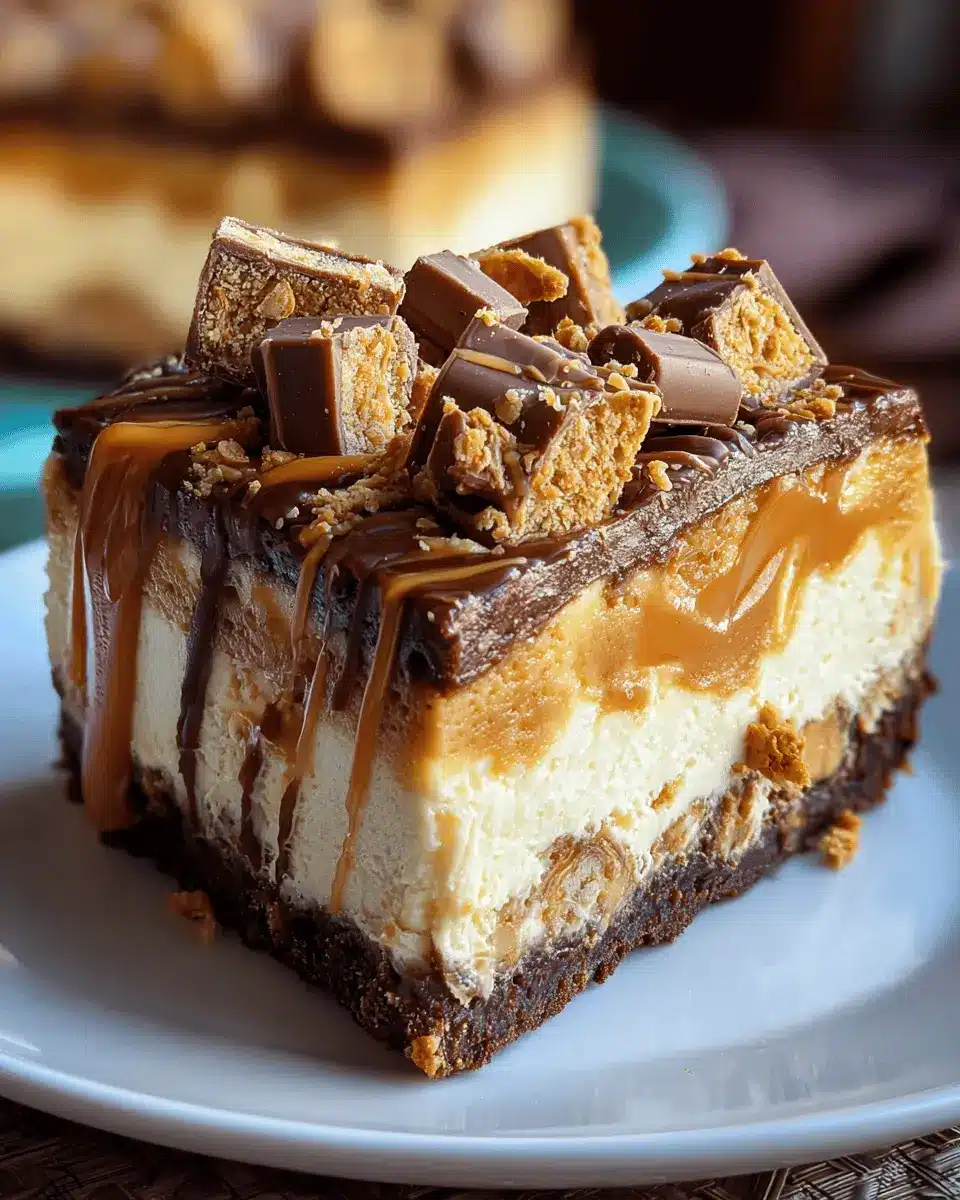
Introduction to Reese’s Butterfinger Cheesecake
Are you ready to elevate your dessert game? If you’re a busy young professional balancing work, social life, and maybe a side hustle, you deserve a sweet treat that captures both indulgence and nostalgia. Enter the Reese’s Butterfinger Cheesecake, a delightful blend of creamy cheesecake, rich peanut butter, and crunchy Butterfinger pieces that will make your taste buds dance with joy.
Why Reese’s Butterfinger Cheesecake is the Ultimate Dessert for Young Professionals
In today’s fast-paced world, finding the perfect dessert can be a challenge. This cheesecake is not just about flavor; it’s about the experience. Imagine coming home after a long day, feeling the stress melt away as you savor a slice of this heavenly dessert. It’s like a warm hug on a plate.
-
Quick and Easy to Make: Whether you’re hosting friends or planning a cozy night in, this cheesecake can be prepared ahead of time. Plus, it’s no-bake, meaning you can whip it up without spending hours in the kitchen. Perfect for the young professional with limited time but a love for great food!
-
Impress Your Guests: Your friends will think you’re a pro in the kitchen with minimal effort. Just picture their faces as they take the first bite—pure delight! The combination of rich cream cheese and the crunchy crust topped with chocolate and peanut butter will have them raving about it for weeks. Unleash the culinary star within!
-
Satisfies Multiple Cravings: Craving something creamy, nutty, and sweet? This cheesecake ticks all the boxes. With layers of flavor that echo childhood memories, a Reese’s Butterfinger Cheesecake fits perfectly into your busy lifestyle while comforting your inner child.
And speaking of childhood favorites, did you know that the nostalgic flavors of peanut butter and chocolate can trigger feelings of happiness? Research suggests that indulging in favorite foods can evoke memories, improving mood and providing emotional comfort.
So, get ready to embrace dessert that not only satisfies your sweet tooth but also fits seamlessly into the life of a young professional like you. Let’s dive into the recipe and create a show-stopping dessert for any occasion!
Ingredients for Reese’s Butterfinger Cheesecake
Creating the perfect Reese’s Butterfinger Cheesecake combines the delightful flavors of chocolate and peanut butter with a crunchy twist. Here’s a comprehensive list of what you’ll need to whip up this decadent treat.
For the Crust
- 1 ½ cups of chocolate cookie crumbs – You can use Oreos if you’re craving that classic flavor.
- ½ cup of unsalted butter – Melt it for easy mixing.
For the Filling
- 4 packages (8 oz each) of cream cheese – Make sure it’s softened; trust me, it makes a difference.
- 1 cup of granulated sugar – Sweetness is key here!
- 1 cup of creamy peanut butter – Feel free to taste-test as you go!
- 4 large eggs – These help set the cake perfectly.
- 1 teaspoon of vanilla extract – For that extra layer of flavor.
For the Toppings
- 1 cup of crushed Butterfinger candies – These will add that signature crunch.
- 1 cup of whipped cream – Light and fluffy is the way to go!
As you gather these ingredients, imagine the joy you’ll bring when you share this decadent dessert with friends. Who wouldn’t love a slice of this Reese’s Butterfinger Cheesecake? For tips on assembling and baking, check out the Food Network for additional insights that might inspire your culinary journey!
Step-by-Step Preparation of Reese’s Butterfinger Cheesecake
Preparing a decadent Reese’s Butterfinger Cheesecake is not just an act of baking; it’s an experience filled with sweet anticipation. If you’re ready to impress your friends at the next gathering or simply treat yourself, follow these easy steps!
Make the Crust with Oreo Cookies
The foundation of any great cheesecake is a delicious crust, and for this recipe, we’re using classic Oreo cookies. Here’s how you do it:
-
Ingredients:
-
24 Oreo cookies
-
5 tablespoons of unsalted butter, melted
-
Instructions:
- Preheat your oven to 325°F (160°C).
- In a food processor, crush the Oreo cookies into fine crumbs. If you don’t have a processor, you can use a ziplock bag and a rolling pin—stress relief and baking combined!
- Combine the cookie crumbs with the melted butter until the mixture resembles wet sand.
- Press this blend firmly into the bottom of a springform pan, ensuring it’s even.
- Bake in the preheated oven for about 10 minutes, then let it cool while you prepare the filling.
This crust is the perfect base for bringing together the rich flavors of chocolate and peanut butter. Plus, it’s super easy to make!
Create the Peanut Butter Cheesecake Filling
Now for the real star of the show—the peanut butter cheesecake filling. This combination is guaranteed to satisfy any sweet tooth.
-
Ingredients:
-
16 ounces cream cheese, softened
-
1 cup powdered sugar
-
1 cup creamy peanut butter
-
1 teaspoon vanilla extract
-
3 large eggs
-
Instructions:
- In a large mixing bowl, beat the softened cream cheese with an electric mixer until smooth and creamy.
- Gradually add the powdered sugar, mixing at a low speed until combined.
- Add in the peanut butter and vanilla extract, and mix thoroughly.
- Incorporate the eggs one at a time, ensuring each is fully mixed before adding the next.
This filling is where the Reese’s Butterfinger Cheesecake earns its glory. Imagine the heavenly taste of peanut butter paired with the sweet notes from the sugar — it’s pure magic!
Bake the Cheesecake Layer
Now it’s time to bring it all together with some baking magic!
- Instructions:
- Pour the peanut butter filling into the cooled crust and spread it evenly.
- Bake the cheesecake for about 55-65 minutes. The edges should be set, but the center will still be a bit jiggly.
- Turn off the oven, crack the door slightly, and let the cheesecake cool in the oven for about an hour. This helps prevent cracks!
Why all this cooling? It ensures your cheesecake has that perfect creamy texture without the dreaded cracks.
Prepare the Chocolate Topping
No cheesecake is complete without a decadent topping! For our Reese’s Butterfinger Cheesecake, we’ll create a rich layer of chocolate.
-
Ingredients:
-
8 ounces semi-sweet chocolate
-
1 cup heavy cream
-
Crushed Butterfinger bars for garnish
-
Instructions:
- In a saucepan, heat the heavy cream over medium heat until just below boiling.
- Add the chopped semi-sweet chocolate and stir until smooth.
- Once the cheesecake has cooled, pour the chocolate topping over the top, spreading it evenly.
- Sprinkle crushed Butterfinger pieces on top for that extra crunch and flavor.
Chill, Slice, and Serve
After all your hard work, it’s finally time to enjoy your creation!
- Instructions:
- Cover the cheesecake with plastic wrap and refrigerate for at least 4 hours or overnight—if you can resist!
- When you’re ready to serve, carefully run a knife around the edge of the pan and release the springform.
- Slice into wedges and enjoy your delicious Reese’s Butterfinger Cheesecake!
There you have it! This cheesecake is not just a dessert; it’s an experience that combines the best of chocolate and peanut butter. Remember, sharing is optional, but highly recommended. Treat your taste buds and indulge!
Variations on Reese’s Butterfinger Cheesecake
Additional Candy Options for the Filling
While the original Reese’s Butterfinger Cheesecake is a dream for chocolate and peanut butter lovers, why stop there? You can customize your cheesecake filling with a variety of candies for unique flavor profiles. Consider adding:
- Crushed Snickers: The caramel and nougat will add a chewy dimension.
- Mini M&Ms: Bright bursts of color and crunchy goodness take it up a notch.
- Toffee bits: For that additional caramelized crunch, toffee bits can be a game-changer.
- Chopped Twix: Not only does it bring cookie flavor, but the layers of caramel elevate the experience.
Feel free to mix and match based on your favorites or what you have on hand. For more ideas, check out Food Network’s candy section for some sweet inspiration!
Flavor Twists with Crushed Graham Crackers
Do you want your Reese’s Butterfinger Cheesecake crust to be the highlight of the dessert? Try infusing flavor into the crushed graham crackers! Instead of the classic version, experiment with these options:
- Cinnamon graham crackers: A touch of spice can create an exciting contrast to the sweetness.
- Chocolate graham crackers: For true chocolate devotees, this adds depth and richness.
- Oreo cookies: Crush up some Oreos for a cookie crust that pairs perfectly with peanut butter and chocolate.
By adjusting the crust flavors, you’re easily on your way to crafting a memorable dessert that reflects your personal taste. It makes the cheesecake even more delightful, and who wouldn’t want to enjoy a slice of that?
Adding these variations is an excellent way to get creative and impress your friends at your next gathering!
Cooking Tips and Notes for Reese’s Butterfinger Cheesecake
Ensuring a Smooth Cheesecake Consistency
To achieve that perfectly creamy texture in your Reese’s Butterfinger Cheesecake, room temperature ingredients are essential. Before you start mixing, let your cream cheese and eggs sit at room temperature for about 30 minutes. This helps to prevent clumps and ensures even mixing. For an added layer of fluffiness, beat the cream cheese until it’s silky smooth before adding the sugar. Remember, patience is key!
How to Avoid Overbaking
Overbaking is the nemesis of cheesecakes! To avoid this common pitfall, keep an eye on the time, and test for doneness a bit early. The cheesecake should be set around the edges but still slightly jiggly in the center. Additionally, consider using a water bath for gentle baking. This method, recommended by many pastry chefs, helps maintain moisture, resulting in a luscious cheesecake.
For more expert baking tips, check out resources from sites like Serious Eats or The Kitchn for dedicated baking advice. Happy baking!
Serving Suggestions for Reese’s Butterfinger Cheesecake
Perfect Pairings for Your Cheesecake Bars
Serving your Reese’s Butterfinger Cheesecake can be just as delightful as making it! Consider pairing your delectable cheesecake bars with a scoop of vanilla ice cream. The creamy texture and subtle sweetness of the ice cream balances beautifully with the rich flavors of the cheesecake. You could also serve it alongside a dollop of freshly whipped cream to elevate the experience instantly.
For a more refreshing option, try fresh berries like strawberries or raspberries. Their tartness complements the sweetness of the cheesecake, creating a delightful contrast. Want a drink suggestion? A rich cup of coffee or a refreshing iced tea can make for a great companion, enhancing the cheesecake’s unique flavor profile.
Creative Ways to Present Your Dessert
Presentation plays a crucial role in how we enjoy dessert. When serving your Reese’s Butterfinger Cheesecake, think about using fun serving dishes like mini mason jars or individual dessert plates. Drizzle some melted chocolate or caramel sauce over the top for a visually appealing touch, and sprinkle crushed Butterfinger pieces to add texture.
Consider decorating the platter with edible flowers or mint leaves for a pop of color. Not only does this make for an Instagram-worthy display, but it also adds a refreshing note to the rich cheesecake. Think of it—it’s all about creating an inviting atmosphere around your delicious creation, making every bite even more enjoyable. For more dessert presentation ideas, check out resources like The Spruce Eats where you can find various creative themes and recommendations.
Time Breakdown for Making Reese’s Butterfinger Cheesecake
Preparation Time
Getting started on your Reese’s Butterfinger Cheesecake? You’ll want to set aside about 15-20 minutes for preparation. This includes gathering all your ingredients, like cream cheese, sugar, and, of course, those delicious Reese’s and Butterfinger candy bars. Ensure you have everything at hand, so the process flows smoothly.
Baking Time
Once your cheesecake is prepped and layered, it will need about 50-60 minutes in the oven. Keep an eye on it; you’ll want that perfect golden-brown top without overbaking. A good tip is to use a toothpick to check the center—it should come out clean when it’s ready!
Total Time
In total, you’ll spend about 1 hour and 15 minutes cooking up this sweet masterpiece. After that, let it cool for a couple of hours before slicing into it. Trust me, the waiting will be worth it when you indulge in that rich, creamy slice of cheesecake, layered with all that peanut buttery goodness!
Consider adding some whipped cream on top for that extra flair. Check out our favorite whipped cream recipe here to elevate your dessert game even more! And if you’re wondering how to store leftovers (if there are any), get tips on proper storage methods here. Enjoy making your Reese’s Butterfinger Cheesecake!
Nutritional Facts for Reese’s Butterfinger Cheesecake
Caloric Breakdown
When you indulge in a slice of Reese’s Butterfinger cheesecake, it’s helpful to know what you’re treating yourself to. Typically, one slice contains around 400-500 calories. While this is a dessert that should be enjoyed in moderation, don’t forget that it combines the delightful flavors of creamy cheesecake, chocolate, and crunchy Butterfinger bits, making every calorie worthwhile!
Key Nutritional Information
Here’s a closer look at the nutritional stats for a slice of this heavenly cheesecake:
- Total Fat: ~30g
- Saturated Fat: ~15g
- Cholesterol: ~85mg
- Sodium: ~240mg
- Carbohydrates: ~38g
- Fiber: ~2g
- Sugars: ~25g
- Protein: ~6g
Reese’s Butterfinger cheesecake undoubtedly satisfies your sweet tooth, but balancing it with more nutritious options earlier in the day can make your indulgence a little less daunting. Feeling inspired to whip up this dessert? Check out more recipes on Healthline for fun and nutrition tips!
FAQs about Reese’s Butterfinger Cheesecake
Can I use low-fat cream cheese for this recipe?
Absolutely! If you’re looking to cut back on calories, using low-fat cream cheese is a fine substitution for the regular kind. Just keep in mind that it may slightly alter the texture, making it a bit less creamy. The flavor will still be deliciously rich, especially with the Reese’s and Butterfinger combo bringing in that sweet crunch. If you want the best of both worlds, consider a blend of regular and low-fat cream cheese for that perfect balance.
How do I store leftover cheesecake bars?
First off, lucky you for having leftovers! To store your Reese’s Butterfinger Cheesecake, let the bars cool completely, then cover them with plastic wrap or aluminum foil. You can also place them in an airtight container. Refrigerate for up to five days. If you want to keep them longer, consider freezing. Just make sure to wrap them tightly to prevent freezer burn—nobody wants that! When you’re ready to enjoy them again, simply thaw in the refrigerator overnight.
What’s the best way to serve cheesecake bars?
Serving these delightful bars can actually elevate your dessert game! For a casual gathering, simply slice them into squares and place them on a platter. You could also drizzle some extra chocolate sauce or caramel over the top for that added flair—because who doesn’t love an extra touch? If you’re feeling fancy, a scoop of vanilla ice cream on the side would make for an unforgettable dessert experience. And don’t forget to sprinkle some crumbled Butterfinger on top for a little bit of crunch!
Curious about more cheesecakes? Check out BBC Good Food for inspiration!
Conclusion on Reese’s Butterfinger Cheesecake
In closing, the Reese’s Butterfinger Cheesecake is more than just a dessert; it’s an experience. Imagine creamy cheesecake blended with the delightful crunch of Butterfinger and the rich taste of Reese’s peanut butter. It’s the ultimate treat for anyone looking to impress at a gathering or simply satisfy a sweet tooth at home.
When you serve this cheesecake, expect compliments to roll in. Plus, it’s easier to make than you might think! Don’t hesitate to customize the toppings or even experiment with flavors. For more creative dessert ideas, consider visiting resources like Taste of Home or Food Network. Enjoy this flavorful journey!
Print
Reese’s Butterfinger Cheesecake: An Indulgent Homemade Delight
- Total Time: 5 hours 20 minutes
- Yield: 8 servings
- Diet: Vegetarian
Description
Indulge in a rich and creamy Reese’s Butterfinger cheesecake, featuring the beloved flavors of chocolate, peanut butter, and buttery toffee bits.
Ingredients
- 1 package chocolate cookies
- 1/2 cup unsalted butter, melted
- 16 oz cream cheese, softened
- 1 cup granulated sugar
- 1 cup peanut butter
- 3 large eggs
- 1 teaspoon vanilla extract
- 1 cup whipped cream
- 1 cup Butterfinger candy, crushed
Instructions
- Preheat the oven to 325°F (160°C).
- In a bowl, combine chocolate cookie crumbs and melted butter; press into the bottom of a springform pan.
- In another bowl, beat cream cheese and sugar until smooth, then mix in peanut butter, eggs, and vanilla extract until well combined.
- Pour the cheesecake mixture over the crust and smooth the top.
- Bake for 50-60 minutes until set and slightly jiggly in the center.
- Allow to cool, then refrigerate for at least 4 hours or overnight.
- Top with whipped cream and crushed Butterfinger before serving.
Notes
- Use room temperature ingredients for a smoother batter.
- Feel free to adjust the sweetness by adding more or less sugar.
- Prep Time: 20 minutes
- Cook Time: 1 hour
- Category: Dessert
- Method: Baking
- Cuisine: American
Nutrition
- Serving Size: 1 slice
- Calories: 400
- Sugar: 30g
- Sodium: 250mg
- Fat: 27g
- Saturated Fat: 12g
- Unsaturated Fat: 10g
- Trans Fat: 0g
- Carbohydrates: 33g
- Fiber: 1g
- Protein: 8g
- Cholesterol: 90mg
")