Introduction
Easter is a time for bright colors, sweet treats, and family gatherings, and nothing captures that spirit better than a festive Easter Jell-O Pie. This no-bake dessert is as fun to make as it is to eat, featuring pastel layers of creamy, fruity Jell-O in a buttery graham cracker crust.
If you’re looking for an easy, eye-catching treat that’s perfect for Easter brunch or a spring celebration, this is it. The beauty of this recipe lies in its simplicity—just a handful of ingredients, no oven required, and a stunning result that will impress guests of all ages. Whether you’re a seasoned baker or someone who rarely steps into the kitchen, this recipe is foolproof and guaranteed to be a hit.
What makes this Easter Jell-O Pie special? It’s the perfect balance of creamy and jiggly textures, with flavors that blend beautifully. Plus, it’s a great way to get kids involved in the kitchen, letting them mix, pour, and watch as the layers come together.
Now, let’s dive into why you’re going to love this recipe and why it deserves a spot on your Easter menu.
Why You’ll Love This Easter Jell-O Pie
Key Benefits
No-Bake & Easy to Make
There’s no need to turn on the oven or worry about complicated techniques. This dessert comes together effortlessly, making it ideal for busy holiday prep.
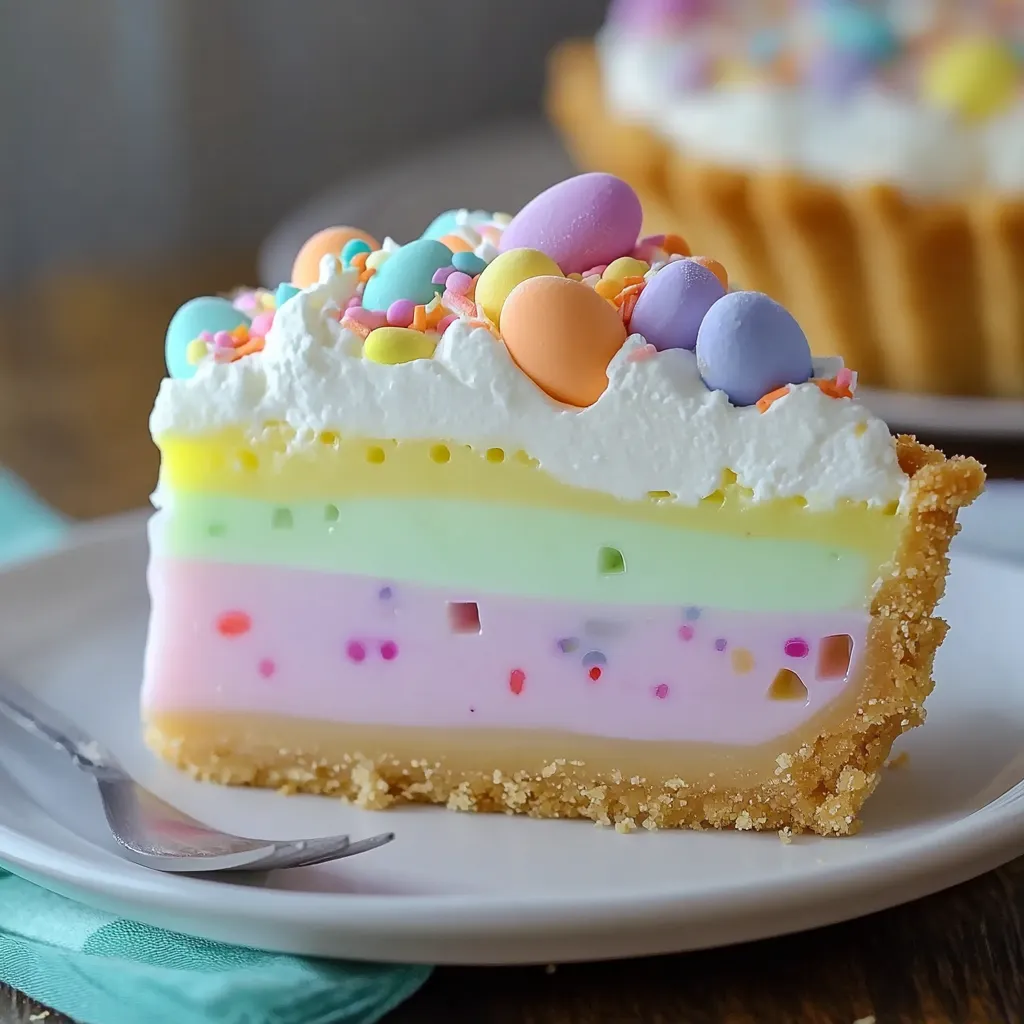
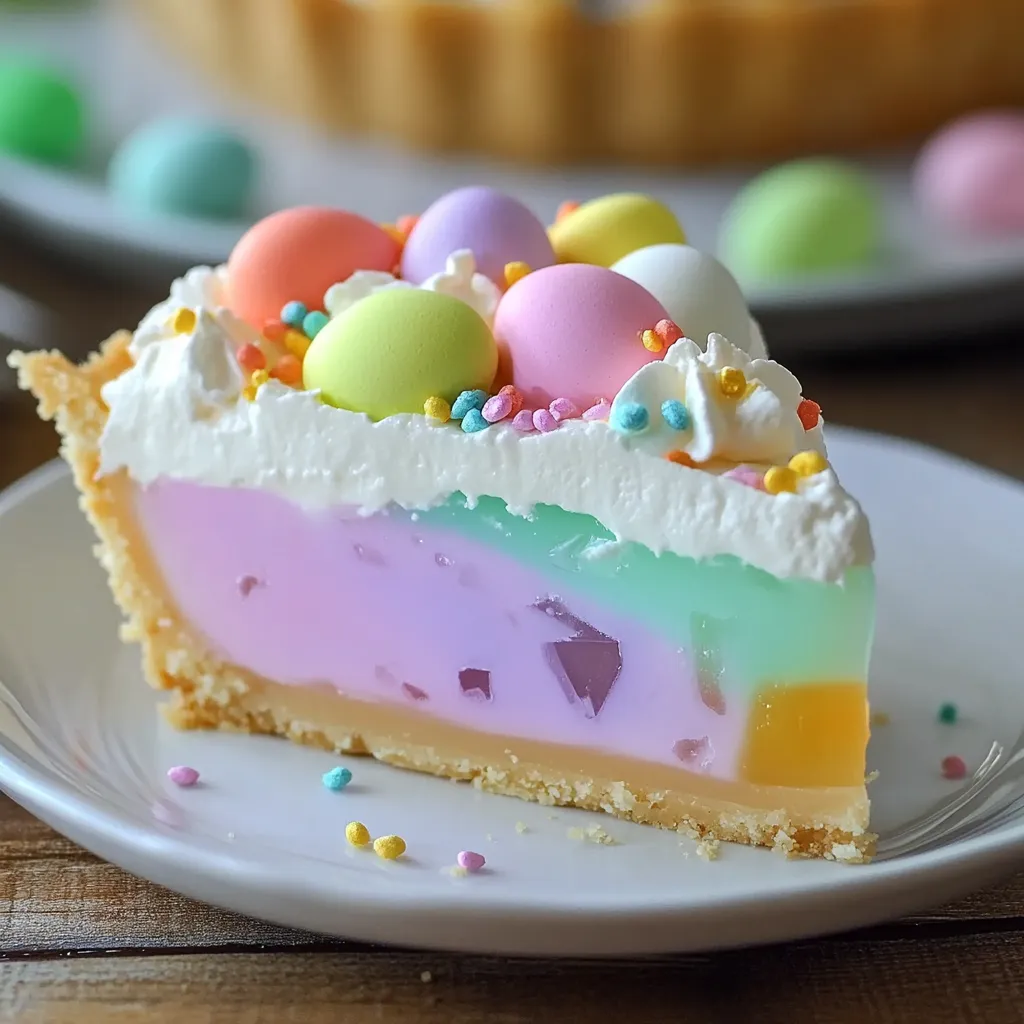
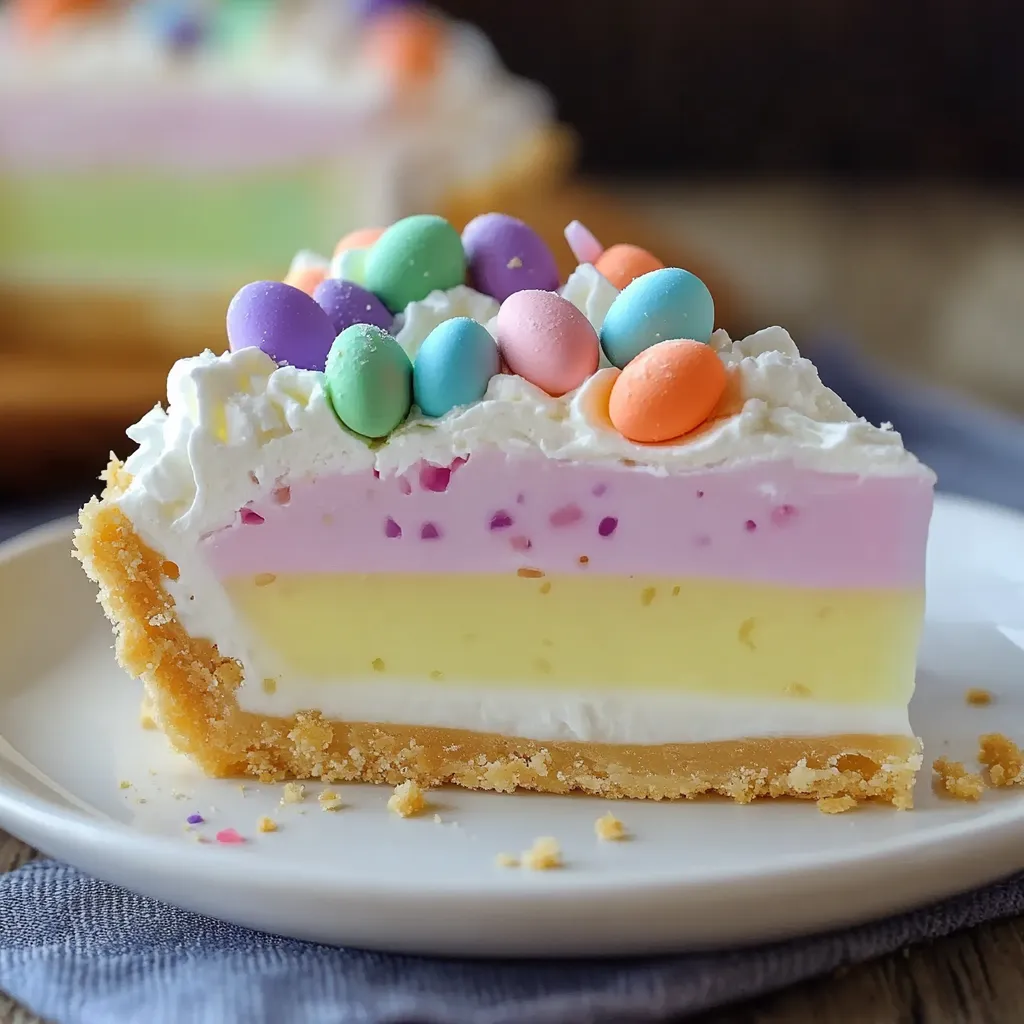
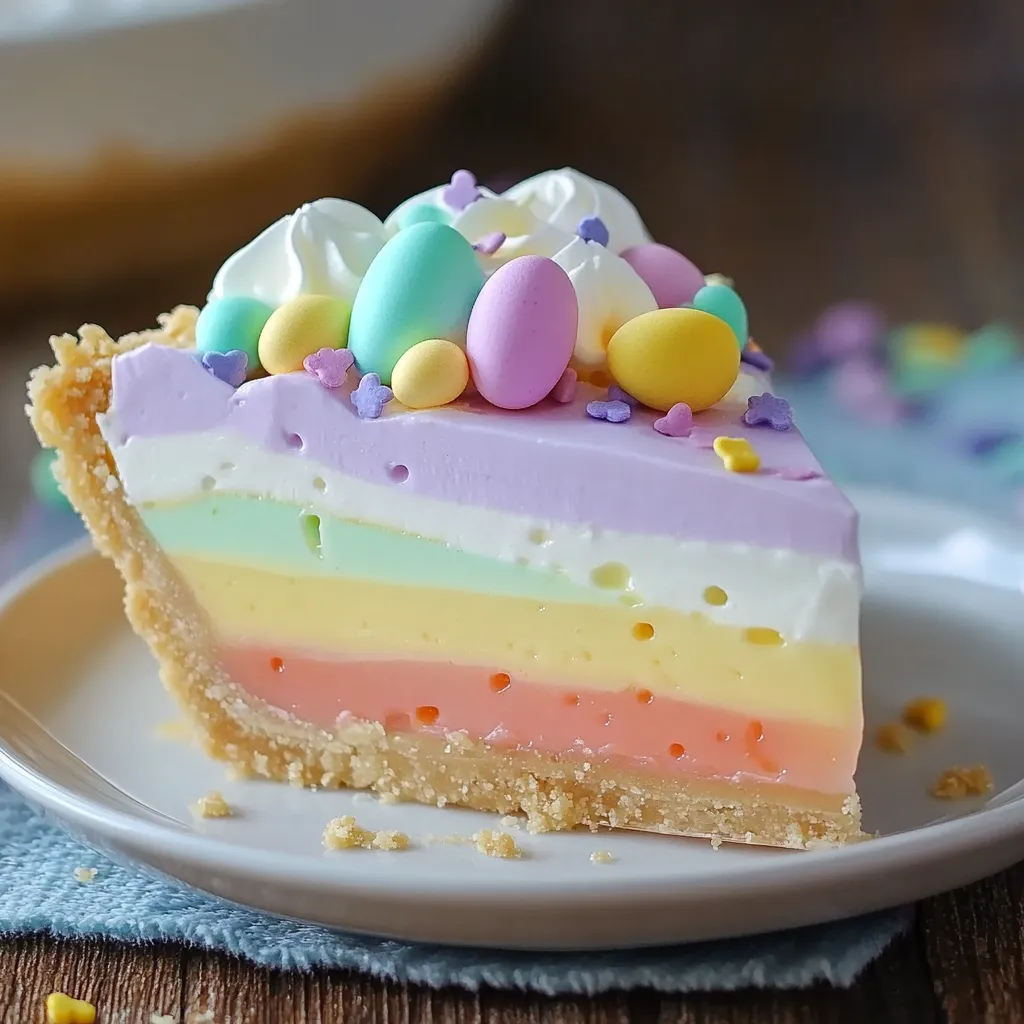
Beautiful Pastel Layers
The soft, dreamy colors of this pie make it a showstopper. When sliced, the layers reveal a stunning ombre effect that adds a touch of magic to any Easter table.
Kid-Friendly & Fun
This is the kind of recipe that kids love to help with. From mixing the Jell-O to watching the layers set, it’s a great way to introduce them to simple kitchen techniques while keeping things fun.
Make-Ahead Convenience
Holidays can be hectic, but this pie can be made the day before and left to chill in the fridge until you’re ready to serve. No last-minute stress—just slice and enjoy.
Who is This Recipe Perfect For?
- Families looking for a fun, festive dessert that everyone will enjoy.
- Beginners who want a foolproof recipe with impressive results.
- Busy hosts who need a make-ahead dessert to free up time for other Easter dishes.
- Anyone who loves Jell-O and wants a unique way to serve it beyond the classic bowl of gelatin.
This Easter Jell-O Pie is more than just a dessert—it’s a celebration of spring, color, and sweet simplicity. Now that you know why it’s a must-try, let’s take a look at what you’ll need to make it happen.
Ingredients for Easter Jell-O Pie
Core Ingredients
Here’s everything you’ll need to bring this colorful pie to life:
- 1 pre-made graham cracker crust – The buttery, crunchy base that holds everything together.
- ½ cup sweetened condensed milk – Adds a creamy richness that balances the fruity Jell-O flavors.
- 1 tub (8 oz) whipped topping (Cool Whip), thawed – Keeps the filling light and airy.
- 3 small boxes (3 oz each) of Jell-O in different pastel colors – Strawberry, lemon, and berry blue work beautifully for Easter.
- 1 cup boiling water per Jell-O flavor – Helps dissolve the Jell-O properly.
- ½ cup cold water per Jell-O flavor – Ensures the Jell-O sets to the right consistency.
- Pastel sprinkles or mini marshmallows (for garnish) – The finishing touch for a festive look.
Ingredient Substitutions & Tips
Want to make some swaps? Here are a few options:
- Homemade Graham Cracker Crust – If you prefer to make your own, mix 1 ½ cups of crushed graham crackers with 6 tablespoons of melted butter and ¼ cup sugar. Press into a pie dish and chill before using.
- Dairy-Free Option – Use coconut condensed milk and a dairy-free whipped topping alternative.
- Sugar-Free Version – Opt for sugar-free Jell-O and a sugar-free whipped topping to cut back on sweetness without sacrificing flavor.
- Different Jell-O Flavors – Feel free to mix it up with your favorite flavors. Peach, lime, or grape can create unique pastel hues.
Best Jell-O Flavors for Easter Jell-O Pie
Choosing the right flavors is key to achieving a beautifully layered look. The best options for an Easter theme are:
- Strawberry or Raspberry – Soft pink, sweet, and slightly tangy.
- Lemon – Light yellow, bright, and refreshing.
- Berry Blue – Pale blue, fruity, and mild.
If you want to create a twist on the classic, try using orange, lime, or grape. The color contrast will still be stunning, and the flavors will blend wonderfully.
Kitchen Tools You’ll Need
Must-Have Tools
This recipe is incredibly low-maintenance when it comes to equipment. Here’s what you’ll need:
- Mixing bowls – One for each Jell-O flavor.
- Whisk or hand mixer – To blend the whipped topping and sweetened condensed milk.
- Measuring cups – For precise liquid measurements.
- Spatula – For folding and layering the mixture smoothly.
Nice-to-Have Tools
If you want to elevate your presentation and make the process even easier:
- A clear pie dish – This allows the beautiful layers to shine through.
- Offset spatula – Helps spread each layer evenly.
How to Make Easter Jell-O Pie – Step by Step
Now for the fun part—putting it all together! This step-by-step guide ensures your layers come out smooth, distinct, and perfectly set.
Step 1: Prepare the Jell-O Mixtures
- In three separate bowls, add one box of Jell-O per bowl.
- Pour 1 cup of boiling water into each bowl and stir until the Jell-O completely dissolves.
- Stir in ½ cup of cold water into each mixture and let them cool slightly.
Step 2: Make the Creamy Filling
- In a large mixing bowl, combine the whipped topping and sweetened condensed milk. Mix until smooth.
- Divide this mixture evenly into three separate bowls.
- Slowly pour one cooled Jell-O flavor into each bowl, stirring gently until the colors are fully combined. You should now have three pastel-colored creamy mixtures.
Step 3: Assemble the Layers
- Pour the first Jell-O mixture into the graham cracker crust, smoothing it out with a spatula.
- Freeze for 10-15 minutes until it sets slightly before adding the next layer.
- Repeat the process with the second and third layers, freezing each layer briefly before adding the next. This ensures the colors don’t mix.
Step 4: Chill and Garnish
- Once all layers are set, refrigerate the pie for at least 4 hours, or overnight, until fully firm.
- Just before serving, decorate with extra whipped topping, pastel sprinkles, or mini marshmallows for a festive touch.
Now, all that’s left to do is slice into your gorgeous layered pie and enjoy!
Expert Tips for the Perfect Easter Jell-O Pie
Even though this is a simple recipe, a few small details can make all the difference. Here are my best tips to help you get flawless layers and the best texture.
Ensure Smooth and Even Layers
To keep your layers distinct and prevent them from blending together, always let each layer set before adding the next. A quick 10-15 minute freeze between layers works wonders—just enough to firm things up without fully freezing the pie.
Prevent Jell-O from Mixing
Pour each Jell-O mixture slowly and carefully over the previous layer. If you pour too fast, the layers might blend together. Using the back of a spoon to gently disperse the liquid as you pour can help.
Speed Up the Setting Process
If you’re short on time, you can pop the pie in the freezer instead of the refrigerator, but only for short periods. Keep in mind that freezing for too long can cause the Jell-O to develop an icy texture instead of that smooth, creamy finish.
Use a Clear Pie Dish for a Stunning Look
If you really want to show off those pastel layers, a glass or clear pie dish is a great choice. It makes the colors more visible and gives your dessert an extra wow factor.
How to Store Easter Jell-O Pie
At Room Temperature
This pie should always be served chilled, so avoid leaving it out for more than 30 minutes at a time. If it sits too long at room temperature, the Jell-O layers can soften and lose their shape.
In the Refrigerator
The best way to store Easter Jell-O Pie is in the refrigerator. Cover it loosely with plastic wrap or foil to keep it fresh. It will stay good for up to 3 days—but let’s be honest, it probably won’t last that long.
Freezing Tips
If you need to make this dessert well in advance, you can freeze it. However, there are a few things to keep in mind:
- Freeze it uncovered for the first hour to prevent condensation. Then wrap it tightly in plastic wrap and foil.
- Let it thaw in the refrigerator for a few hours before serving—this helps maintain the creamy texture.
- If you’re using fresh whipped cream for garnish, add it after thawing, not before freezing.
Frequently Asked Questions (FAQs)
Can I make Easter Jell-O Pie ahead of time?
Yes! In fact, it’s best made a day ahead so it has plenty of time to set properly. Just store it in the refrigerator until you’re ready to serve.
Can I use homemade whipped cream instead of Cool Whip?
Absolutely! Just make sure it’s stabilized whipped cream, so it holds its shape. To stabilize it, mix in a little powdered sugar or gelatin while whipping.
Why did my Jell-O layers mix together?
If your layers mixed instead of staying separate, it’s likely because the previous layer wasn’t set enough before adding the next. Be sure to freeze each layer for 10-15 minutes before pouring the next one.
Can I use sugar-free Jell-O?
Yes, sugar-free Jell-O works just fine. The texture will remain the same, but the sweetness level will be slightly reduced.
Related Recipes to Try
If you loved this Easter Jell-O Pie, you might enjoy these other festive desserts:
- Lemon Raspberry Cupcakes – A bright, tangy treat perfect for spring.
- Pineapple Upside-Down Cupcakes – A tropical twist on a classic dessert.
- Peeps Cupcakes – Fun, colorful cupcakes featuring Easter’s favorite marshmallow candy.
These related recipes complement the Easter Jell-O Pie and will add even more sweetness to your holiday spread.
Final Thoughts
Easter Jell-O Pie is the kind of dessert that’s just as fun to make as it is to eat. Whether you’re making it for a family gathering, a festive spring brunch, or just because you love bright and cheerful desserts, this pie is a guaranteed crowd-pleaser.
The layers are creamy and fruity, the texture is light and airy, and best of all—it’s incredibly easy to put together. Once you make it, don’t be surprised if it becomes a new Easter tradition in your home.
Try it out, and if you do, let me know how it turned out. I’d love to hear if you used different flavors, added your own twist, or shared it with loved ones. Enjoy!
Print
Easter Jell-O Pie Recipe
- Total Time: 4 hours 15 minutes
- Yield: 8-10 servings
Description
This Easter Jell-O Pie is the perfect festive dessert—easy to make, beautifully layered, and no-bake! With a creamy texture and fruity flavors, this pie is a hit for any spring celebration.
Ingredients
- 1 pre-made graham cracker crust
- ½ cup sweetened condensed milk
- 1 tub (8 oz) whipped topping (Cool Whip), thawed
- 3 small boxes (3 oz each) of Jell-O in different pastel colors (strawberry, lemon, berry blue)
- 1 cup boiling water per Jell-O flavor
- ½ cup cold water per Jell-O flavor
- Pastel sprinkles or mini marshmallows (for garnish)
Instructions
Step 1: Prepare the Jell-O Mixtures
- Dissolve each Jell-O flavor in 1 cup boiling water in separate bowls.
- Stir in ½ cup cold water and let them cool slightly.
Step 2: Make the Creamy Filling
- Mix whipped topping and sweetened condensed milk until smooth.
- Divide into three equal portions and mix each with a different Jell-O flavor.
Step 3: Assemble the Layers
- Pour one Jell-O mixture into the graham cracker crust and smooth it out.
- Freeze for 10-15 minutes before adding the next layer.
- Repeat until all layers are added, freezing briefly between each.
Step 4: Chill & Garnish
- Refrigerate for at least 4 hours (or overnight).
- Garnish with extra whipped topping, pastel sprinkles, or mini marshmallows.
Notes
- For best results, let each layer set slightly before adding the next.
- Use a clear pie dish for a beautiful presentation.
- Can be made a day in advance for convenience.
- Prep Time: 15 minutes
- Cook Time: 4 hours
- Category: Dessert
- Method: No-bake
- Cuisine: American
Nutrition
- Calories: 210
- Sugar: 25g
- Sodium: 85mg
- Fat: 8g
- Unsaturated Fat: 5g
- Carbohydrates: 32g
- Protein: 3g
")