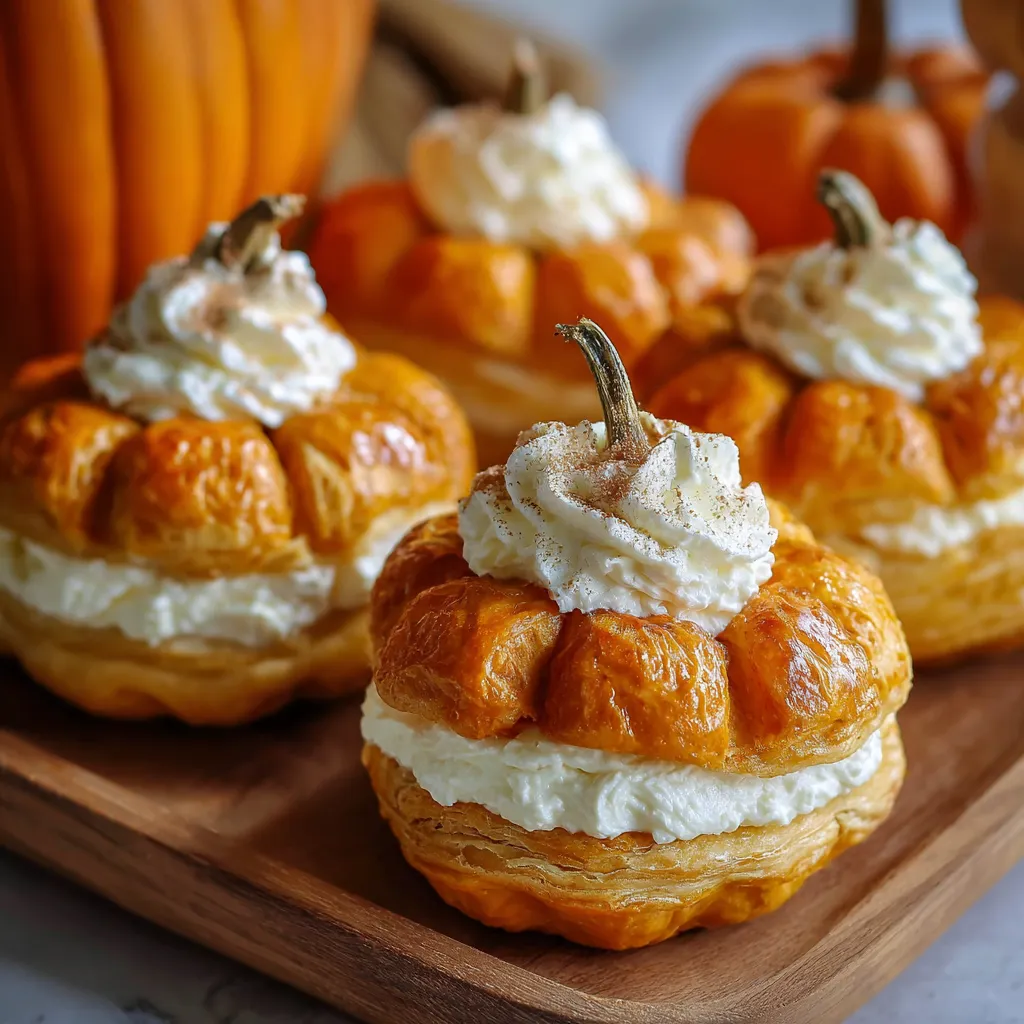
There’s something magical about fall baking—the scent of cinnamon in the air, the warmth of the oven, and the comfort of cozy flavors. These Crescent Pumpkins with Cream Cheese and Pumpkin Pie Filling are everything you love about the season, wrapped up in a flaky, golden pastry. They’re quick, easy, and just plain fun to make. Whether you’re looking to impress at a fall brunch or surprise your kids with a sweet after-school treat, this recipe is going to be your new go-to. Let’s dive in.
Why You’ll Love This Recipe
These aren’t just cute little pastries—they’re a bite-sized celebration of fall. Here’s why you’ll want to make them again and again.
Key Benefits
-
Quick and Easy: With store-bought crescent dough and a simple filling, you’ll have these ready in under 30 minutes.
-
Kid-Friendly: Both to eat and make. Let the kids shape their own pumpkins—it’s half the fun.
-
Perfect Flavor Balance: The tangy cream cheese complements the warm pumpkin spice filling beautifully.
-
Festive and Versatile: Whether for Halloween, Thanksgiving, or just a cozy weekend, these fit right in.
Suitable For
-
Beginner Bakers: If you can stir and fold, you can make these. No fancy skills required.
-
Holiday Entertaining: Ideal for brunch buffets, dessert tables, or a cozy breakfast spread.
-
Small Bites Fans: These are perfect as mini desserts or a sweet treat with your morning coffee.
-
Fall Flavors Lovers: If you wait all year for pumpkin season, this one’s for you.
Ingredients for Crescent Pumpkins with Cream Cheese and Pumpkin Pie Filling
Simple pantry staples come together here for a treat that tastes like way more effort than it takes.
Core Ingredients
Here’s what you’ll need:
-
1 can refrigerated crescent roll dough (8-count): These form the base of your “pumpkin.” Crescent dough sheets also work great.
-
4 oz cream cheese, softened: Adds richness and that irresistible tang.
-
1/2 cup canned pumpkin purée: Make sure it’s pure pumpkin, not pumpkin pie filling.
-
2 tbsp brown sugar: For just the right touch of sweetness.
-
1/2 tsp pumpkin pie spice: The classic blend of cinnamon, nutmeg, ginger, and cloves.
-
1/2 tsp vanilla extract: Rounds out the flavor.
-
1 egg (for egg wash): Gives the pumpkins their beautiful golden sheen.
-
Orange food coloring (optional): A fun touch if you want them to look like little pumpkins.
-
Pretzel sticks or green candy (optional): These go on top for a festive “stem.”
Substitutions and Tips
Baking is all about flexibility, and this recipe is no different.
-
No brown sugar? Use maple syrup or honey—just reduce the amount slightly to avoid excess moisture.
-
Don’t have pumpkin pie spice? Mix 1/4 tsp cinnamon, 1/8 tsp nutmeg, a pinch of ginger, and a pinch of cloves.
-
Dairy-free? Try vegan cream cheese—there are great options out there.
-
Want a stronger pumpkin flavor? Add a touch more purée, but go easy so the filling doesn’t get too soft and leak during baking.
-
Making it ahead? Prepare the filling and keep it in the fridge. Assemble and bake when you’re ready to serve.
Best Crescent Dough for Crescent Pumpkins
Let’s talk dough. It’s the foundation of this whole recipe, so choosing the right one makes all the difference.
-
Refrigerated crescent roll dough: The standard 8-count can works beautifully. If using the perforated triangles, pinch the seams well to seal them so the filling stays tucked inside.
-
Crescent dough sheets: These give you more freedom to cut and shape your dough without dealing with seams. Great for cleaner pumpkin shapes.
-
Want more structure? Pop the dough in the fridge for 10 minutes before shaping. Cold dough is easier to handle and holds its form better during baking.
Kitchen Tools You’ll Need
No fancy gadgets required—just the basics and a few extras if you want to elevate the process.
Must-Have Tools
-
Baking sheet: Standard size works great.
-
Parchment paper: Keeps cleanup easy and prevents sticking.
-
Mixing bowl: For blending that dreamy pumpkin cream cheese filling.
-
Spoon or cookie scoop: To portion out the filling.
-
Pastry brush: For applying the egg wash evenly.
Nice-to-Have Tools
-
Toothpick or small knife: To draw the pumpkin ridges before baking. Totally optional, but it gives that authentic pumpkin look.
-
Silicone baking mat: Reusable and great for consistent baking.
-
Cooling rack: Helps the pumpkins cool evenly without getting soggy bottoms.
How to Make Crescent Pumpkins with Cream Cheese and Pumpkin Pie Filling
Now for the fun part—let’s bake. This is where your kitchen starts to smell like fall, and those little pumpkin-shaped pastries come to life. Don’t worry if it’s your first time working with crescent dough or shaping anything into a “pumpkin”—I’ll guide you through each step, and you’ll be surprised how easy it is.
Step 1: Prep the Filling
In a medium mixing bowl, stir together the softened cream cheese, pumpkin purée, brown sugar, pumpkin pie spice, and vanilla extract. Mix until smooth and creamy. You’re looking for a thick, spreadable texture here. If the cream cheese isn’t soft enough, it may leave small lumps—let it sit at room temperature for a few more minutes, or give it a quick microwave blast (just 10 seconds at a time).
Step 2: Prepare the Dough
Unroll the crescent dough on a lightly floured surface or straight onto parchment paper. If you’re using crescent roll triangles, gently pinch the seams together to make one large sheet. Then cut it back into eight even squares or sections. Try to keep the pieces close to the same size so they bake evenly.
Step 3: Add the Filling
Spoon about one tablespoon of your pumpkin cream cheese mixture into the center of each dough piece. Keep it centered and leave space around the edges so you can seal them up without the filling leaking out. If you want to be precise, use a cookie scoop for uniform portions.
Step 4: Shape the Pumpkins
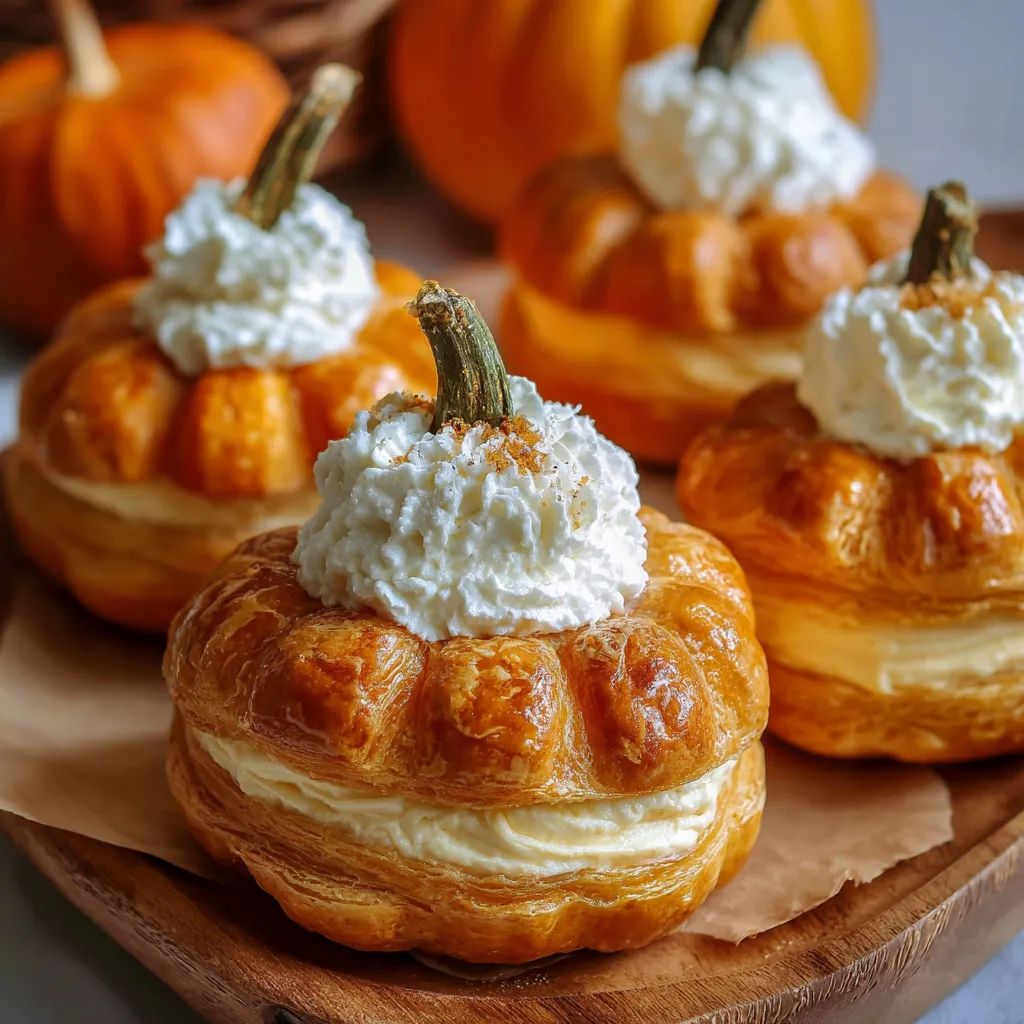
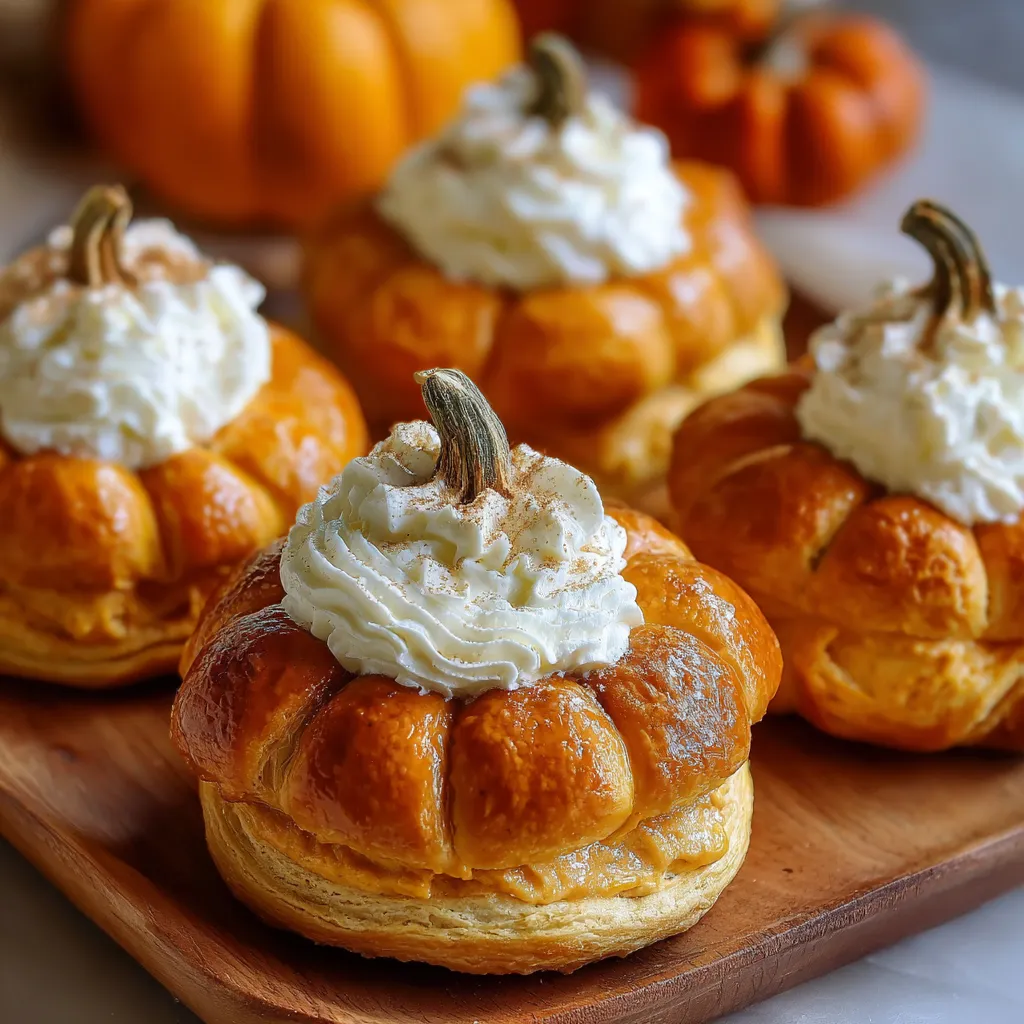
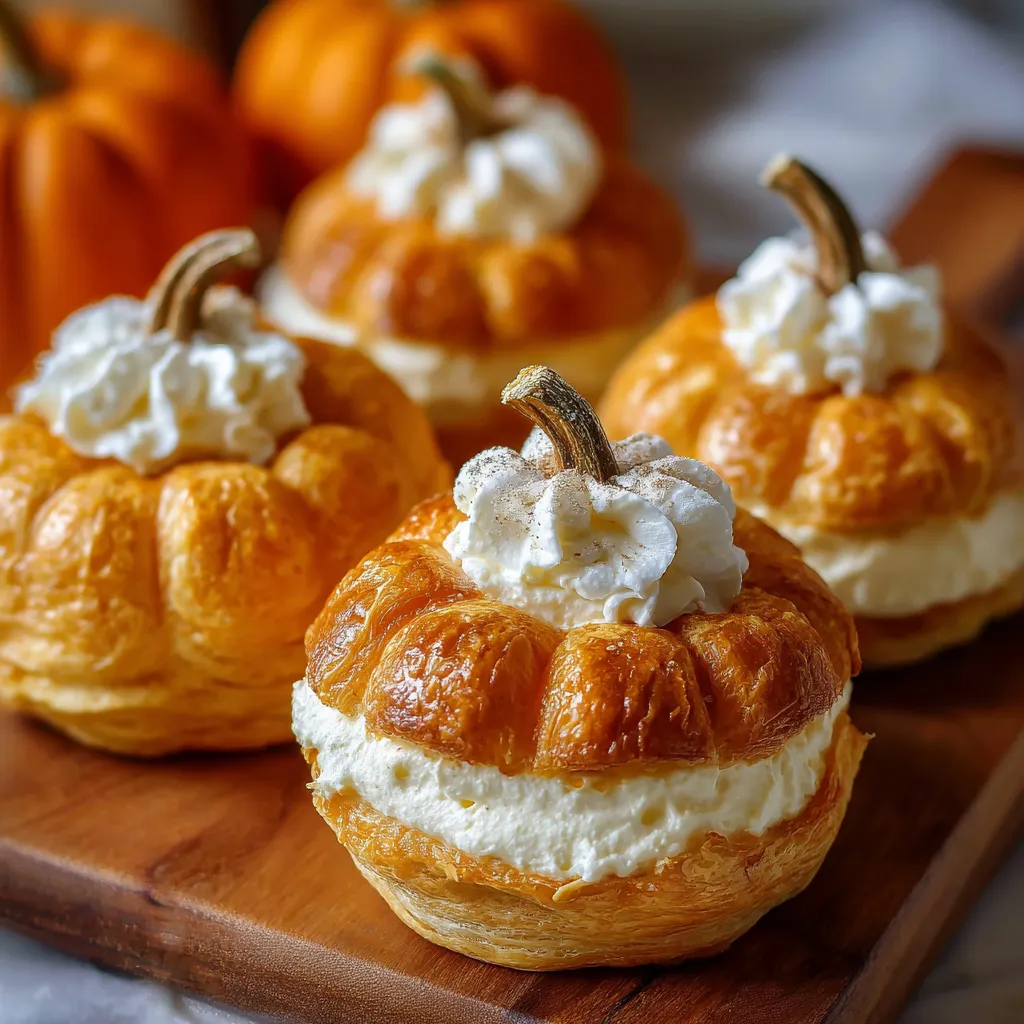
Now fold the corners up over the filling and pinch everything closed. Gently press and shape each one into a round ball—don’t stress about perfection here. Think rustic pumpkins, not factory-perfect. Once shaped, use a toothpick or small knife to lightly score a few vertical lines along the sides, just like a real pumpkin’s ridges. These lines will still show a bit after baking and add a really cute touch.
Step 5: Add the Festive Touch
In a small bowl, beat the egg and stir in a couple of drops of orange food coloring (if using). Brush this egg wash gently over the tops of each pumpkin. This will give them a beautiful glossy finish and that golden-orange color that screams fall.
Step 6: Bake and Decorate
Place your pumpkins on a parchment-lined baking sheet, spaced slightly apart. Bake at 375°F for 12 to 15 minutes, or until they’re puffed and golden. The bottoms should be lightly browned, and the tops should look set and slightly glossy.
Once they’re out of the oven, let them cool for a few minutes. Then, if you like, gently press a pretzel stick or piece of green candy into the top of each one for a “stem.” It’s not just cute—it helps people instantly recognize them as mini pumpkins.
Tips for Success
A few extra tips can take these from good to bakery-level:
-
Chill the dough slightly before shaping. Warm dough gets sticky and harder to shape. Ten minutes in the fridge makes a big difference.
-
Seal them well. Pinch the seams firmly so the filling stays tucked in. If they open during baking, they’ll still taste amazing, but might not look as pumpkin-like.
-
Don’t overfill. A heaping tablespoon is plenty—too much, and the filling can leak out while baking.
-
Use a silicone brush. It helps spread the egg wash more evenly and gently over the delicate dough.
-
Let them cool slightly before handling. The filling will be hot and soft right out of the oven.
How to Store Crescent Pumpkins
These treats are best fresh, but leftovers keep surprisingly well. Here’s how to make the most of them.
At Room Temperature
Once cooled, store them in an airtight container on the counter for up to 1 day. Great if you’re baking in the morning and serving that afternoon.
In the Refrigerator
They’ll keep in the fridge for up to 4 days. Reheat them in a low oven (about 325°F) for 5–7 minutes to bring back the flaky texture. The microwave works too, but the pastry won’t be quite as crisp.
Freezing Tips
You can freeze these either before or after baking.
-
Unbaked: Freeze shaped pumpkins (without egg wash) on a tray until firm, then transfer to a freezer bag. When ready to bake, brush with egg wash and add 2–3 minutes to the bake time.
-
Baked: Let them cool completely, then wrap individually or store in a single layer with parchment between each. Reheat in the oven straight from frozen at 350°F for about 10–12 minutes.
Frequently Asked Questions (FAQs)
Can I make these ahead of time?
Yes, definitely. You can prepare and shape the pumpkins, then refrigerate them overnight. Add the egg wash just before baking. You can also make the filling a few days in advance and store it in the fridge.
Can I use puff pastry instead of crescent dough?
Absolutely. Puff pastry will give you a flakier, more layered texture. Just be sure to seal the edges well and bake until deep golden.
Can I make them gluten-free?
Yes, just use a gluten-free crescent dough or gluten-free puff pastry. Most health food stores or large supermarkets carry at least one option.
What if I don’t have pumpkin pie spice?
No problem. Just mix your own using 1/4 teaspoon cinnamon, 1/8 teaspoon nutmeg, and a pinch of ginger and cloves. It’s easy and smells amazing.
Related Recipes
If you loved these Crescent Pumpkins with Cream Cheese and Pumpkin Pie Filling, check out these fall-inspired sweets:
-
Pumpkin Spice Pancakes Recipe – Soft and fluffy with cozy fall flavors.
-
Cinnamon Rolls with Apple Pie Filling – A gooey fall twist on a classic.
-
Best Pumpkin Bread Recipe – Moist and packed with spice, this is a seasonal staple.
-
Cream Cheese Stuffed French Toast – Perfect for brunch, with a creamy surprise inside.
-
Keto Pumpkin Pancakes Recipe – A lower-carb way to enjoy pumpkin spice mornings.
Conclusion
Crescent Pumpkins with Cream Cheese and Pumpkin Pie Filling are a sweet, flaky bite of fall wrapped in buttery crescent dough. They’re quick to whip up, endlessly charming, and deliciously spiced. Whether you’re baking with kids, preparing for a brunch, or just want something warm and seasonal with your coffee, this recipe hits all the right notes. Give them a try, and don’t be surprised if they become a yearly tradition.
Print
Crescent Pumpkins with Cream Cheese and Pumpkin Pie Filling
- Total Time: 30 minutes
- Yield: 8 pumpkins
Description
Flaky, festive pumpkin-shaped pastries filled with a cozy blend of cream cheese and pumpkin pie spice—perfect for autumn gatherings.
Ingredients
- 2 tbsp brown sugar
- 1/2 tsp pumpkin pie spice
- 1/2 tsp vanilla extract
- 1 can refrigerated crescent roll dough (8-count)
- 4 oz cream cheese, softened
- 1/2 cup canned pumpkin purée
- 1 egg (for egg wash)
- Orange food coloring (optional)
- Pretzel sticks or green candy (optional)
Instructions
- Preheat oven to 375°F and line a baking sheet with parchment paper.
- Mix cream cheese, pumpkin purée, brown sugar, pumpkin pie spice, and vanilla until smooth.
- Unroll crescent dough and seal seams if needed. Cut into 8 portions.
- Spoon about 1 tbsp of filling into the center of each piece.
- Fold and shape into pumpkins. Score ridges with a toothpick or knife.
- Beat egg with orange food coloring. Brush each with the egg wash.
- Bake for 12–15 minutes or until golden brown.
- Cool slightly. Add pretzel stick or candy for stem if desired.
Notes
- Use crescent dough sheets for easier shaping.
- Chill dough briefly for cleaner pumpkin shapes.
- Substitute pumpkin pie spice with cinnamon and nutmeg if needed.
- Prep Time: 15 minutes
- Cook Time: 15 minutes
Nutrition
- Serving Size: 1 pumpkin
- Calories: 160
- Sugar: 6g
- Sodium: 210mg
- Fat: 9g
- Saturated Fat: 4g
- Unsaturated Fat: 4g
- Trans Fat: 0g
- Carbohydrates: 18g
- Fiber: 1g
- Protein: 3g
- Cholesterol: 30mg
")